Audita · User Guide
Everything Audita does, and how to drive it.
Audita is a menu bar SPL meter and NIOSH hearing-dose tracker for macOS. This page is the canonical user reference. Skim the table of contents to jump to a feature, or read top-to-bottom for the full tour. The full audita:// URL scheme reference lives on a separate page.
1. What Audita does #
Audita is a macOS menu bar app that protects the hearing of audio professionals. It continuously measures the sound pressure level (SPL) reaching a microphone at your listening position and calculates how much of your safe daily hearing budget has been used, using the NIOSH Recommended Exposure Limit (85 dBA reference, 3 dB exchange rate, 80 dBA threshold). It runs passively alongside any DAW, with no conscious interaction required.
One measurement chain feeds two jobs:
- Hearing protection. A-weighted SPL (IEC 61672-1) accumulates into a cumulative dose percentage. Color-coded thresholds, NIOSH-aligned notifications, EU 2003/10/EC peak monitoring on a parallel C-weighted path.
- Monitoring Discipline. A separate, optional layer that pins your monitoring level to a calibrated reference (K-14 / K-12 / K-20 / mastering / custom) and warns when your level drifts or sits off-target for too long.
Safe duration at different levels
The NIOSH formula gives you a budget that halves every 3 dB. Below 80 dBA no dose accumulates at all. This table is the canonical reference cited from the landing page and FAQ.
| Level | Safe duration | |
|---|---|---|
| 80 dBA | Threshold | No dose accumulates below this |
| 85 dBA | 8 hours | NIOSH criterion |
| 88 dBA | 4 hours | |
| 91 dBA | 2 hours | |
| 94 dBA | 1 hour | |
| 97 dBA | 30 minutes | |
| 100 dBA | 15 minutes |
The dose resets at midnight.
Audita is $19.99, one-time purchase, with a 7-day free trial. macOS 14 (Sonoma) or later.
2. First launch #
On first launch:
- macOS asks for microphone access. Click OK. Audita needs microphone access to measure SPL; the measurement microphone you pick (see below) is the only audio source it reads.
- The Audita icon appears in the menu bar. Click it to open the popover.
- Open Settings → Audio and select your measurement microphone from the input device picker. Defaults to the system default input. Any mic works (built-in, talkback, anything CoreAudio sees); for the most accurate readings we recommend a small condenser or omnidirectional measurement mic permanently mounted near the listening position.
- Run the 3-step calibration wizard (Settings → Audio). Without calibration, the SPL numbers Audita displays are not in real-world dB.
Audita is agent-only. It never appears in the Dock or the ⌘-Tab switcher. All interaction happens through the menu bar.
DAW auto-detection
Audita watches for known DAWs to launch and quit, and automatically starts and ends sessions accordingly. Out of the box, 15 DAWs are tracked by bundle ID: Logic Pro, GarageBand, Pro Tools, LUNA, Ableton Live, REAPER, Cubase, Nuendo, Studio One, FL Studio, Bitwig Studio, Audacity, Adobe Audition, Final Cut Pro, DaVinci Resolve.
When the first tracked DAW launches, an Audita session starts. When the last one quits, the session ends and a recap notification fires. Multiple simultaneous DAWs are handled correctly - only the first launch and last quit trigger transitions.
To add a DAW that isn't in the built-in list, open Settings → DAWs → Add Custom DAW and enter its bundle ID and display name. Custom DAWs persist across launches and survive Auris imports.
Pressure Bloom states (menu bar and popover header)
The menu bar glyph is the Pressure Bloom, the same arcs-and-dot shape as the Audita app icon. The number of arcs reflects live SPL; the colour reflects today's NIOSH dose tier. So a single glyph tells you "loud right now" and "how much of today's hearing budget has been spent" at the same time. The same state machine drives the larger Bloom in the popover header (see The dropdown menu), so both surfaces always show the same arc count and colour at any given moment.
| Condition | Glyph | Colour |
|---|---|---|
| No session running | Full bloom (3 arcs + dot) | Neutral (system foreground) |
| Session, < 35 dBA | Dot only | Dose tier |
| Session, 35-55 dBA | 1 arc + dot | Dose tier |
| Session, 55-80 dBA | 2 arcs + dot | Dose tier |
| Session, ≥ 80 dBA | 3 arcs + dot (full bloom) | Dose tier |
The 80 dBA arc-count maximum lines up with the NIOSH dose accrual threshold (Constants.thresholdDBA): the moment your listening starts counting against today's budget is the moment the glyph reaches its full shape. Higher-dB cues come through the dose-tier colour, not extra arcs.
The dose-tier colour is unchanged from v1.1: safe 0-40 % is green, caution 40-70 % is yellow, warning 70-90 % is orange, danger 90 %+ is red. Today's dose is saved continuously so a quit/relaunch doesn't lose progress. Accumulated dose is stamped with the calendar date and discarded if the date has changed since last launch - each day starts clean at midnight.
When no session is running, the bloom renders as the full three-arc shape in a neutral system-foreground colour. That distinct "Audita is present, just not measuring" state reads differently from the dose-tinted bloom you see during a live session.
4. The dropdown menu #
Click the menu bar icon to open the popover. Two panels: the live measurement panel (default) and the session history panel (accessed via the History button).
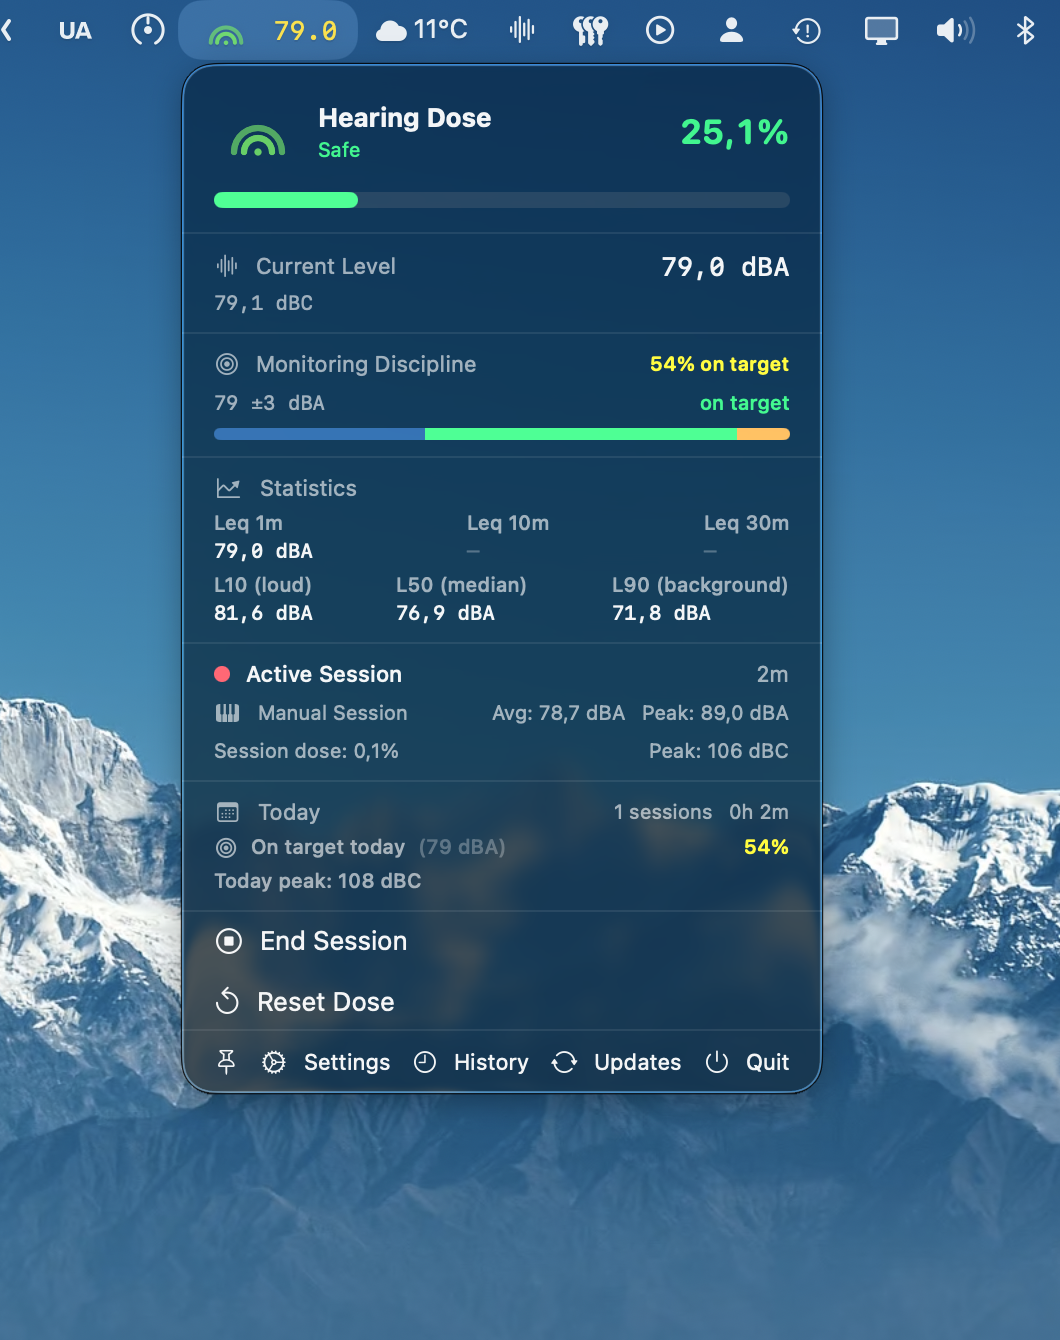
A larger Pressure Bloom sits in the popover header next to the accumulated dose readout. It shares its data driver with the menu bar glyph: arcs follow live SPL, colour follows today's NIOSH dose tier. Same state machine as the menu bar icon (see Menu bar icon states), just rendered larger in the popover header. When no session is running, the popover glyph falls back to the full three-arc neutral bloom that indicates "Audita is here, just not measuring".
License status
"Licensed", "Trial - N days left", or "Trial expired" in red, with an Activate or Manage button alongside.
Active session block
Visible while a session is running (auto-started by a DAW or manually started). Shows the DAW name, elapsed time, running average dBA and peak dBA / dBC, and the dose accrued during this session only. The peak counters (≥115 dBA, ≥135 dBC) appear as red badges when the corresponding EU thresholds have been exceeded.
Live dBA and dBC
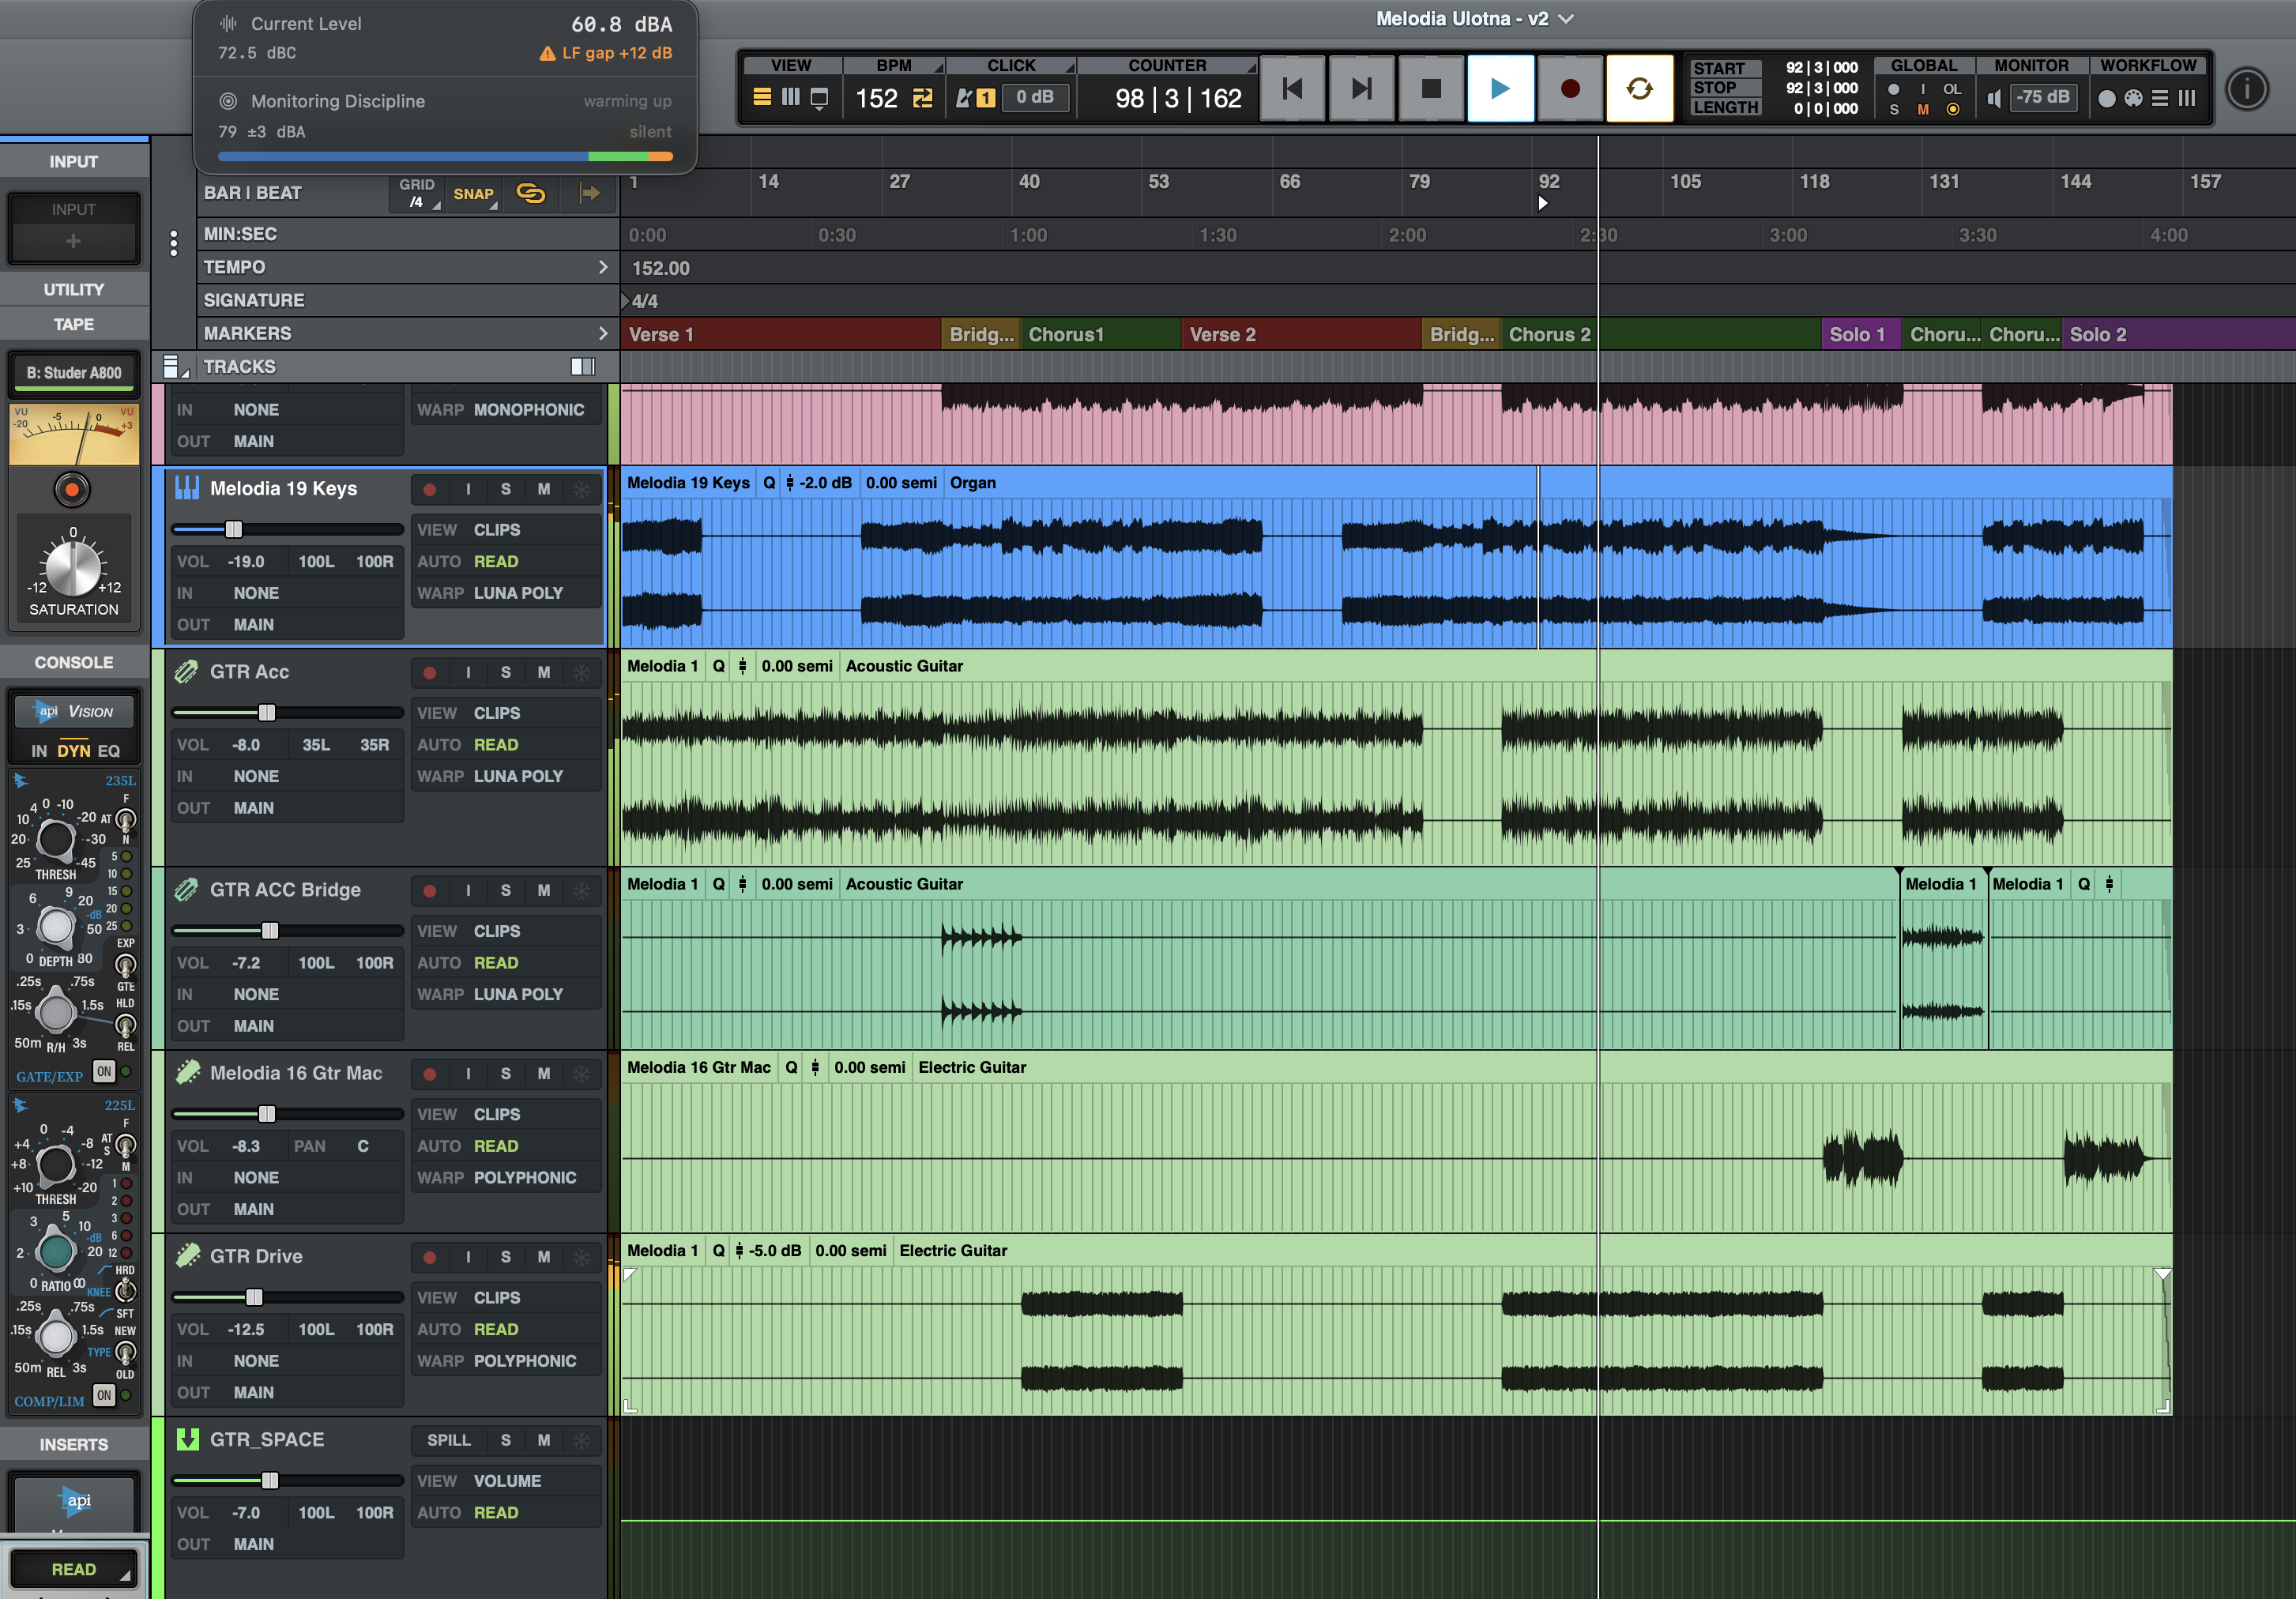
Two large numbers showing the smoothed A-weighted and C-weighted SPL at your microphone position. Exponentially smoothed (α = 0.3) for display; dose accumulation uses the unsmoothed per-tick value internally. A dBC − dBA gap indicator appears below when the gap exceeds 6 dB (caution) or 10 dB (warning), flagging significant low-frequency content that A-weighting alone underreports.
Monitoring Discipline gauge
When Monitoring Discipline is enabled and the audio chain is calibrated, a small gauge shows the active reference target (e.g. K-14 / 79 dBA ±3), the live distance from target in dB, and the rolling on-target % for the current session. See Monitoring Discipline for the full mechanic.
Today's dose
The cumulative NIOSH dose percentage for the current calendar day, color-coded by zone (green / yellow / orange / red). Below it, peak counters for today's ≥135 dBC and ≥115 dBA events when non-zero. The dose resets at midnight.
Footer: pin and history
Two buttons at the bottom:
- Pin icon - opens or closes the floating measurement panel. The icon swaps between an outline pin (closed) and a filled accent-tinted pin (open).
- History - opens the second panel of the popover, showing the 7-day bar chart and chronological session list. Click History window at the top to open the standalone resizable history window with calendar navigation and 30-day range stats.
Start Session / End Session
Manual session control. Useful when you're not in a tracked DAW (e.g. mixing in iZotope RX, listening on Spotify, scoring against a reference track in QuickTime). The session records exactly like an auto-detected one but is labelled Manual until you give it a custom name.
Settings…
Opens the Settings window. Six tabs: Audio (device, calibration), Safety (conservative dose, peak monitoring), Reference (target dBA, alerts), DAWs (custom bundle IDs), Panel (floating panel sections), General (menu bar display, launch at login, notifications, Auris import).
5. Floating measurement panel #
A detached always-on-top window that keeps the measurement panel visible while you work in another app. Opened via the pin icon in the menu bar footer; dismissed via the same pin or by double-clicking the panel surface.
What it shows
All the same data the menu bar popover shows, configurable per section in Settings → Panel:
- Hearing dose (today's NIOSH dose with color)
- Current SPL (dBA + dBC)
- Monitoring Discipline (target, distance, on-target %)
- Leq / Ln statistics
- Active session details
- Today's summary (dose, peaks)
All sections default on. Sections that depend on context (no active session, monitoring disabled, audio not running) auto-hide regardless of the toggle.
Behaviour
- Always on top. Floats above other windows at
NSWindow.Level.floating. - Follows you across spaces and full-screen apps. Joins all spaces; visible whether you're in a DAW's full-screen mode, on a different Mission Control space, or on a secondary display.
- Borderless and translucent. No title bar, no traffic lights. The SwiftUI material background draws edge-to-edge.
- Liquid Glass on macOS 26+. Uses the system's translucent
.glassEffectmaterial and inherits the color of whatever is behind it. On macOS 14-25 it falls back to.regularMaterial- still translucent, but flat. - Resizable, position-remembered. Drag any edge to resize. The frame is auto-saved between launches.
- Auto-resize on section toggle. Toggling sections in Settings → Panel re-fits the window without leaving a gap; the top edge stays where you put it so the resize feels anchored.
6. Calibration #
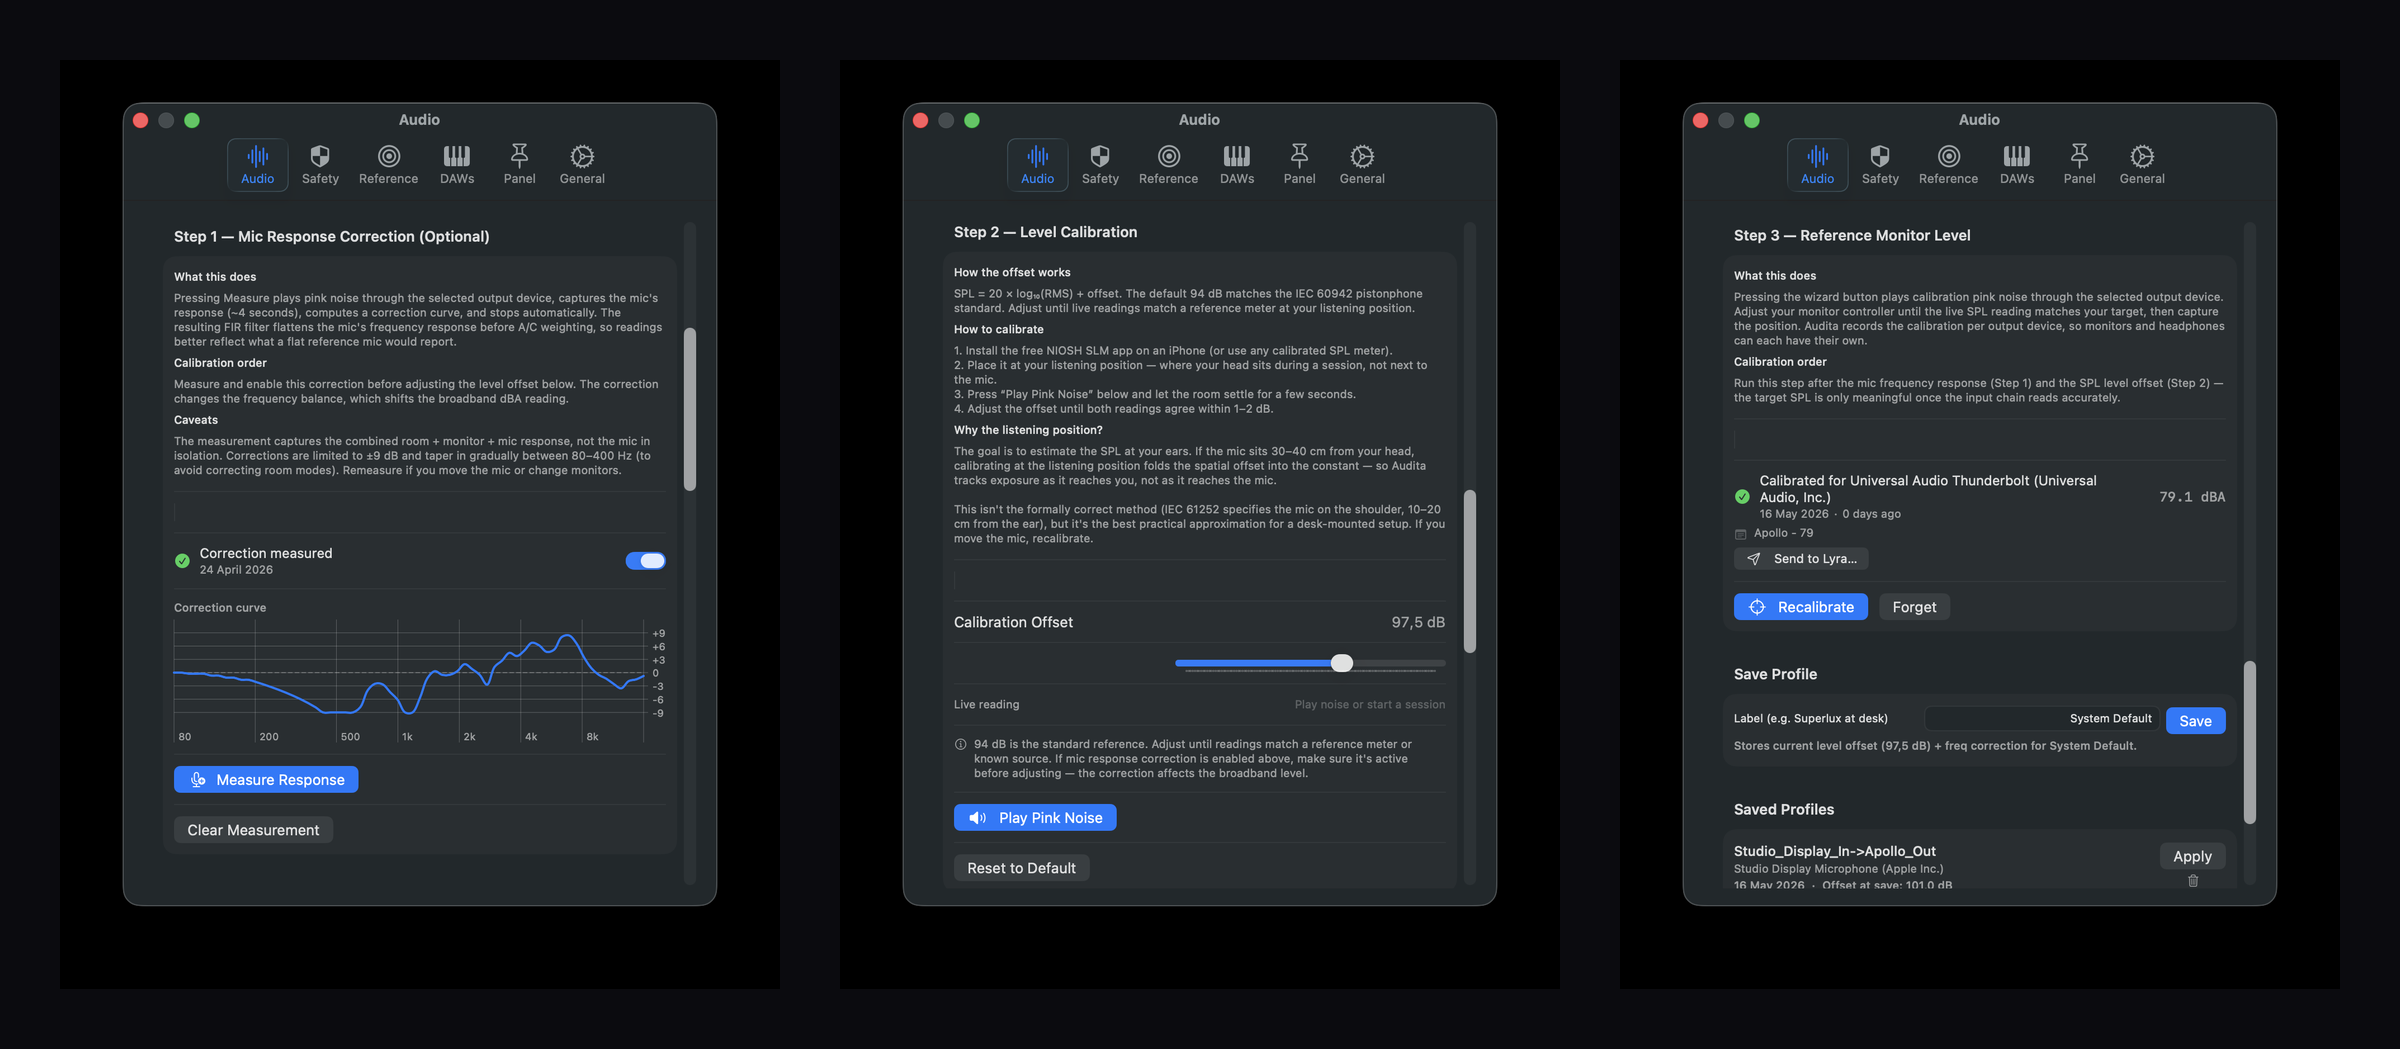
Audita's measurement chain is only as accurate as its calibration. Settings → Audio presents calibration as a numbered 3-step journey because the steps depend on each other: Step 2 only matters if Step 1 has flattened the mic, and Step 3 only matters if Steps 1 and 2 have made the broadband level reliable.
TL;DR. Run Step 1 once per mic. Run Step 2 every time you move the mic or change the gain. Run Step 3 once per pair of monitors.
Step 1 - Mic frequency response correction (optional)
Most desk-mounted measurement mics, talkback channels on audio interfaces, and onboard laptop mics have non-flat frequency responses that bias dBA readings by 1-5 dB depending on programme content. Step 1 measures your mic's actual frequency response with pink noise and an FFT, then derives a corrective FIR filter that flattens the input chain before the A and C weighting filters run.
- Place the measurement mic at your normal listening position - where your head sits during a session.
- Turn your monitors to a normal listening level - loud enough to dominate room noise, not so loud the mic clips.
- Settings → Audio → Step 1 → Measure.
- Pink noise plays for ~4 seconds. The mic captures the response. The FIR is computed and saved automatically.
- The status row updates to Active.
Re-run when: you change the measurement mic, move it to a meaningfully different position, or change room treatment in the listening area.
Step 2 - Level offset (the main one)
This is the single number that maps 20·log₁₀(digital RMS) to real-world dB SPL. The default 94 dB matches the IEC 60942 pistonphone standard - a calibrator that produces a 1 kHz tone at exactly 94 dB SPL. If you have a pistonphone, place it on the mic and adjust the offset until the live reading shows 94 dBA. For everyone else, calibrate against an iPhone running the free NIOSH SLM app (independently validated to ±2 dB):
- Install NIOSH SLM on iPhone.
- Place the iPhone at your listening position - where your head would be - not next to the measurement mic.
- Open Settings → Audio → Step 2. Click Play Pink Noise under the offset slider and let your monitors settle at a typical listening level. The live SPL reading is shown next to the slider.
- Note the difference: NIOSH reads
XdBA, Audita readsYdBA. - Adjust the offset slider by
(X − Y). So if NIOSH says 78 and Audita says 72, increase the offset by 6. - Repeat until both meters agree to within 1-2 dB. Click Stop Pink Noise when you're done.
Right under the offset slider is a free-text Mic Location field. Use it to record the physical setup ("Earthworks M30 at LP, 1.2 m behind monitors, 38 cm above desk, gain at unity"). It's stored alongside the offset so you can reproduce or cross-check the calibration weeks later.
Why the listening position, not next to the mic? The goal of dose tracking is to estimate the SPL at your ears, not at an arbitrary point in the room. Your measurement mic is a proxy for your ears - if it sits 30-40 cm away from where your head actually is, there will be a small but real difference in level due to distance and room reflections. Calibrating with the iPhone at the listening position folds that spatial offset into the calibration constant. This is not the formally correct method (IEC 61252 specifies the mic on the shoulder, 10-20 cm from the ear), but it's the closest practical approximation for a desk-mounted setup. If you move the mic, recalibrate.
Step 3 - Reference monitor level (per output device)
Steps 1 and 2 establish that what Audita measures matches reality. Step 3 captures which physical knob position on your monitor controller produces your target reference level - and stores that record per output device UID, so each monitor pair carries its own calibration.
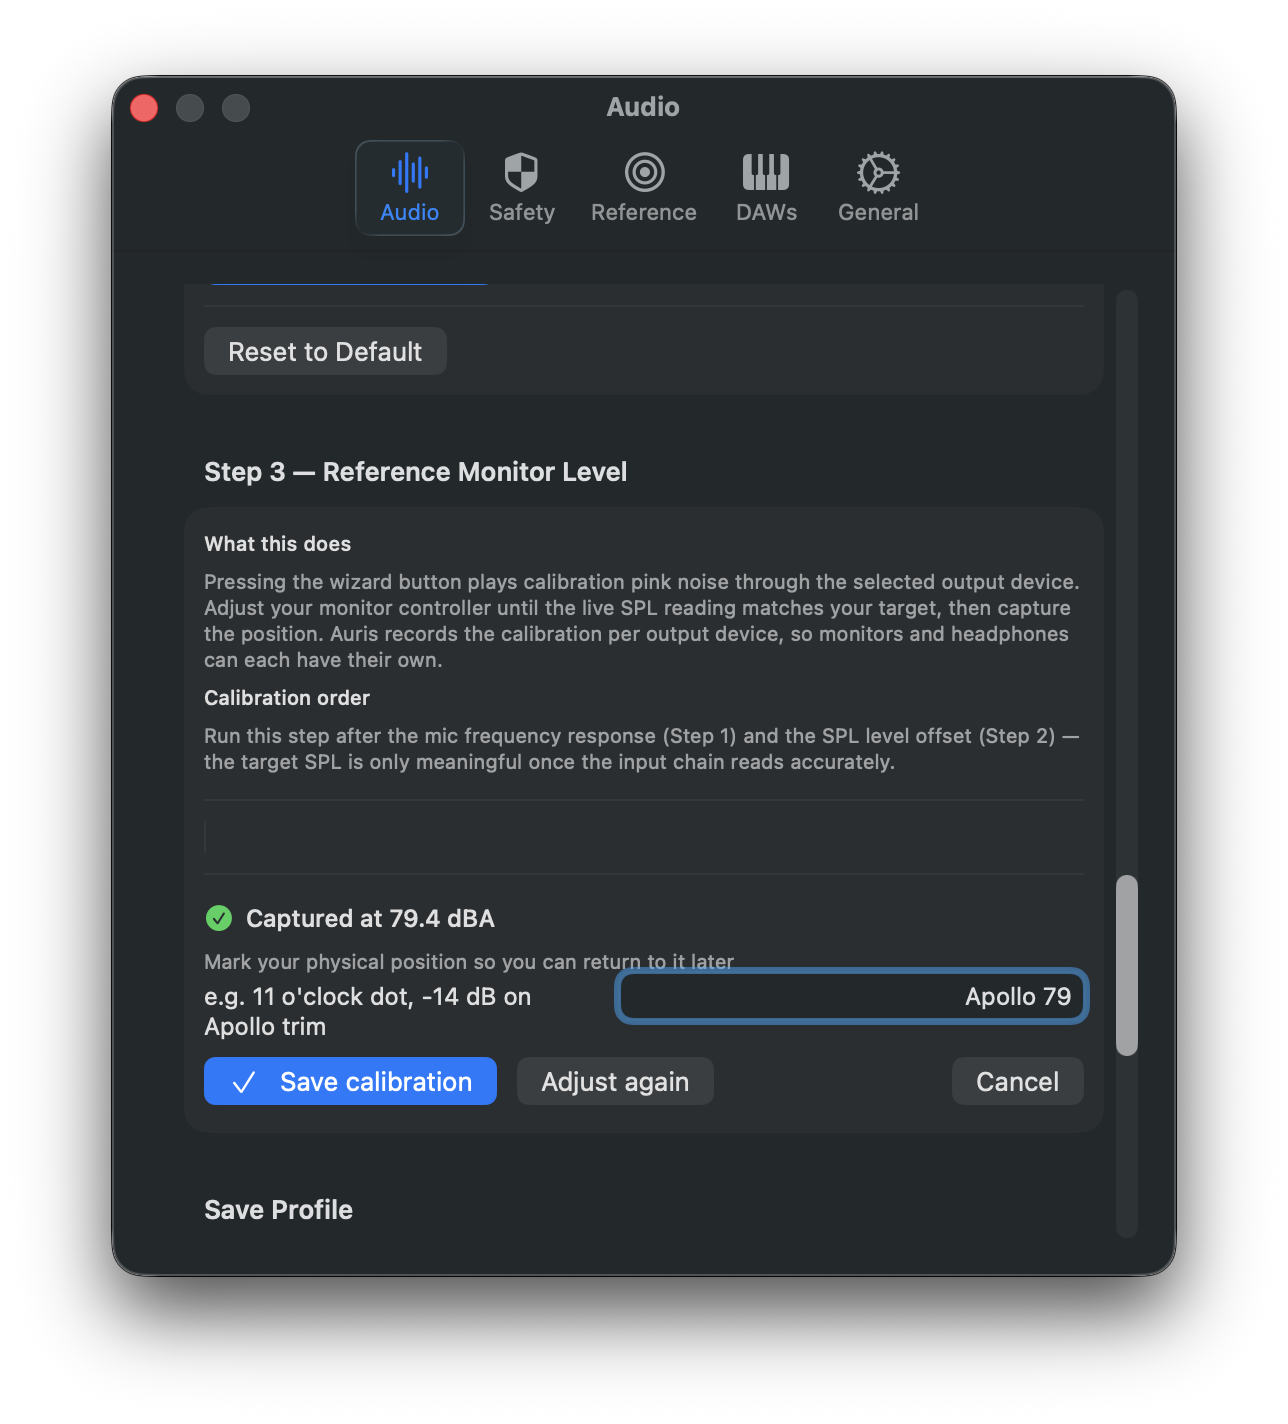
- Settings → Audio → Step 3 → Run Calibration Wizard.
- Pink noise starts playing through the selected output device. The live SPL is shown alongside your target dBA (set in Settings → Reference, defaulting to 79 dBA / K-14).
- Adjust your physical monitor controller until the live SPL matches the target. Take your time - this is the moment that defines what "K-14" means on your rig.
- Click Capture. Pink noise stops; the position is held so you can verify it before saving.
- Type a short note describing the controller position (e.g. "Apollo knob at 11 o'clock, monitors L+R at 0 dB on the desk panel").
- Click Save. The record is persisted; the card shows a green checkmark.
Audita stores the captured measuredDBA alongside the target for honesty - if you aimed for 79 but the closest knob detent gave 80.4, that's recorded. The discrepancy is shown in the saved-record card so you can decide whether to live with it or fine-tune.
Re-run when: you switched monitor pairs or selected a different output device, you moved a knob and forgot to put it back, you changed monitor placement or room treatment, or you added/removed a hardware level pad.
Calibration profiles
If you work in multiple physical setups - studio desk, mobile rig with its own measurement mic, second room - saving a named profile that captures Step 1 (FIR) + Step 2 (offset) lets you switch between them in one click. Settings → Audio → Calibration Profiles has a save button and a picker. The active profile name is shown in the menu bar popover.
Step 3 records aren't part of profiles - they're keyed by output device UID, so the current output determines which Step 3 target applies. A profile only carries the mic (Step 1) and the level offset (Step 2).
7. Monitoring Discipline #
A separate, optional layer on top of dose tracking that helps you mix and master at a stable, calibrated reference level - and warns you when you've drifted off it.
Hearing protection (the dose calculation) tells you how dangerous today's listening was. Monitoring Discipline tells you how disciplined today's listening was. Different questions, different answers. A 12-hour day at 70 dBA produces zero NIOSH dose but is also zero K-14 mixing time.
Reference targets
Audita ships with four presets in Settings → Reference, plus a Custom option:
| Standard | Target | Where it's used |
|---|---|---|
| Mastering | ~73 dBA | Critical listening, low-level detail work |
| K-14 | 79 dBA | Bob Katz mixing reference (default) |
| K-12 | 83 dBA | Broadcast / loudness-targeted mixing |
| K-20 / Dolby / SMPTE | 85 dBA | Film, theatrical, reference-loudness mix stages |
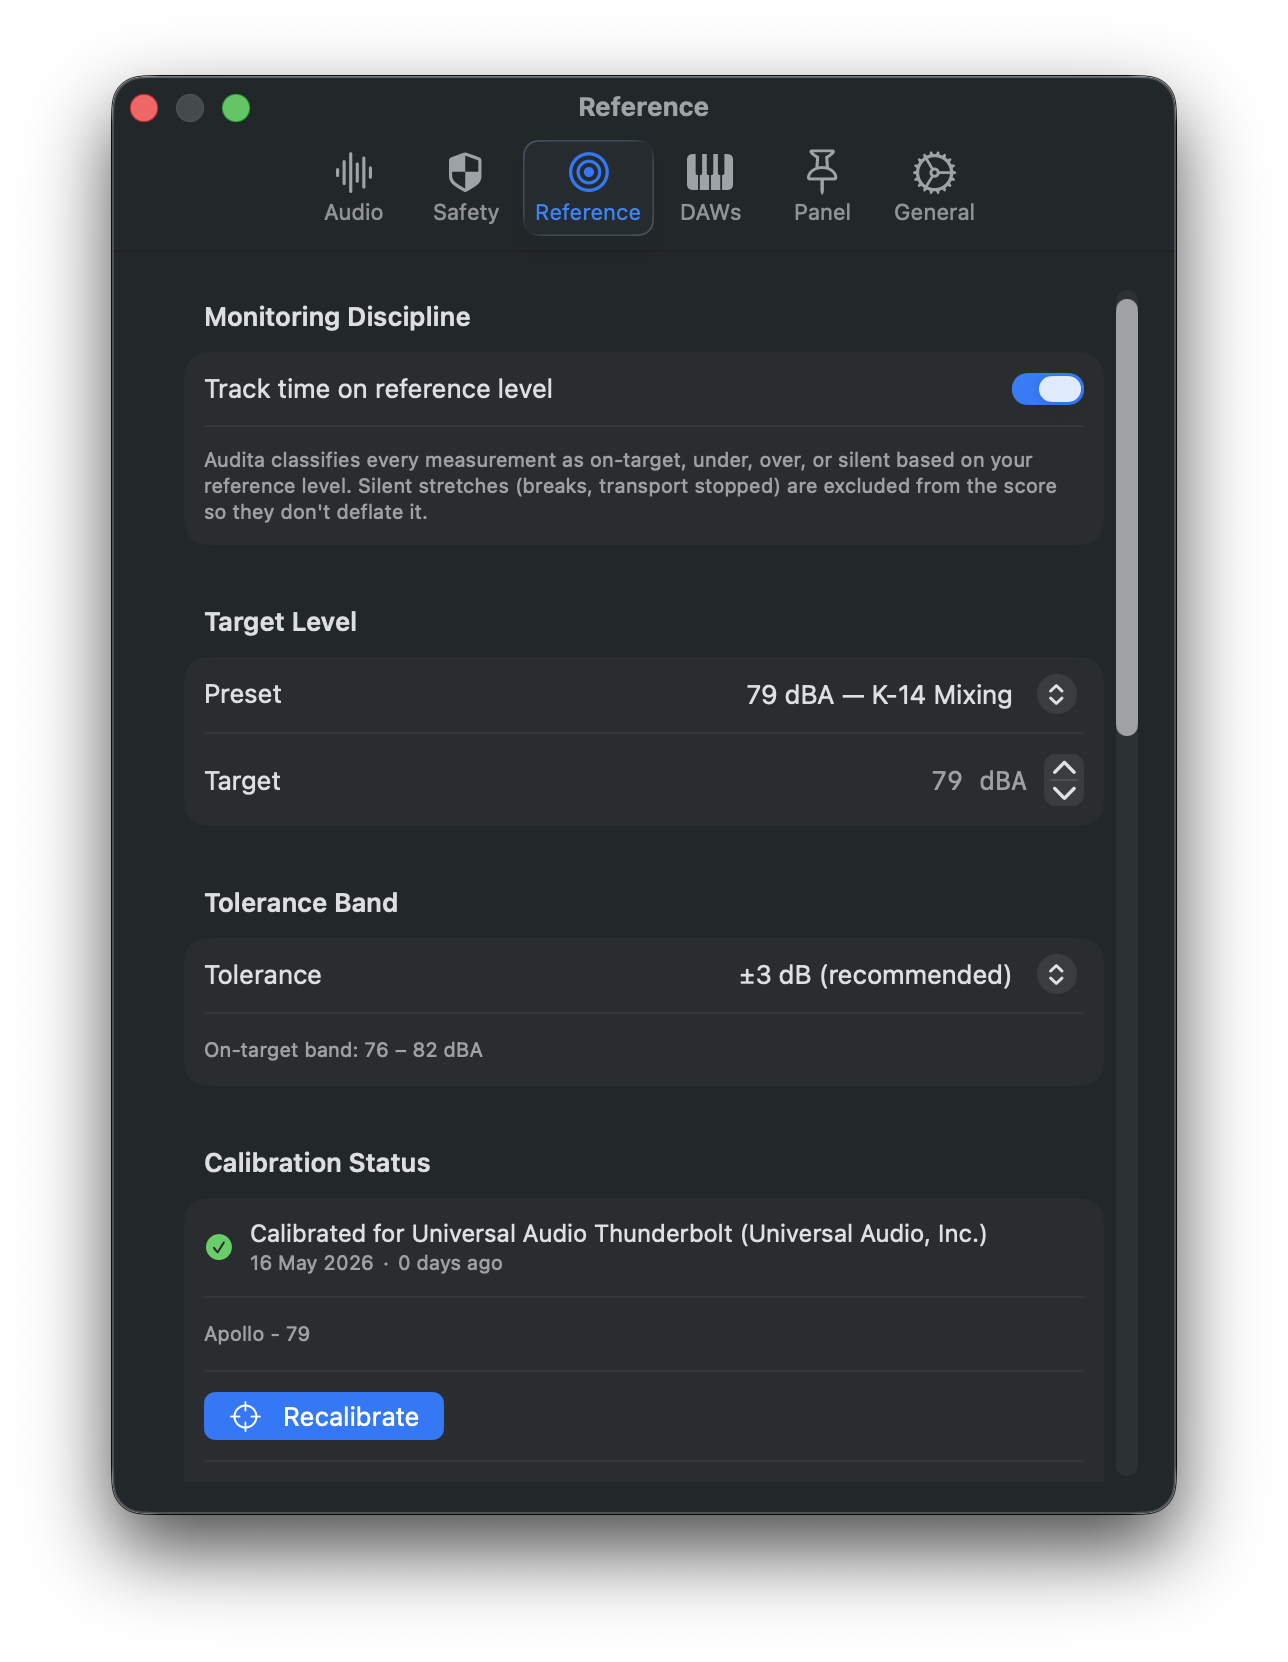
On-target percentage
Every SPL tick (10 Hz) is classified into one of four zones:
| Zone | Condition |
|---|---|
| Silent | dBA < 50 OR dBA < (target − 30) - nothing meaningful is playing |
| Under | (silent floor) ≤ dBA < (target − tolerance) |
| On-target | (target − tolerance) ≤ dBA ≤ (target + tolerance) |
| Over | dBA > (target + tolerance) |
The on-target % reported in the menu bar's Monitoring Discipline section is:
on_target % = on_target_seconds / (under + on_target + over) × 100Silent time is excluded from the denominator - breaks don't penalise your discipline score. A session where you mixed for 90 minutes (80 % on target) and then took a 30-minute break still reports 80 %. The metric is suppressed (shown as "-") until at least 30 seconds of non-silent monitoring time has been recorded.
The drift detector
Drift is the slow, unconscious creep of monitoring level upward over a long session. Your ears adapt, you compensate, you get louder, the cycle continues. Audita catches this in the background.
- Ten minutes after the session begins, Audita snapshots the current rolling 30-minute Leq as the session baseline.
- From then on, the rolling 30-min Leq is compared against that baseline on every 1 Hz tick.
- When the rolling Leq exceeds the baseline by ≥3 dB, a stopwatch starts.
- If the elevated condition persists for ≥5 continuous minutes, the alert fires.
- The alert is one-shot per session - once you've been told you're drifting, you won't be told again until the next session starts. The 30-min snooze action defers any future drift warnings.
The off-target detector
Drift is about change. Off-target is about intent. You can be totally stable for 30 minutes and still be 5 dB below your stated target the whole time. The off-target detector asks: was that intentional?
- Every 1 Hz tick, the current dBA is classified against the alert tolerance band (separate from, and wider than, the on-target tolerance - default ±5 dB vs ±3 dB).
- Classifications fill a rolling buffer trimmed to the user-configured window (default 15 minutes).
- The alert fires when the window is full, and at least 50 % of it was active monitoring (we don't ping you on a break), and at least 90 % of that active time was off-target (the deviation has to be persistent).
- The notification reports the dominant direction: below target or above target.
- One-shot per session, with a 30-min snooze.
Configurable in Settings → Reference → Alerts
- Drift alert - on/off.
- Off-target alert - on/off, plus window (5 / 10 / 15 / 30 / 60 min), tolerance (±3 / ±5 / ±10 dB), and direction (under-only, over-only, both).
Snooze is routed by category
Snoozing a drift alert silences future drift alerts only - dose alerts still fire. Snoozing an off-target alert silences future off-target alerts only. Snoozing a dose / peak / sustained-SPL alert silences those collectively but leaves drift and off-target alone. A user who's mid-mastering at a level intentionally below K-14 can silence off-target alerts without losing the safety net of dose alerts.
When Monitoring Discipline is meaningful
When you're working at a roughly stable level (mixing, mastering, music creation) on a calibrated output. If you're tracking, A/B-ing across levels, or the output device has changed since the last Step 3 calibration, disable Monitoring Discipline in Settings → Reference.
8. Sessions & DAW detection #
A session is a contiguous span of recorded measurement. Each session captures start and end time, the DAW that triggered it, average dBA, peak dBA and dBC, peak impulse counts, the dose accumulated during that session only, and sparse SPL readings taken every 60 seconds.
How sessions start and end
- Auto. The first tracked DAW launch starts a session. The last tracked DAW quit ends it. Multiple simultaneous DAWs are correctly handled (only the first/last transitions trigger).
- Manual. Menu → Start Session and End Session. Use when you're working outside a tracked DAW.
- URL.
audita://session/startandaudita://session/end. See the URL scheme reference.
Session recap notification
When a session ends, Audita fires a recap notification: "This session used X.X% of your daily dose. Running total: Y.Y% - Z.Z% remaining today." Sessions with < 0.1 % dose (mic wasn't meaningfully active) are skipped. No action buttons - informational only.
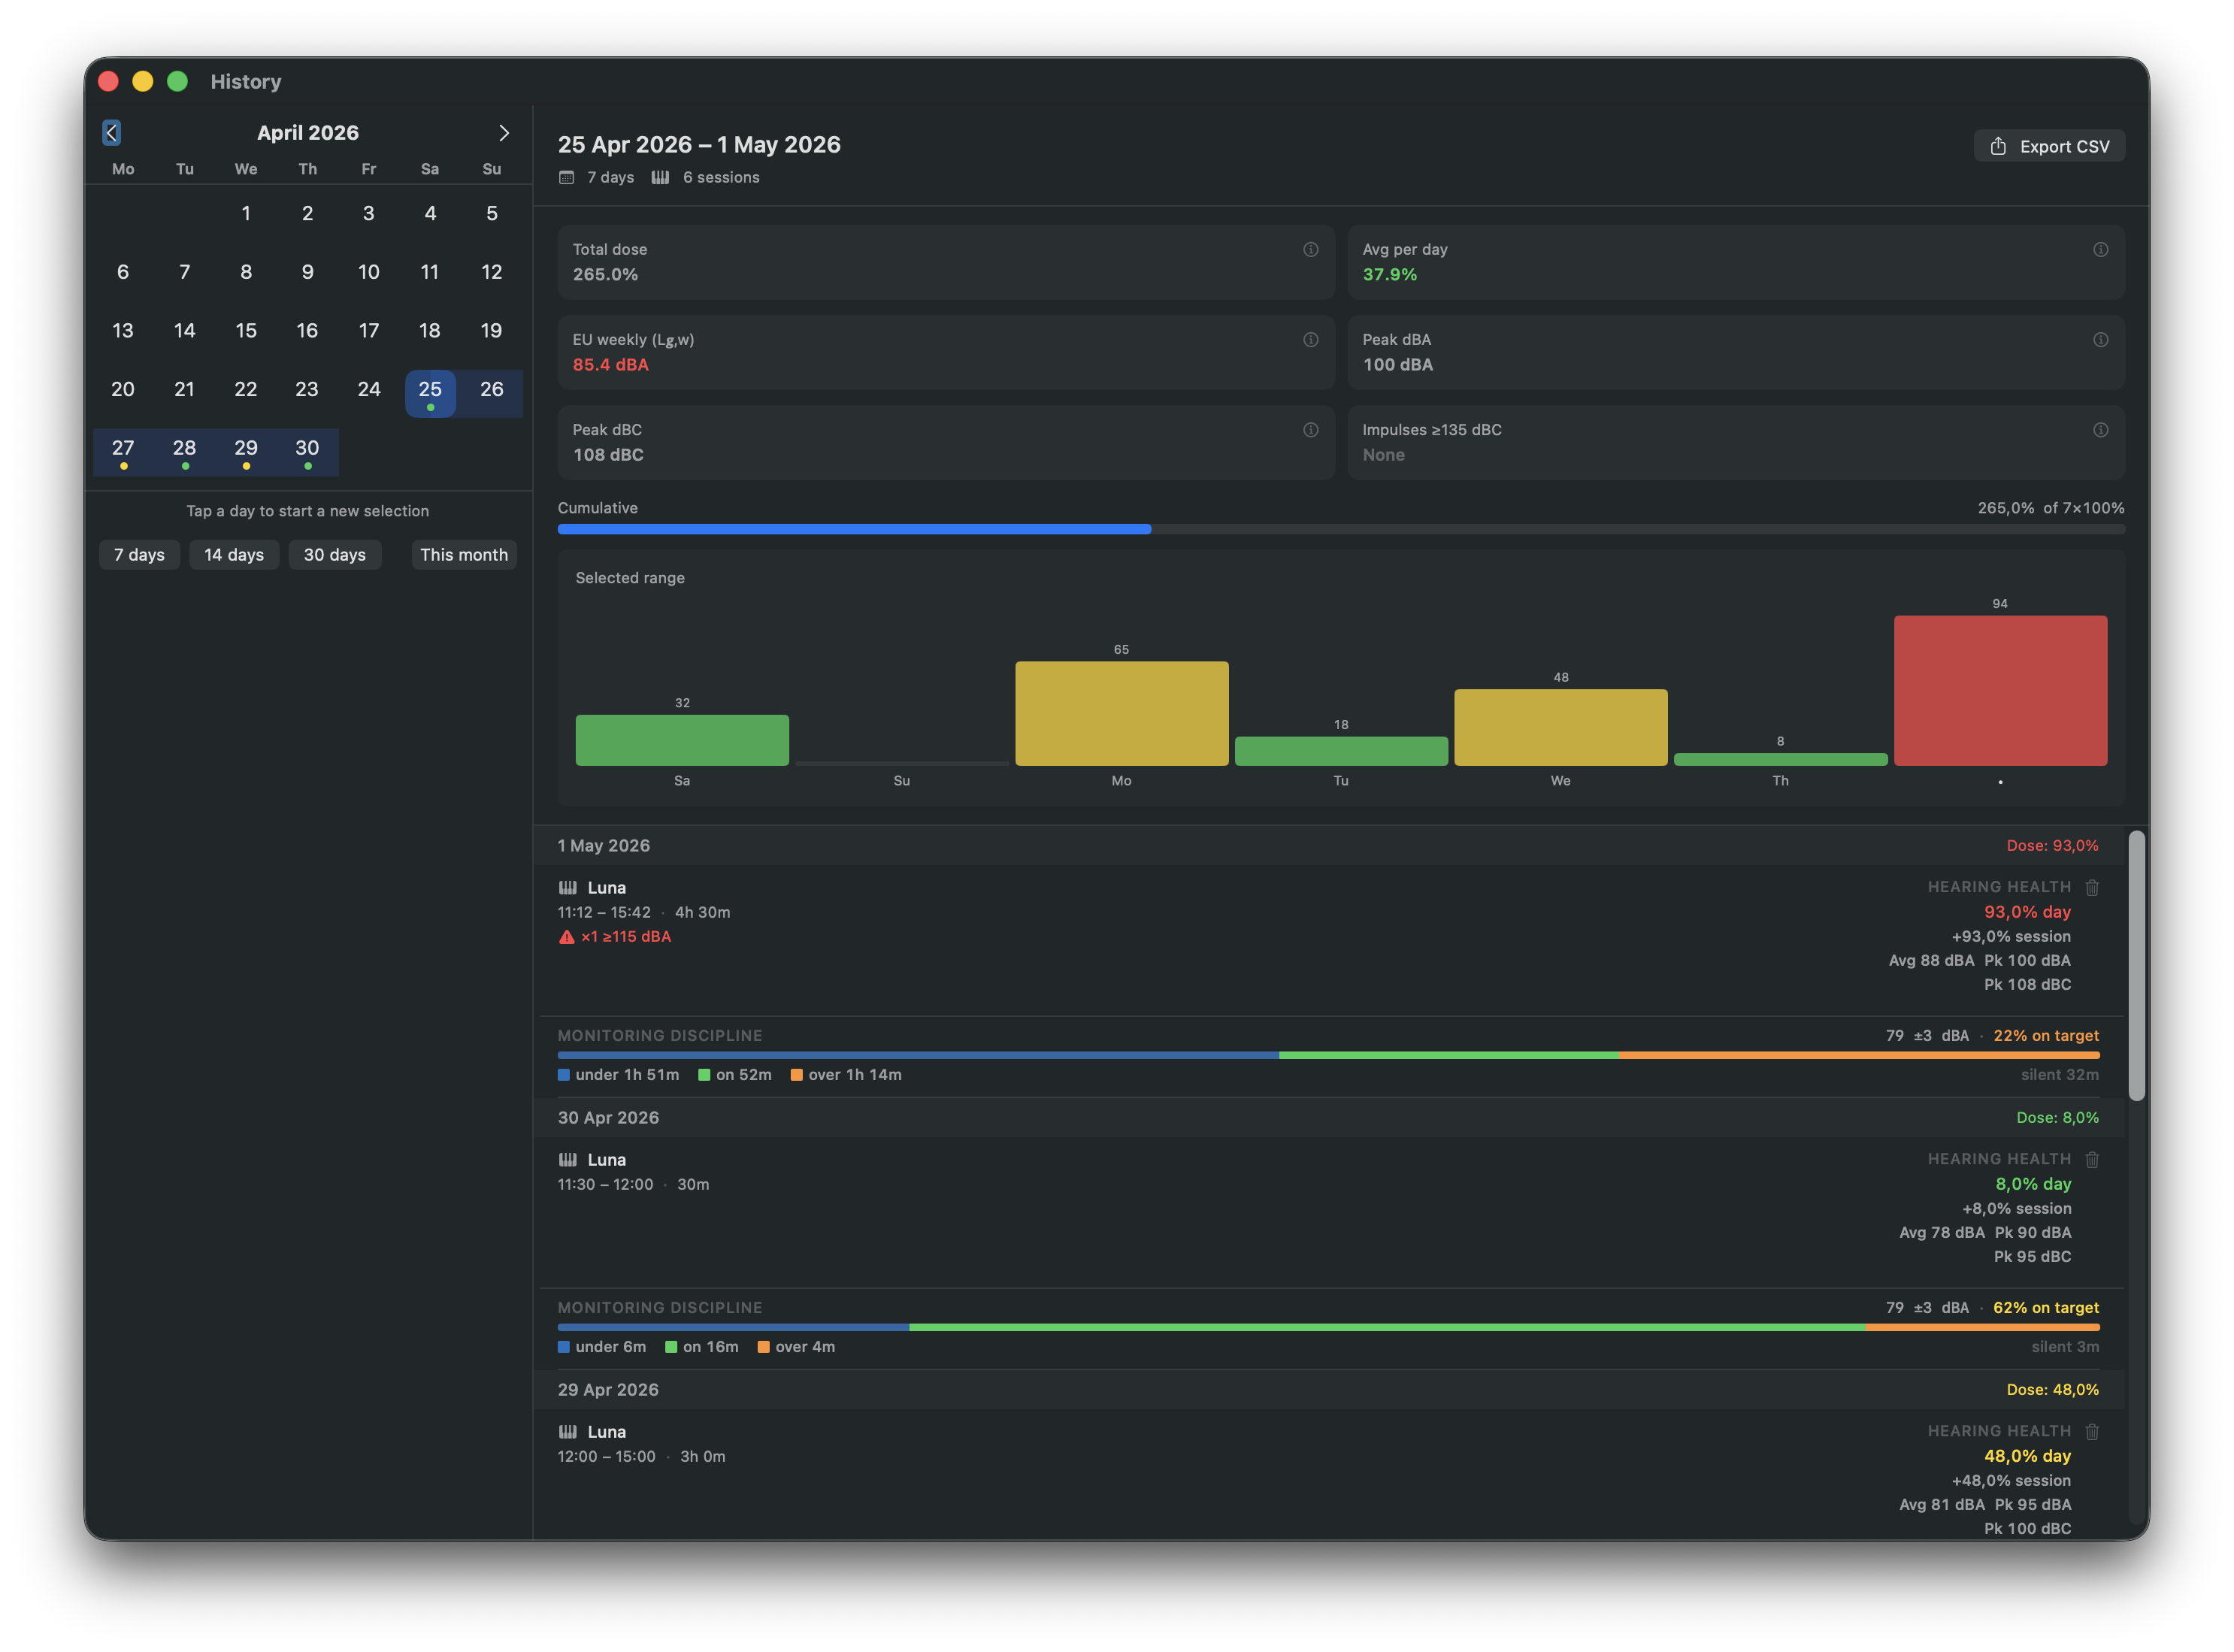
Session history
Sessions persist to ~/Library/Containers/com.headroom.Audita/Data/Library/Application Support/Audita/sessions.json. Retention is configurable in Settings → General → Storage - default is 90 days for full session records and 14 days for the detailed time-series within each session. See Session reports & sharing for the full retention model.
Two ways to review history:
- History panel in the menu bar popover. 7-day bar chart at the top (each bar is one day, color-coded by dose) plus a chronological session list grouped by date. The chart header shows the EU
L_EX,wweekly exposure level (ISO 9612, in dBA, green/orange/red against the 85 dBA criterion) and a daily average. - History window. Standalone resizable window with a 30-day calendar on the left and six stat tiles on the right (Total dose, Avg per day, EU weekly, Peak dBA, Peak dBC, Impulses ≥135 dBC). Open it from the menu bar popover's History button. Each tile has an ⓘ button with a plain-English explanation.
Peak monitoring (EU 2003/10/EC)
Beyond cumulative dose, Audita monitors for dangerous peak impulses on the C-weighted path. Three thresholds per EU Directive 2003/10/EC:
| Threshold | EU action level | Meaning |
|---|---|---|
| 135 dBC | Lower action value | Hearing protection must be available |
| 137 dBC | Upper action value | Hearing protection must be worn |
| 140 dBC | Absolute ceiling | No exposure permitted - immediate damage risk |
Notifications fire when an impulse exceeds 135 dBC, rate-limited to one per 30 seconds. Peak counts are tracked per session and per day. EU Directive 2003/10/EC also defines a maximum 115 dBA instantaneous A-weighted level - a separate limit from the C-weighted thresholds. A red ≥115 dBA: N badge appears in the active session block, today's summary, and session history rows whenever the count is non-zero. Even a count of 1 indicates a level capable of immediate mechanical hair-cell damage.
Conservative dose mode
Standard dose calculation uses A-weighted levels only. For bass-heavy work (sub-bass mixing, kick tracking, live sound with subwoofers), Settings → Safety → Conservative dose mode uses max(dBA, dBC) for dose accumulation. Each tick, whichever weighting gives the higher reading is used. For mid-range content (speech, acoustic instruments), dBA ≈ dBC and behaviour is unchanged. There is no formal NIOSH or OSHA standard for this approach - it's a maximum-protection option.
9. Session reports & sharing (v1.2+) #
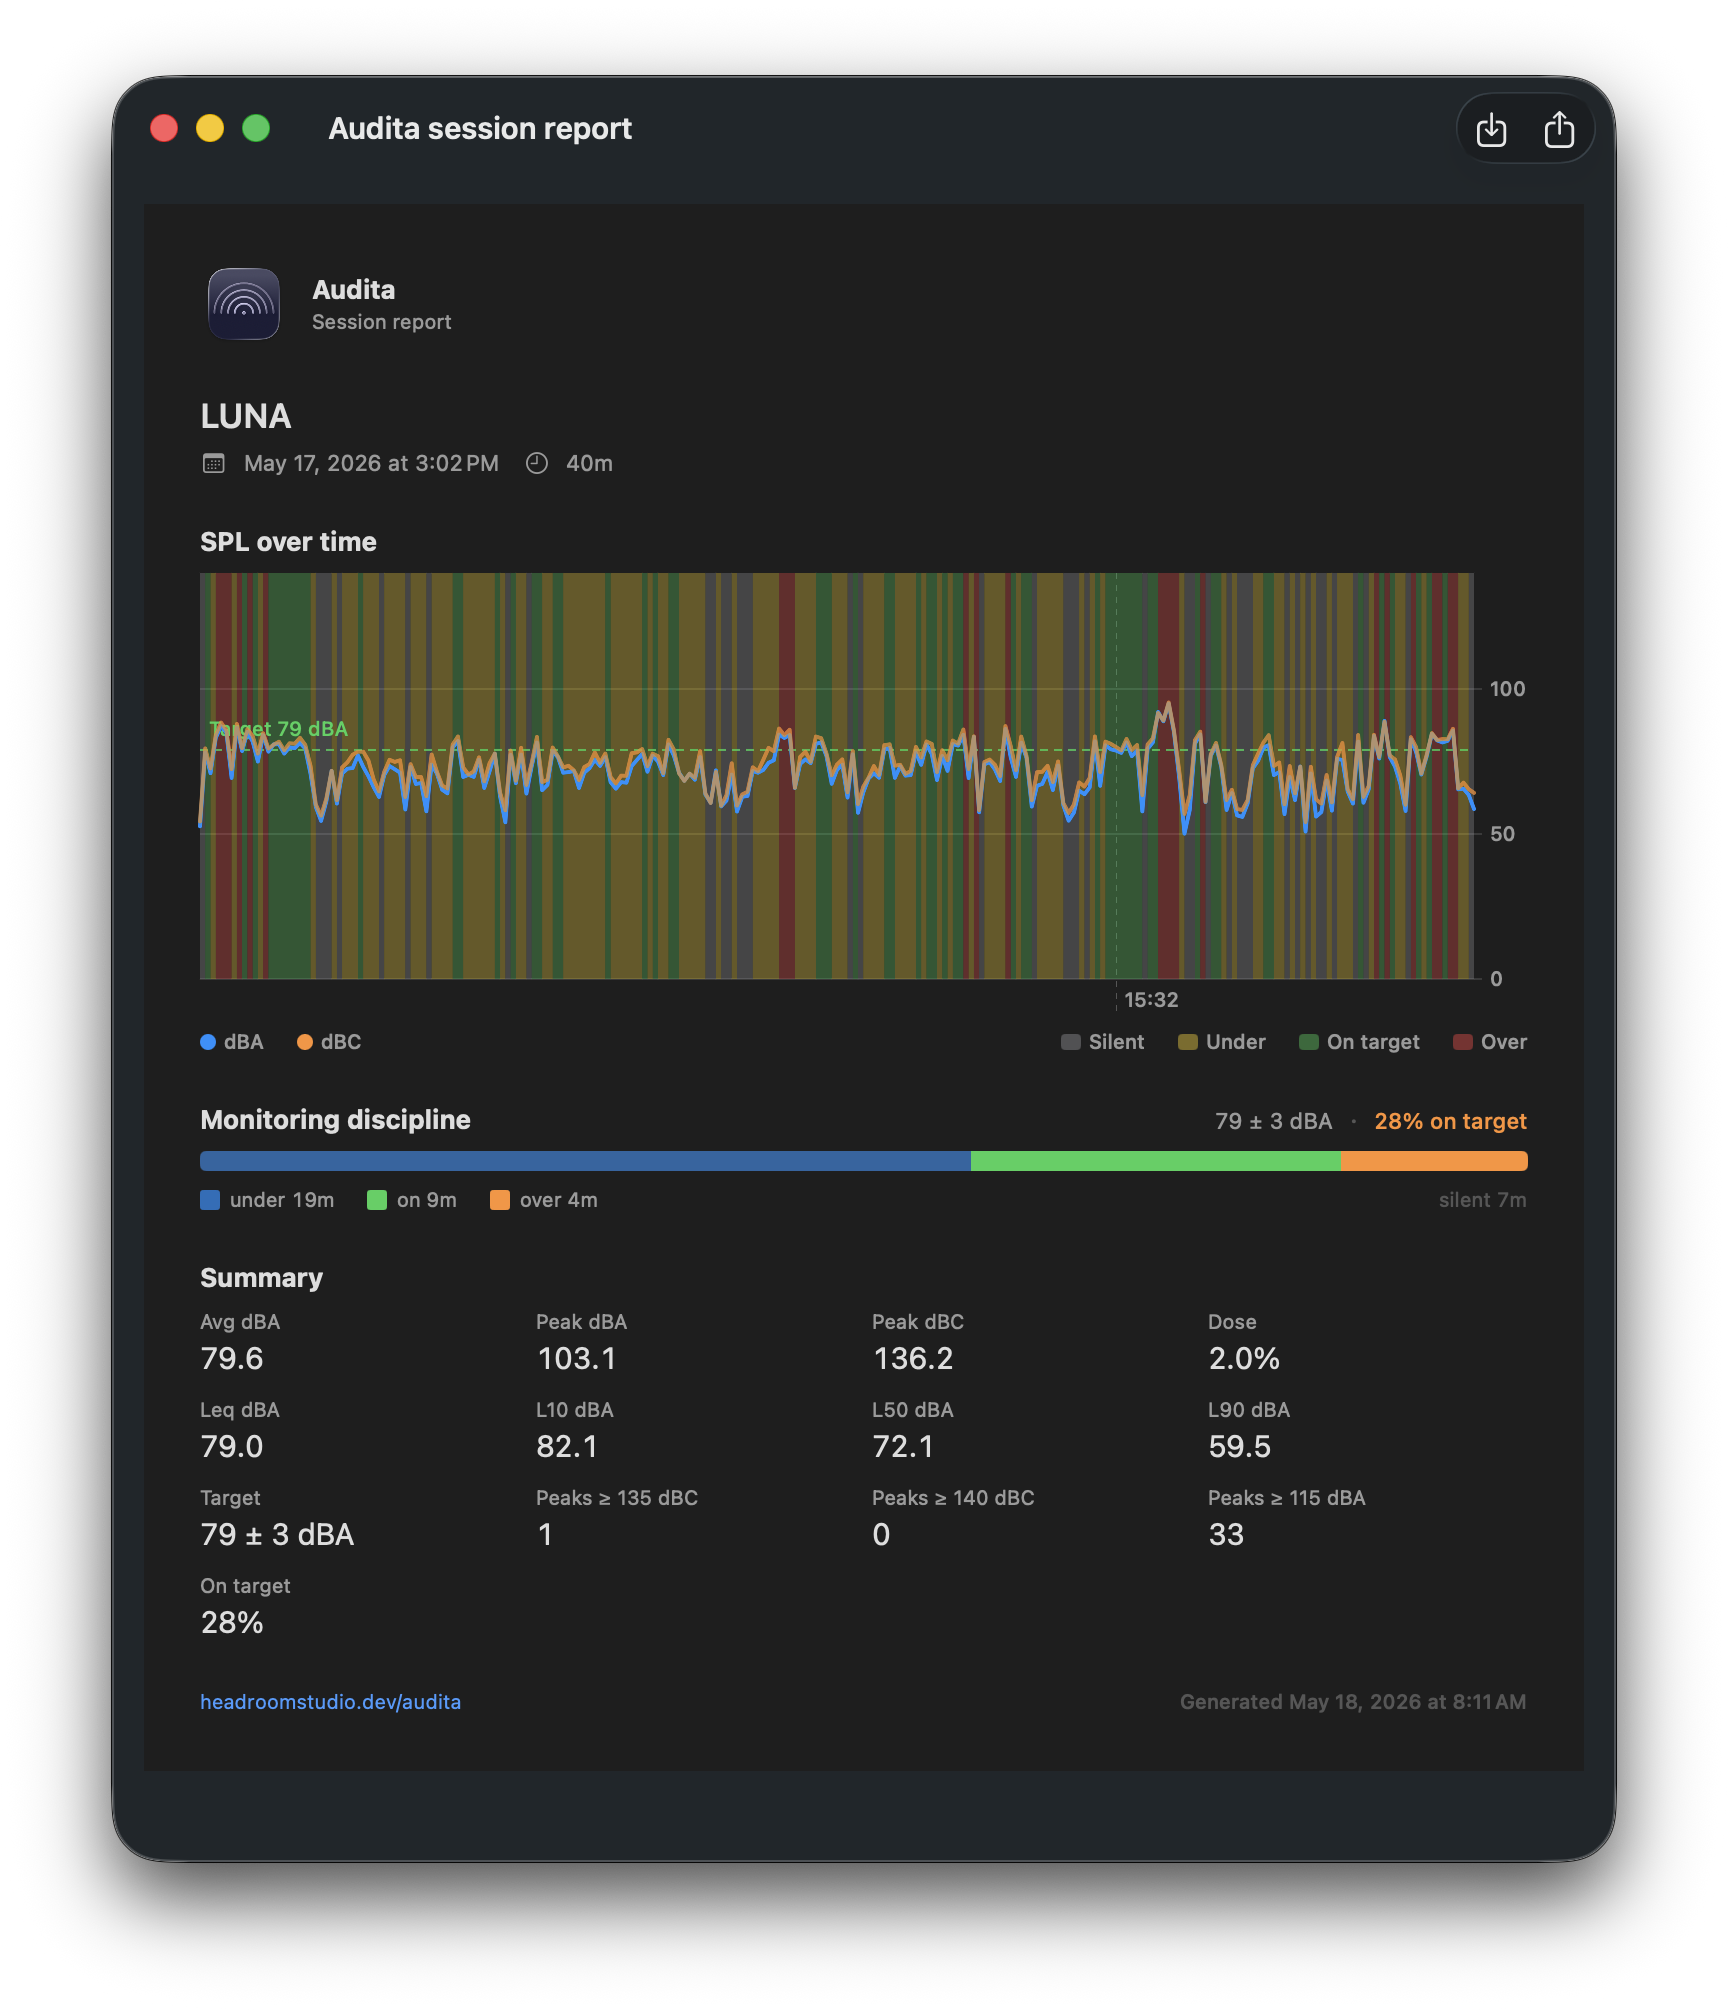
Every session Audita records can be opened as a one-page Session Report and shared as a PDF through the standard macOS Share menu - AirDrop to a phone, attach to a Mail draft for a producer, drop into a Messages thread, or save to disk for an archive. The Session Report is also a self-contained brief for anyone who hasn't seen Audita before: chart, stats, and a footer link to the product.
What the report contains
A single-page layout, top to bottom:
- Brand strip - Audita mark and the session's DAW + date + duration.
- SPL chart - dBA (and dBC) plotted across the session's duration. The chart's background is shaded by monitoring-discipline zone: silent, under, on-target, over. The shaded bands make it easy to see at a glance how much of the session was spent at reference and how much drifted off.
- Stats grid - average SPL, peak SPL, session dose %, EU peak-impulse counters (135 / 137 / 140 dBC and 115 dBA when non-zero), elapsed time, on-target % for the session.
Behind the scenes the time-series sample rate was bumped from one reading per minute (in v1.1) to one reading every 10 seconds in v1.2, so the chart has enough density to read. Older v1.1 sessions still render - they just plot at the lower density they were captured at.
Three ways to open it
- History panel context menu. Open the menu bar popover, switch to the History panel, right-click any session row. The context menu has Open Report and Share Report… entries.
- Menu bar popover button. Share Last Session… sits in the popover next to the manual session controls - one click on the most recent finished session.
- Session-recap notification action. When a session ends, the recap notification carries a Share Report… action button. Use it right after a session if you want to send the report to someone without opening Audita.
PDF format and the Share menu
Hit Share in the report window (or the Share Report… entry on any of the three entry points above) and Audita renders the report to a temporary PDF, then opens the standard macOS Share menu. From there: AirDrop to another device, Mail to attach to a draft, Messages to a thread, Save As to drop the file anywhere on disk, or any third-party share extension you've installed (Slack, Things, Drafts, Reminders, your password manager - whatever you have).
The generated PDF lives temporarily at ~/Library/Caches/Audita Reports/. Caches are macOS-managed - the system handles cleanup on its own schedule, and you can safely empty the folder by hand any time.
CSV export (the analyst's companion)
The PDF is the per-session narrative. For broader-time analysis, the History window's Export CSV button drops the selected date range into a spreadsheet-friendly file. Two blocks per file: one row per session, then a per-day summary block.
Per-session columns: Date, DAW, Start, End, Start ISO (sortable), Duration (min), Avg dBA, Peak dBA, Peak dBC, Leq dBA, L10 dBA, L50 dBA, L90 dBA, Target dBA, Tolerance dBA, Time under (s), Time on target (s), Time over (s), Time silent (s), On-target %, Impulses ≥135 dBC, Impulses ≥140 dBC, Peaks ≥115 dBA, Dose %.
Daily summary columns: Date, Sessions, Total dose %, Peak dBA, Peak dBC, Impulses ≥135 dBC, Impulses ≥140 dBC, Peaks ≥115 dBA.
Leq is the legally-cited metric in ISO 9612 and EU Directive 2003/10/EC; the CSV is the place to extract it for compliance logs. Sessions that pre-date a feature (e.g. v1.1 sessions, which had no Monitoring Discipline buckets) leave those cells empty.
Retention settings
Old sessions take up disk space, mainly through the per-session SPL time-series. Settings → General → Storage exposes two sliders that let you tune the trade-off between archive depth and disk footprint:
- Keep detailed time-series for [N] days (default 14). After the threshold passes, that session's chart downsamples to one sample per 100 seconds - still legible in the report chart, roughly 10x smaller on disk. The report still opens, the chart still draws, you just lose the fine grain.
- Keep sessions for [N] days (default 90). Sessions older than this are deleted entirely. Replaces the v1.1 hard-coded 30-day prune, so by default you keep three times as much history as before.
A live preview caption under the sliders shows how the current settings will affect existing data. If a slider drag would drop existing sessions, the caption turns orange and reads, for example, "7 sessions older than 60 days will be deleted on next launch" - so you can see what you're about to commit to.
Slider drag is non-destructive. Retention deletion runs at next launch only, never on slider drag. If you change a slider and then change your mind, just quit Audita without restarting - or move the slider back. The deletion pipeline never runs mid-session, so a session in progress is never affected by retention changes.
10. Pause & resume monitoring (v1.2+) #
There are days when you don't want Audita to count what's playing - you're auditioning loud reference tracks, running a sweep, testing a speaker, or rehearsing in the room and don't want the rehearsal to spend your hearing budget for the working day. Pause halts dose accumulation without ending the active session.
Three ways to pause and resume:
- Menu bar popover. The Pause Monitoring button sits next to Start Session / End Session and toggles to Resume Monitoring while paused. Indefinite pause only from this surface; for timed pauses use the URL scheme or a Shortcut.
- URL scheme -
audita://monitoring/pausefor an indefinite pause,audita://monitoring/pause?duration=900for a 15-minute timed pause.audita://monitoring/resumeends it. See the URL scheme reference. - App Intents (Shortcuts / Siri / Spotlight) - the Pause Monitoring intent takes a required
durationMinutesvalue. Enter0for an indefinite pause; any positive number gives you a timed pause that auto-resumes. Spotlight prompts for the value when you run the action without one. The Resume Monitoring intent takes no parameters. See the App Intents reference.
While paused, the SPL feed still runs (the menu bar readout keeps updating) but the dose calculator skips accumulation on every tick. The pause state is checked at 10 Hz, so dose stops accruing within ~100 ms of the pause being requested. A timed pause auto-resumes at the configured deadline.
Visual indicators. Three surfaces reflect pause state so the gated pipeline is never silent:
- The menu bar Pressure Bloom and live SPL number desaturate to neutral grey while paused; they spring back to colour the moment monitoring resumes.
- The menu bar popover shows an orange "Monitoring paused" banner at the top, with the resume time appended for timed pauses (e.g. "Resumes 14:32.").
- The floating measurement panel shows the same banner above its sections.
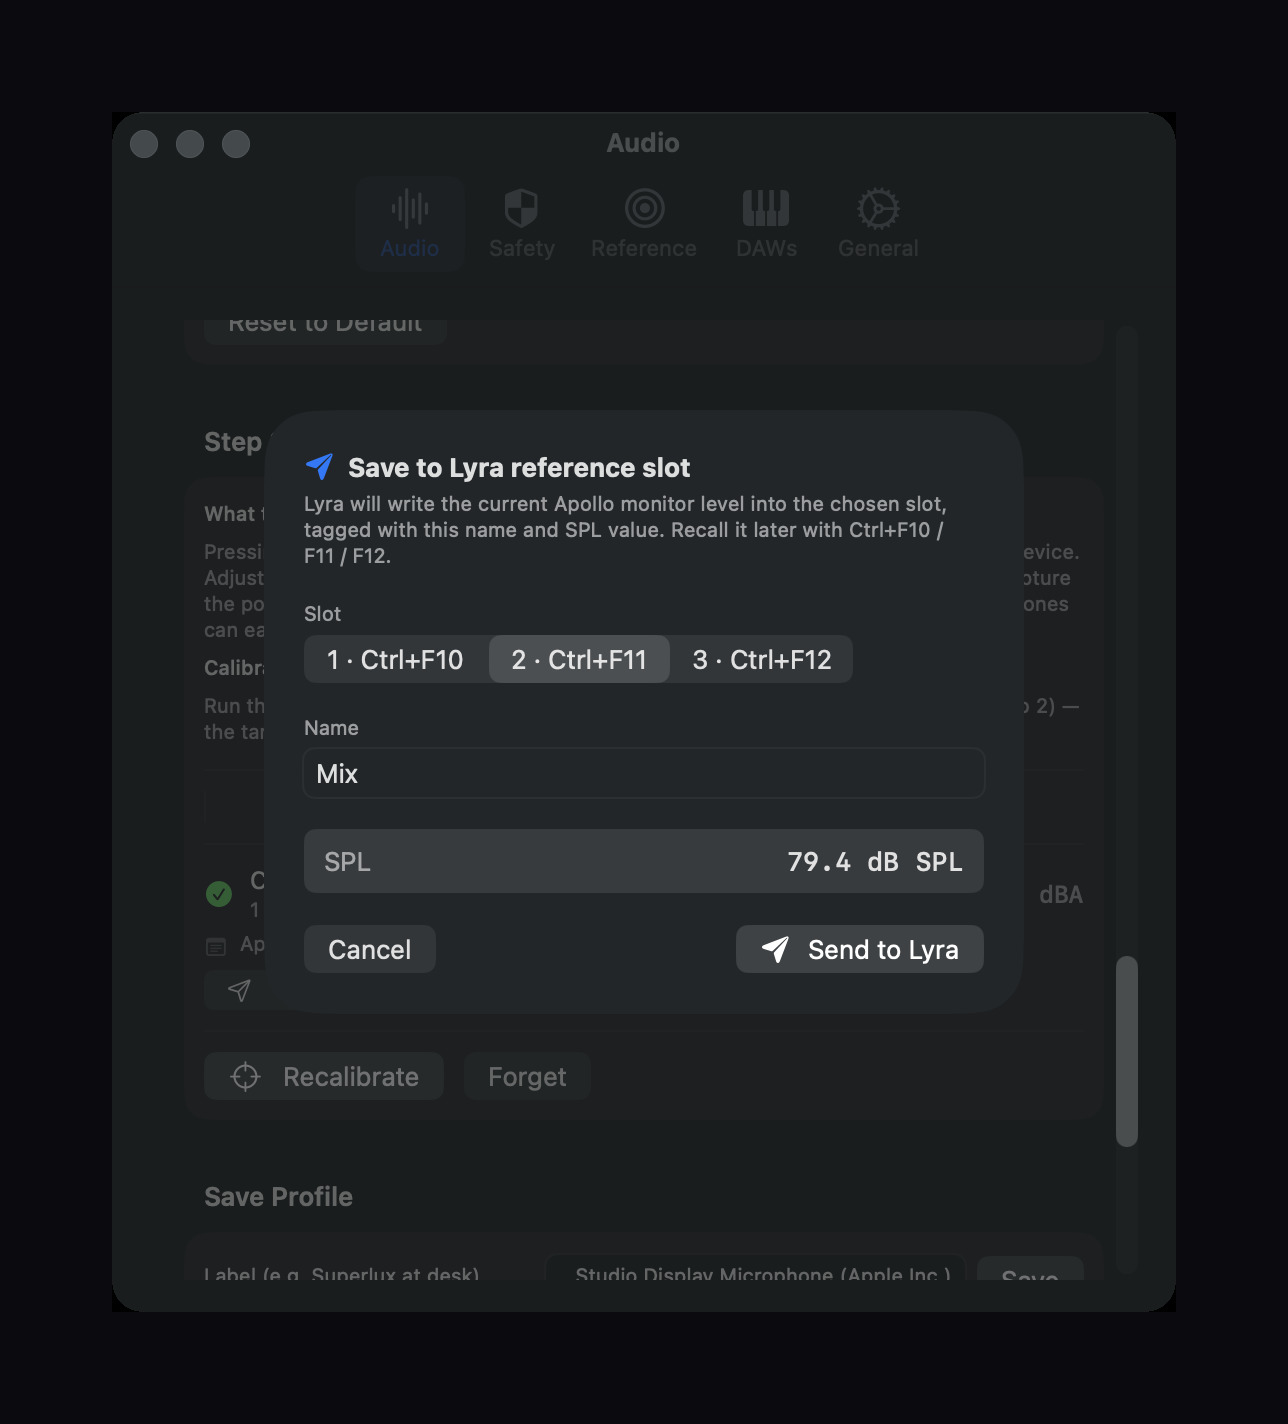
11. Send to Lyra - write a calibrated level into a Lyra reference slot #
Lyra is the Headroom menu bar app that controls Apollo Twin X monitor volume via the UA Mixer Engine. Lyra has three Reference Level slots (Ctrl+F10 / F11 / F12). Audita can write the calibrated dB SPL value and the live Apollo monitor position into one of those slots so the slot recalls the exact level you just calibrated.
How to use it
After running Step 3 calibration against an Apollo output device, the saved-calibration card in Settings → Audio → Step 3 grows a Send to Lyra… button. Click it to open the sheet:
- Slot picker - 1, 2, or 3 (Ctrl+F10 / F11 / F12 respectively).
- Name - defaults from your K-System target (73 dBA → "Mastering", 79 → "K-14", 83 → "K-12", 85 → "K-20"). Edit freely.
- SPL readout - read-only, the calibrated value about to be stored.
When you confirm, Audita fires lyra://reference/{n}/save?name=…&dBSPL=… and Lyra:
- Reads the live Apollo monitor level (so the slot reflects exactly what Audita just measured against).
- Stores tapered + name + dBSPL together.
- Pops the labeled HUD as confirmation - e.g.
Mix - 85 dB SPL.
Audita does not send the tapered position itself. Lyra reads it directly from the Apollo when receiving the URL, which is exactly the position the user just calibrated against. Audita contributes only name and dBSPL as metadata that Lyra surfaces in its menu and HUD.
Don't have Lyra? The Send to Lyra button is hidden when Lyra isn't installed; a subtle hint links to the Lyra product page instead. Audita works fully without Lyra - it's a cross-app convenience for users who own both. Requires Lyra 1.4 or later.
12. URL scheme & automation #
Audita registers a custom audita:// URL scheme so any tool that can fire a URL can read its state or drive its sessions and pause - Shortcuts, Stream Deck, Keyboard Maestro, Hammerspoon, BetterTouchTool, AppleScript, open from the shell, other apps.
A brief overview:
| URL | What it does |
|---|---|
audita://spl | Read live SPL (dBA, dBC, peak dBA) |
audita://dose | Read today's NIOSH dose and peak counters |
audita://session | Read the active session payload |
audita://state | Aggregated payload (spl + dose + session + pause) |
audita://session/start | Start a manual session (optional ?daw=…) |
audita://session/end | End the current session |
audita://monitoring/pause | Pause dose accumulation (optional ?duration=<seconds>) |
audita://monitoring/resume | Resume monitoring |
All endpoints accept the standard x-callback-url parameters (x-success, x-error) so you can chain Audita into a wider workflow. Read endpoints require an x-success URL to deliver their payload; write endpoints treat both callbacks as optional. Responses use flat snake_case query parameters in plain ASCII - no JSON parsing required on the consumer side.
Audita also ships a bundle of App Intents for the Shortcuts app, Siri, and Focus Filters - seven intents covering the same reads, sessions, and pause/resume that the URL scheme exposes. If you live inside the Shortcuts ecosystem, the intents are the smoother path; the URL scheme is the lowest-common-denominator surface for everything else (Stream Deck, Keyboard Maestro, Hammerspoon, AppleScript, shell). For sharing a report of a finished session, the Session Report window below covers every export case better than a Shortcut step.
The cross-app studio-on ritual is a three-step Shortcut that chains both apps: open your DAW, start an Audita session, switch Lyra to a reference monitor level.
The full automation reference - every intent, every URL endpoint, every return field, error vocabulary, and the worked studio-on ritual example - lives on the API reference page.
13. Importing from Auris #
Audita is the successor to Auris, which was sunset on 2026-05-08. Auris 1.3 shipped with a Move to Audita export modal; Audita 1.0 and later include a first-launch import wizard that reads the exported JSON and brings your data over.
What's imported:
- Session history (up to 30 days).
- Today's accumulated dose.
- Calibration profiles (Step 1 FIR + Step 2 offset).
- Step 3 target calibration records, keyed by output device UID.
- Custom DAW bundle IDs.
- Mic frequency response correction filters.
The wizard runs once on first launch. It can be re-run later from Settings → General → Migration → Import from Auris if you want to bring data over from a second Mac.
Your existing Auris license key and trial state carry across automatically. Reinstalling Audita on a machine that previously had Auris finds the same trial countdown and license credentials. Existing Auris users do not need to re-pay.
14. Trial & licensing #
Audita is $19.99, one-time purchase, via Lemon Squeezy.
Trial
The first launch starts a 7-day free trial with full functionality - every feature, no nags, no watermarks. The trial start date persists across reinstalls. After 7 days Audita shows a hard-lock window on launch and refuses to run until you activate a license.
Buying
Click Buy Audita in the menu (or the Buy button on the website). Lemon Squeezy emails you the license key after checkout.
Activating
Menu → Activate (or Manage if already licensed) opens the license window. Paste your key and click Activate. Activation requires an internet connection. Once activated, Audita works fully offline.
Two-machine limit
Each license can be active on up to two Macs. To free a slot, open Audita on the machine you want to release, Menu → Manage License → Deactivate, then activate on the new Mac.
Lost your key?
Check the Lemon Squeezy confirmation email. If you can't find it, email hello@headroomstudio.dev with the address you used at checkout.
Validation
Audita silently re-validates your license on each launch. If activation has been revoked (refund, deactivation, abuse), the local credentials are cleared and the app drops to trial / expired state. Network failures are silently ignored - the offline case is benefit-of-the-doubt.
15. Updates #
Audita checks for new versions automatically. When one's available you'll see an update prompt at the next launch. To check on demand: Menu → Check for Updates…
Release notes: headroomstudio.dev/audita/releases.html.
16. Troubleshooting #
No SPL reading - the menu bar shows a dash
- Microphone permission. Open System Settings → Privacy & Security → Microphone and verify Audita is in the list and toggled on.
- Input device selected. Open Settings → Audio and confirm the measurement microphone is selected. If you previously selected a device that has since been unplugged, Audita stops measuring gracefully - re-select an available device or plug the original back in.
- Audio engine status. The dash means the audio engine isn't running. After granting microphone permission for the first time, quit and relaunch Audita to re-initialise the engine.
Readings are wildly off (off by 20+ dB)
Audita measures relative to the digital full-scale level of your microphone. Without Step 2 calibration, the displayed dB is not in real-world SPL - it's a digital level offset by the default 94 dB pistonphone constant. Run Step 2 against an iPhone running NIOSH SLM to map the digital scale to real-world dB SPL.
dBA and dBC differ by > 10 dB on broadband content
On broadband pink noise, dBA and dBC should be within ~3 dB. A larger gap means your mic has significant low-frequency response that A-weighting alone underreports. Run Step 1 to flatten the mic, then re-verify against pink noise. If the gap persists after Step 1, the mic itself may be the issue (check the cable, preamp, and gain staging).
On-target % stays at "-"
The metric is suppressed until at least 30 seconds of non-silent monitoring time has been recorded. If you've been monitoring for longer and it still says "-", check that the dBA is above the silent floor (50 dBA, or target − 30 dBA, whichever is higher).
Drift alert never fires
The drift detector needs 10 minutes of baseline plus 5 minutes of sustained elevation. A 20-minute session is the earliest it can fire. If you're in a longer session and expected an alert, check that Settings → Reference → Alerts → Drift alert is enabled.
Auris import skipped or didn't find data
Re-run from Settings → General → Migration → Import from Auris. Make sure the Auris export JSON is on the same machine; the wizard expects the file at the path produced by Auris 1.3's "Move to Audita" modal. If you've moved Macs, copy the export file across first.
Trial says expired but I just installed
The trial start date persists across reinstalls and across a prior Auris install on the same Mac, so a reinstall won't reset it. If you genuinely just installed Audita for the first time and it's reading as expired, email hello@headroomstudio.dev.
License says invalid even though I just bought it
Wait 30 seconds and try again - Lemon Squeezy occasionally needs a moment to propagate. If it still fails, double-check that there's no leading/trailing whitespace in the key you pasted. Otherwise email hello@headroomstudio.dev with the key and order number.
Notifications don't appear
Open System Settings → Notifications → Audita and confirm notifications are allowed. For Focus-breaking alerts (warning/danger dose, peak alerts, 115 dBA ceiling, sustained-SPL), enable Settings → General → Notifications → Time Sensitive notifications in Audita and confirm Time Sensitive is allowed in the system Notifications pane.
Sparkle won't show an update prompt
Reset Sparkle's "already checked / already skipped" state:
defaults delete com.headroom.AuditaRelaunch, then Menu → Check for Updates… to force a fresh check. This also resets other preferences (menu bar display, today's dose, etc.) to factory defaults.
17. Reporting bugs & feedback #
Email hello@headroomstudio.dev with what happened, what you expected, and ideally what's in the Console.app logs filtered by Audita.
18. Widgets (v1.3+) #
Audita ships six desktop widgets so both sides of Audita are visible at a glance, without opening the app: how closely you are holding your monitoring level, and how much of your hearing budget the day has used. To add one, right-click the desktop (or open Notification Center and choose Edit Widgets) and find Audita. They run on macOS 14 (Sonoma) and later, and need Audita to have run at least once so it can publish its current state.
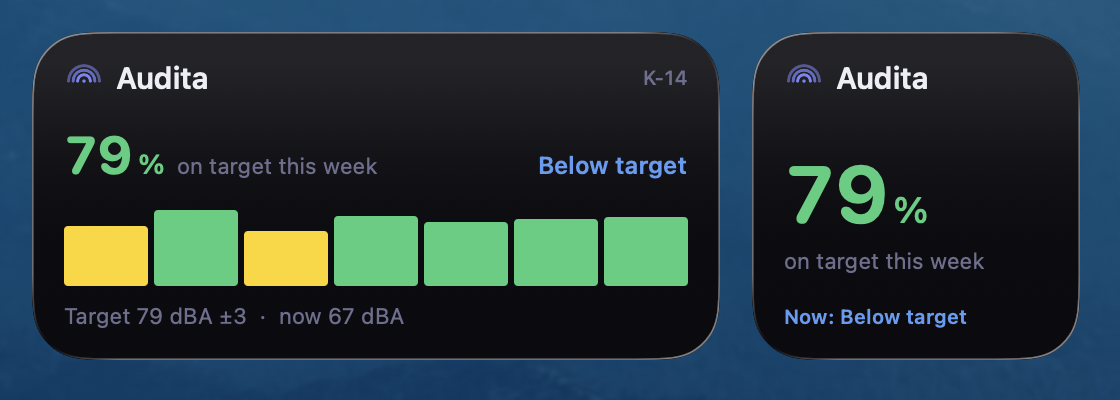
On Target (small, medium). How much of your monitoring this week was at your calibrated reference level, as a time-weighted percentage, with a 7-day chart on the medium size. When a session is running it also shows the live state (on target, below, or above). This is the Monitoring Discipline use case on the desktop, and it stays useful when you are not monitoring. The same figure also appears as an On target tile in the History window.
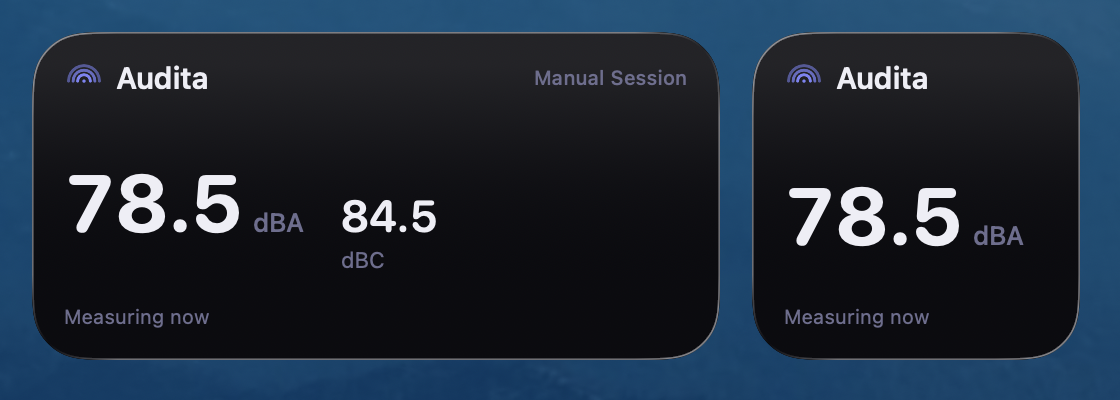
Latest SPL (small, medium). The most recent A-weighted level Audita measured, with dBC on the medium size. Widgets cannot listen to your audio the way the app does, so this is the last reading, with the time it was taken. When Audita is not measuring it reads Idle rather than showing 0 dBA.
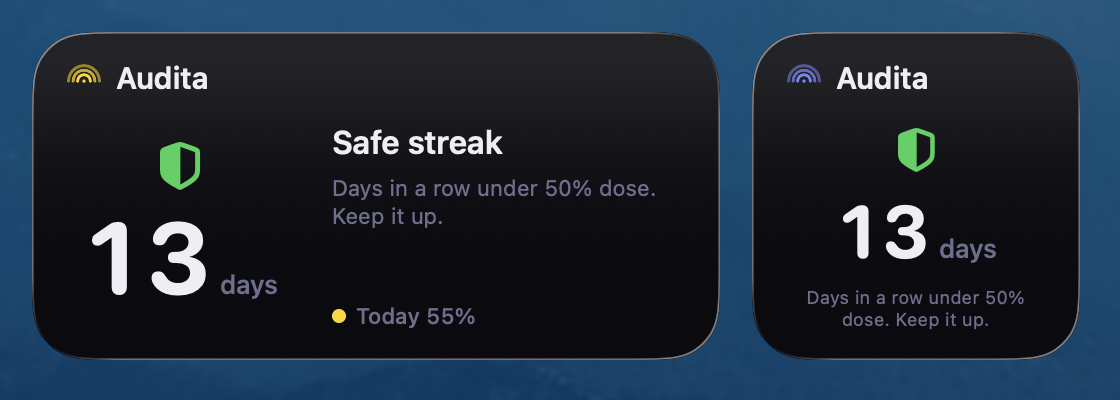
Safe Streak (small, medium). Consecutive days, up to yesterday, your dose stayed under 50% of the daily limit. The same streak Audita reports through Shortcuts and Siri.
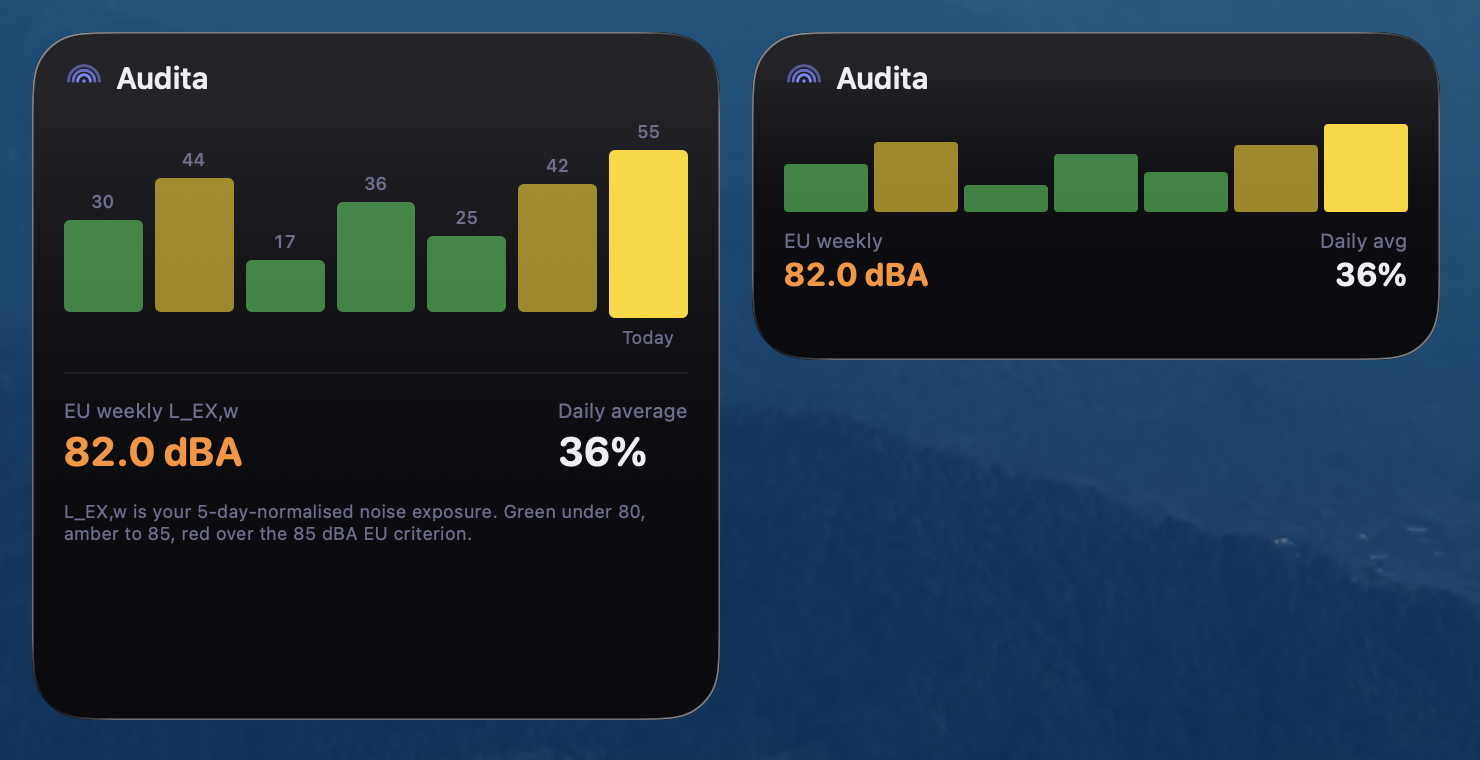
Weekly Exposure (medium, large). Your last 7 days of dose as a bar chart, with the EU weekly exposure level (L_EX,w, ISO 9612) against the 85 dBA criterion. The same figures as the in-app weekly chart.
Today's Dose (small, medium) shows your accumulated NIOSH dose as a ring that fills and changes colour from green to red; the medium size adds your safe streak and EU weekly level. Overview (large) puts today's dose, latest SPL, your on-target state, your streak, and the weekly chart in one tile.

Widgets refresh when your dose tier changes colour, when a session starts or ends, at midnight, and on a light schedule while you are measuring. The system limits how often a widget can redraw, so the numbers move about once a minute rather than in real time. For a live reading, use the menu bar or the floating panel.