Specula · User guide
Everything Specula does, and how to drive it.
This page is the canonical reference. Skim the table of contents to jump to a feature, or read top-to-bottom for the full tour.
1. Quick start #
- ⌘O - pick an audio file (WAV / AIFF / FLAC / CAF / MP3 / AAC).
- Space plays. ⌘. stops. Click the waveform to move the playhead.
- ⌘-drag on the waveform to select a region. ⌘Return runs full offline analysis on the selection.
- Scroll to zoom, ⌥-scroll for amplitude (vertical) zoom, ⇧-scroll to pan.
- ⌃1-⌃5 toggle each analysis section on/off. ⌃⌥1-⌃⌥5 focuses one section (hides the rest).
- ⌘1 Edit · ⌘2 Compare · ⌘3 Chapter · ⌘4 Dialogue - the four authoring modes, mutually exclusive. Each carries its own accent colour (amber / sky-blue / green / rose) and its own toolbar in the same chrome slot.
- ⌘, opens Preferences (Layout · Spectrogram · FFT / Analysis · Speech · Targets · Report · Updates · License · Acknowledgements tabs).
2. Loading & playback #
Open a file
⌘O opens the standard file picker. Multiple-selection is allowed: the first file becomes the primary and the rest open as compare slots. Specula loads each file into RAM as a Float32 non-interleaved buffer. Pre-computed waveform peaks and clip regions are calculated during load.
Other ways to open files:
- Drag & drop one or more audio files onto the main window, or onto the Dock icon (works whether Specula is running or not).
- Open With from Finder (right-click an audio file). Specula registers as an audio handler but not the default, so it stays out of your way unless you pick it.
- File → Open Recent lists the last files you opened from any source above. The list is managed by macOS, so it survives quitting and relaunching.
open path/to/file.wavfrom Terminal works for the same reason: it routes through Launch Services.
Opening files always starts a clean comparison. If two files were already in compare, opening a single new file replaces the whole set; opening three new files replaces the whole set with those three. To append to the current comparison without starting fresh, use File → Add Files to Compare… (⇧⌘O) or the Compare button in the file dock.
Transport
| Space | Play / pause |
| ⌘. | Stop and return to start |
| ← / → | Skip ±5 seconds |
| ⇧← / ⇧→ | Skip ±1 second |
| ⌘← | Jump to start |
| L | Toggle loop. Loops the current selection if one exists, otherwise the whole file. |
Hold play-start
Next to Loop in the transport bar is a small ↺ Hold play-start toggle. Default: off. Pause stops playback at the current position (classic transport behaviour). Turn it on (the icon fills, accent-tinted) and Pause (Space or the play / pause toggle) returns the playhead to where Play was last started, or where you last manually placed the cursor with a waveform click. Tap Space again and you re-play the same passage from the same starting point. Useful when you're A/B'ing a passage by ear without wanting to re-position the cursor each time.
In compare mode the toggle also makes nudge buttons (±1 sample / ±1 ms) re-seek to that anchor, so the comparison point doesn't drift forward while you click alignment buttons.
Stop is unchanged either way: it always rewinds to the beginning of the file.
Playback rate
Variable rate from 0.25× to 2×, with optional pitch preservation (timestretch).
| [ | Step rate down |
| ] | Step rate up |
| \ | Reset rate to 1× |
The Transport bar exposes the rate menu (0.25× · 0.5× · 0.75× · 1× · 1.25× · 1.5× · 2×) and the "preserve pitch" toggle.
Output device
The Transport bar shows the current output as a compact Output: <Device Name> pill on the right side. Click it (or press ⌥⌘O, or pick Window → Output Panel) to open the Output window. The window holds a device dropdown (with channel count next to each name; the Refresh Devices item lives at the bottom of the menu) above the per-channel routing matrix. Switching device rebuilds the audio engine. Specula is happy with any device, from built-in speakers to multichannel pro audio interfaces.
The Output window is hidden by default and remembers its size and position across launches. On macOS 26 the window itself uses Liquid Glass, so it reads as a floating utility panel over the main app (the same Liquid Glass opt-out toggle covers it). Routing details are in Channel routing & monitor mode.
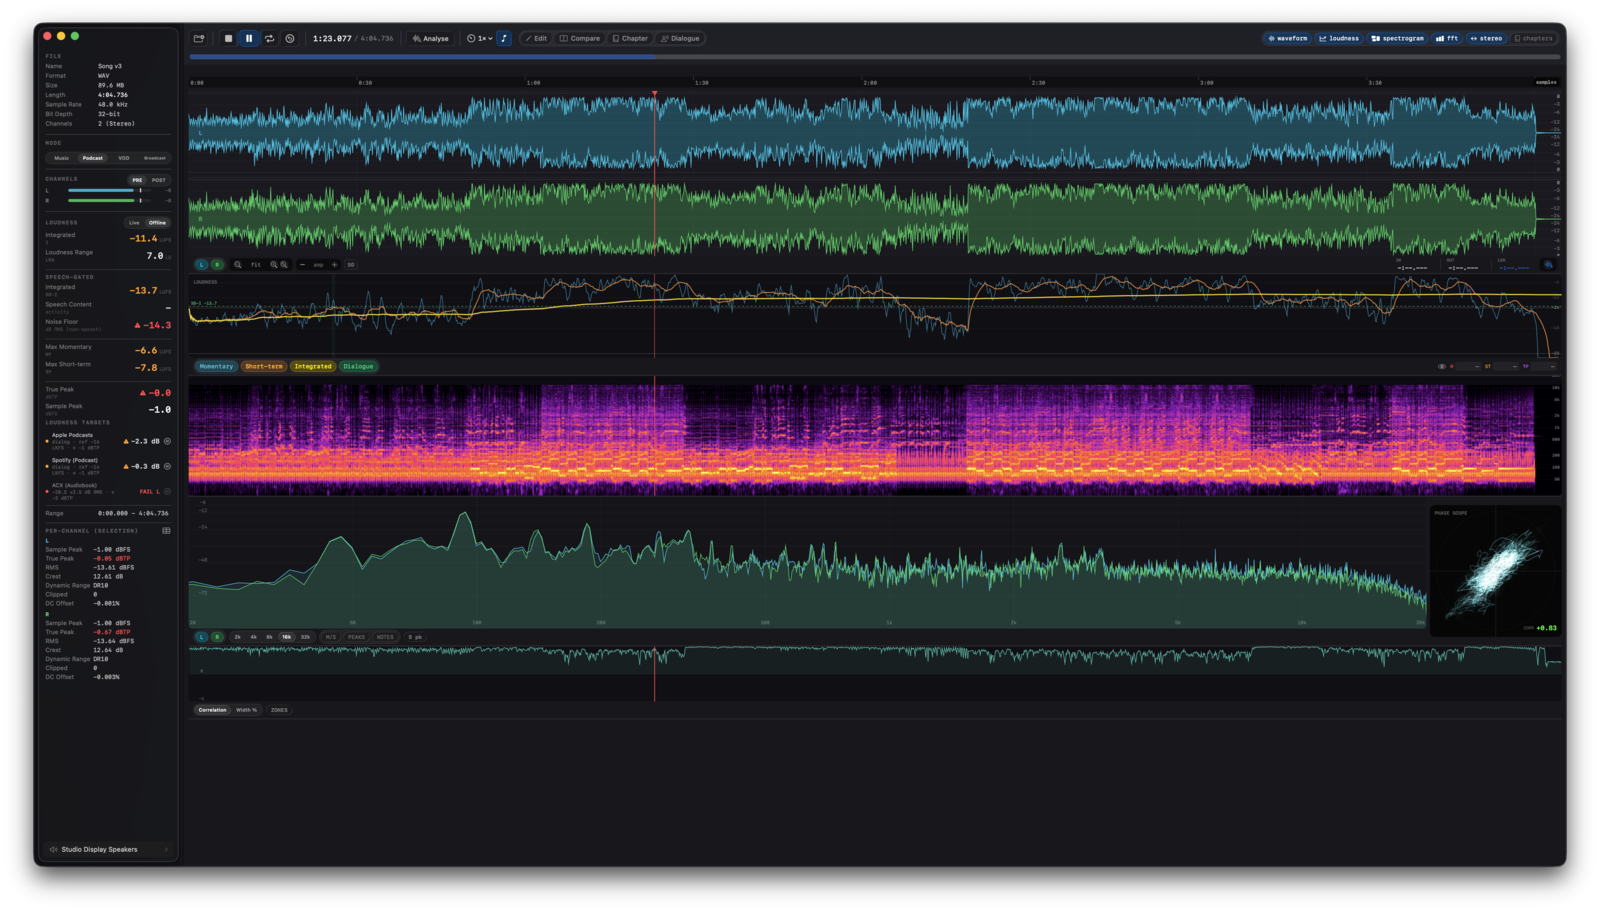
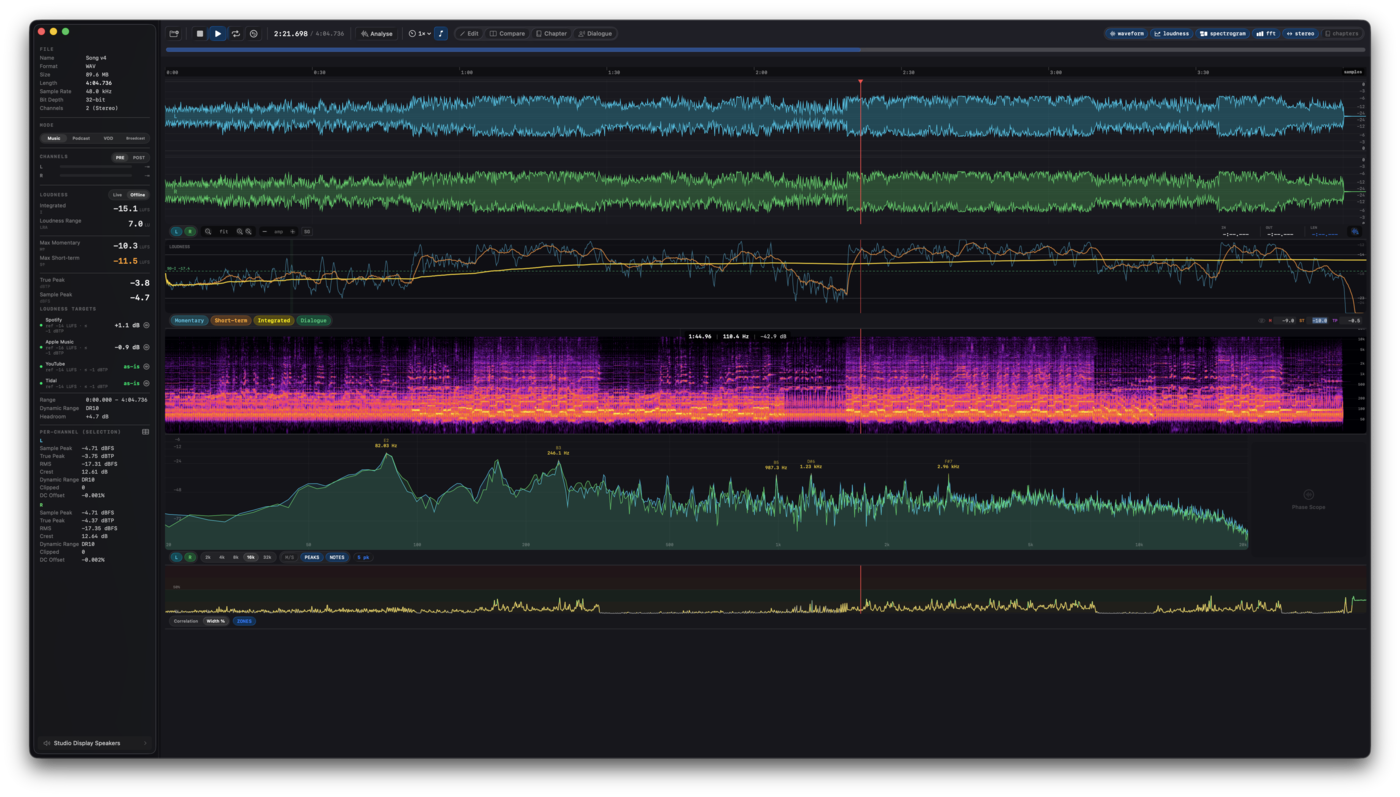
3. Waveform display #
Renders all channels of the loaded file simultaneously, scaled to fill the section height. Each channel uses its layout colour - mono, stereo, quad, 5.1, 7.1 each have a distinct palette.

Interaction
- Click or plain drag → move the playhead (a drag scrubs). A click also clears any existing selection.
- ⌘-drag → create a selection region. Once a selection exists, drag its edge to resize it or drag its body to move it (no ⌘ needed). Esc clears it.
- Scroll (mouse wheel or two-finger swipe) → horizontal zoom. Specula keeps the cursor pixel anchored as you zoom.
- ⇧-scroll → pan / scroll horizontally.
- ⌥-scroll → amplitude (vertical) zoom.
- The control strip below the waveform also has −/+ zoom buttons, a fit button (back to full width), and a separate amplitude zoom control, so you can zoom without a scroll wheel. The small ? button there opens this gesture legend in-app.
Ruler
A time ruler runs above the waveform. Click the ruler-mode toggle in the waveform control strip to swap between Time (HH:MM:SS.mmm) and Samples (frame count). Useful when you need to align two takes by sample.
Vertical / amplitude zoom
The control strip below the waveform has an amplitude zoom control (−/+ buttons) - useful for inspecting low-level detail without it being lost in the noise floor. Default is 1× (full ±0 dBFS range).
Clip detection
During load, Specula scans every channel for sample values ≥ ±1.0. Each detected clip region is highlighted in red on the waveform and counted in the Channel Info sidebar.
dBFS grid
The waveform draws horizontal grid lines at 0, −3, −6, −9, −12, −18, −24, −30, −36, −48, −60, −72, −84, −96 dBFS. Lines auto-cull when the channel is too short to label them legibly.
Speech regions overlay (SG toggle)
After file load, Silero VAD runs in the background and produces a per-100 ms speech / non-speech timeline. The waveform's control strip has an SG toggle - when enabled, detected speech blocks are shaded in teal. Useful for visually verifying the VAD result before relying on speech-gated loudness numbers.
Channel mute
Click a channel label in the Channels sidebar to mute that channel for playback. Useful for soloing one side of a stereo file or isolating a single channel of a multi-channel master.
4. Selection & selection analysis #
A selection is a [start..end] range on the waveform. Selections drive offline analysis, edit-mode operations, and loop playback.
| Esc | Clear selection (waveform + FFT) |
| ⌘A | Select all |
| ⌘Return | Run offline selection analysis |
Load-time analysis (automatic)
Most of the offline numbers populate the moment a file finishes loading, with no key press. A detached background pass over the whole file produces:
- Integrated LUFS, LRA, True Peak (4× oversampled dBTP), Sample Peak.
- Max Momentary LUFS, Max Short-term LUFS.
- Speech-gated Integrated LUFS, Speech % via Silero VAD over the entire file.
- Dynamic Range, Headroom, Speech-gated Noise Floor.
- Per-channel Peak / RMS / Crest Factor / DC.
- Stereo width curve, loudness curves (momentary / short-term / integrated per-100 ms).
- Spectrogram columns for the whole file, if the "Auto-compute spectrogram on load" toggle is enabled in Settings → Spectrogram → Performance. Off by default; see Spectrogram.
These numbers feed the info panel's Offline tab and both the PDF and JSON reports immediately after open. A typical music track finishes the pass in a few hundred milliseconds. Long-form audio takes proportionally longer.
Selection analysis (⌘Return)
⌘Return reruns the full analysis pipeline on the current selection rather than the whole file. Use it when you want metrics scoped to a specific region (a chorus, a problem section, a candidate edit point), or when you want the averaged FFT spectrum view.
Selection-scoped output:
- Time range - selection start and end.
- Every metric from the load-time pass, recomputed against the selected range only.
- Averaged FFT spectrum for the FFT view - a much smoother, more accurate read than the rolling live spectrum.
- Spectrogram columns for the selection (independent of the auto-compute toggle, which only applies to whole-file load-time spectrograms).
A spinner in the Loudness sidebar indicates the analysis is in flight; results land when it completes (typically ~1-3 s for a multi-minute selection). Live measurement keeps running in the background regardless.
⌘Return is not required to populate true peak or per-channel stats on a freshly loaded file: those land in the Offline tab and the report automatically. Reach for ⌘Return when the question is about a region of the file, or when you want the averaged spectrum on the FFT view.
Frequency selection (FFT)
The FFT spectrum view has its own horizontal selection on the frequency axis - and it's an active playback filter, not a measurement readout. See FFT spectrum for details. Esc clears the FFT selection too.
5. EBU R128 loudness #
Specula implements full ITU-R BS.1770-4 / EBU R128:
- K-weighting - two cascaded biquad IIR sections, coefficients computed once per sample rate.
- 100 ms gating blocks - each block contributes one mean square value.
- 400 ms sliding window for momentary.
- 3 second sliding window for short-term.
- Dual gating - absolute threshold at −70 LUFS, relative threshold at −10 LU below the ungated mean.
- True Peak - 4× oversampled inter-sample peak detection.
What's shown live (sidebar)
| Metric | Description |
|---|---|
| Momentary (M) | 400 ms window, updates 10×/sec |
| Short-term (S) | 3 s window |
| Integrated (I) | Whole-file integrated LUFS, dual-gated. Resets on file load and on play-from-zero. |
| LRA | The 10-95 percentile range of the gated short-term distribution |
| True Peak (dBTP) | Highest 4×-oversampled inter-sample peak. Turns red above −1 dBTP. |
| Sample Peak (dBFS) | Highest absolute sample value across the whole file. |
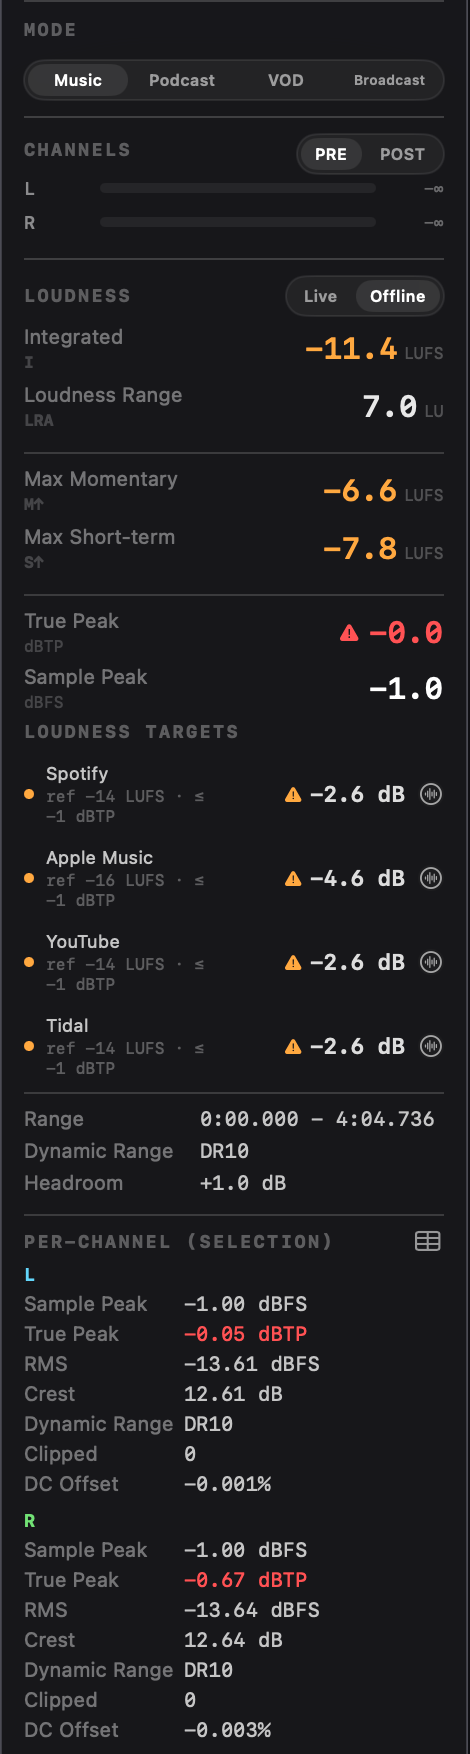
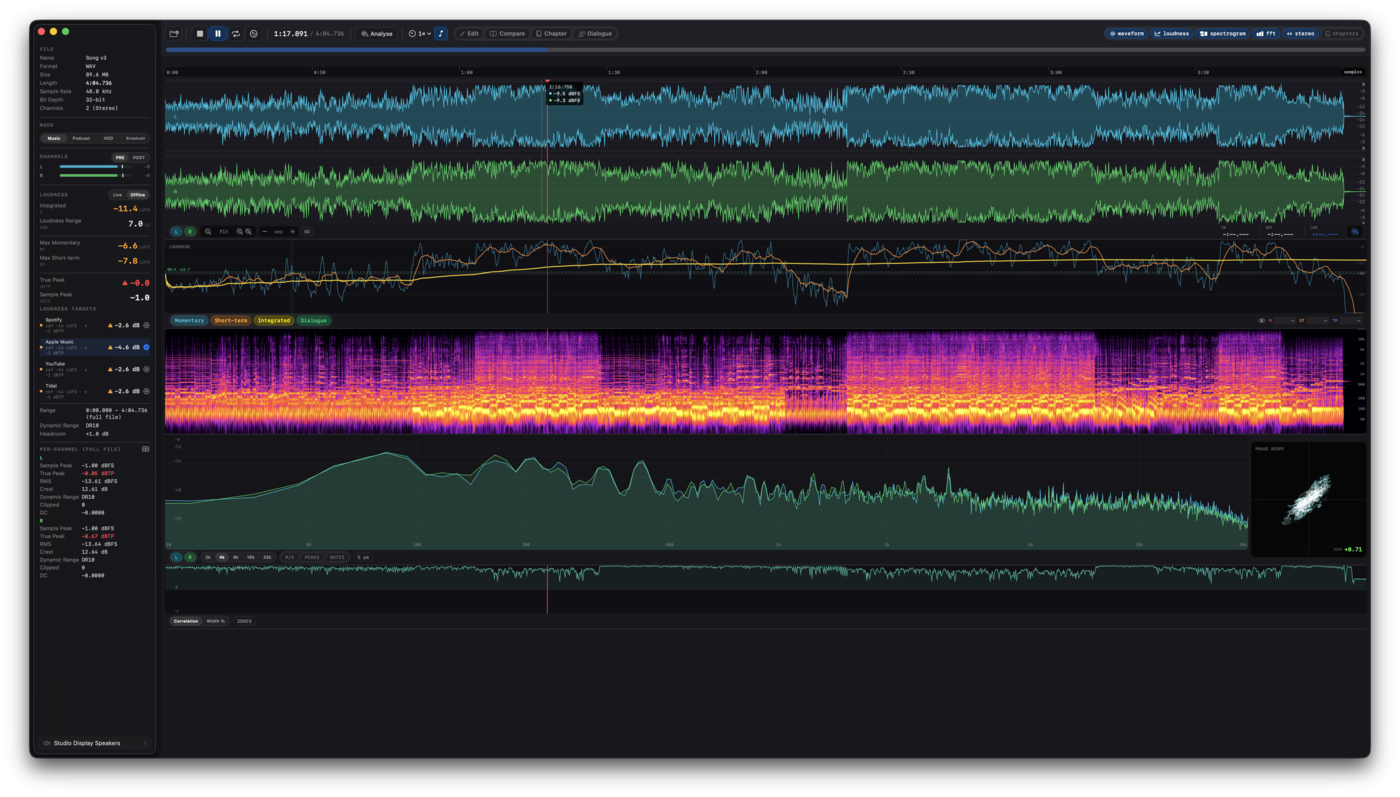
Live vs Offline loudness display
The Loudness section in the sidebar has a [Live] [Offline] segmented control at the top. Live shows the real-time measurement updating during playback. Offline shows the whole-file results from the load-time analysis pass, populated immediately after the file finishes loading; running ⌘Return on a selection narrows the same metrics to that selection.
The same rows appear in both modes from the chosen source: Integrated, LRA, Speech-Gated, Speech %, Momentary / Short-term (labelled Max Momentary / Max Short-term in Offline since they're whole-file or whole-selection maxima rather than instantaneous), True Peak, Sample Peak, Loudness Targets. Offline adds Time range, Dynamic Range, Headroom, Noise Floor (Podcast mode), and per-channel Peak / RMS / Crest / DC below. The choice persists across launches. Live measurement keeps running in the background regardless of mode.
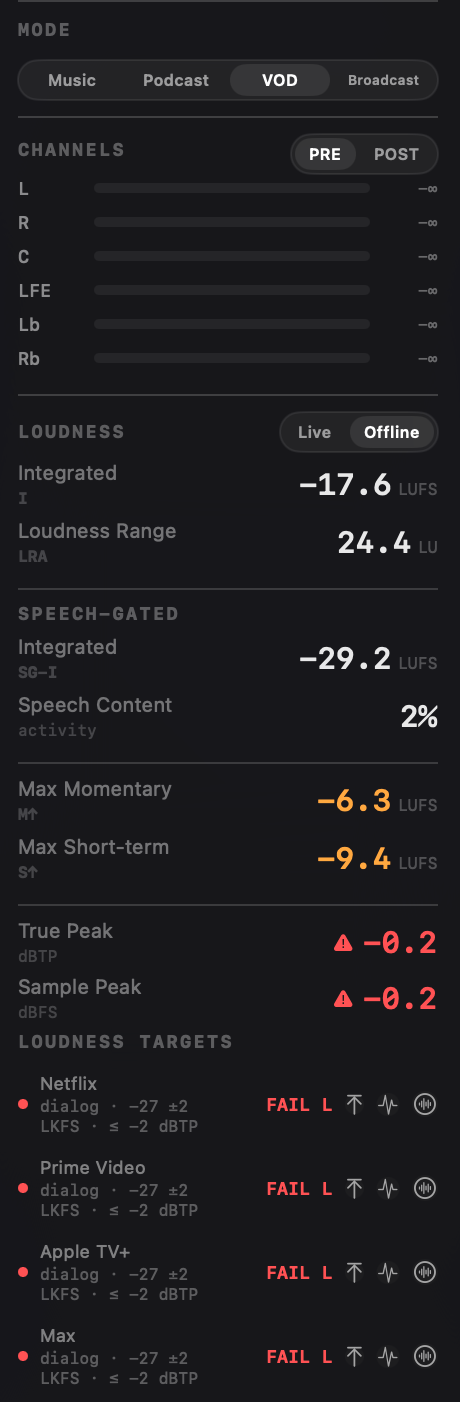
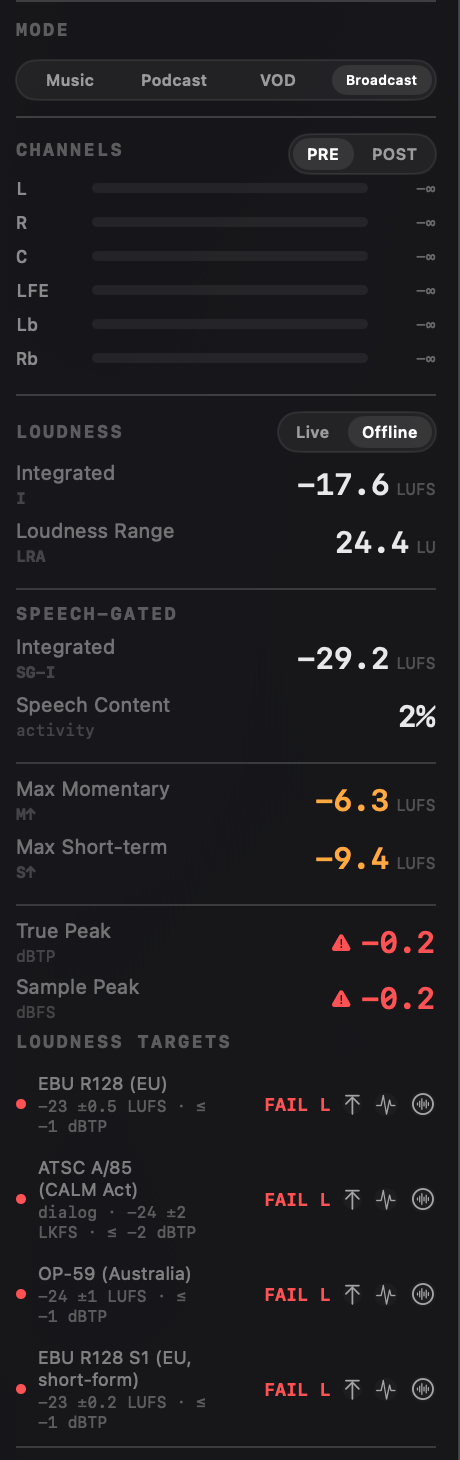
Mode (Music / Podcast / VOD / Broadcast)
The info panel has a top-level Mode picker right under the File section. Mode is the per-file analysis context - switch it to reframe the same file as a different deliverable. It drives both the Loudness Targets panel and which metric rows appear in the sidebar:
| Metric | Music | Podcast | VOD | Broadcast |
|---|---|---|---|---|
| Integrated, LRA, M/S, True/Sample Peak, Targets, Per-channel | ✓ | ✓ | ✓ | ✓ |
| Speech-Gated I, Speech % | - | ✓ | ✓ | ✓ |
| Noise Floor (ACX) | - | ✓ | - | - |
| Dynamic Range, Headroom | ✓ | - | - | ✓ |
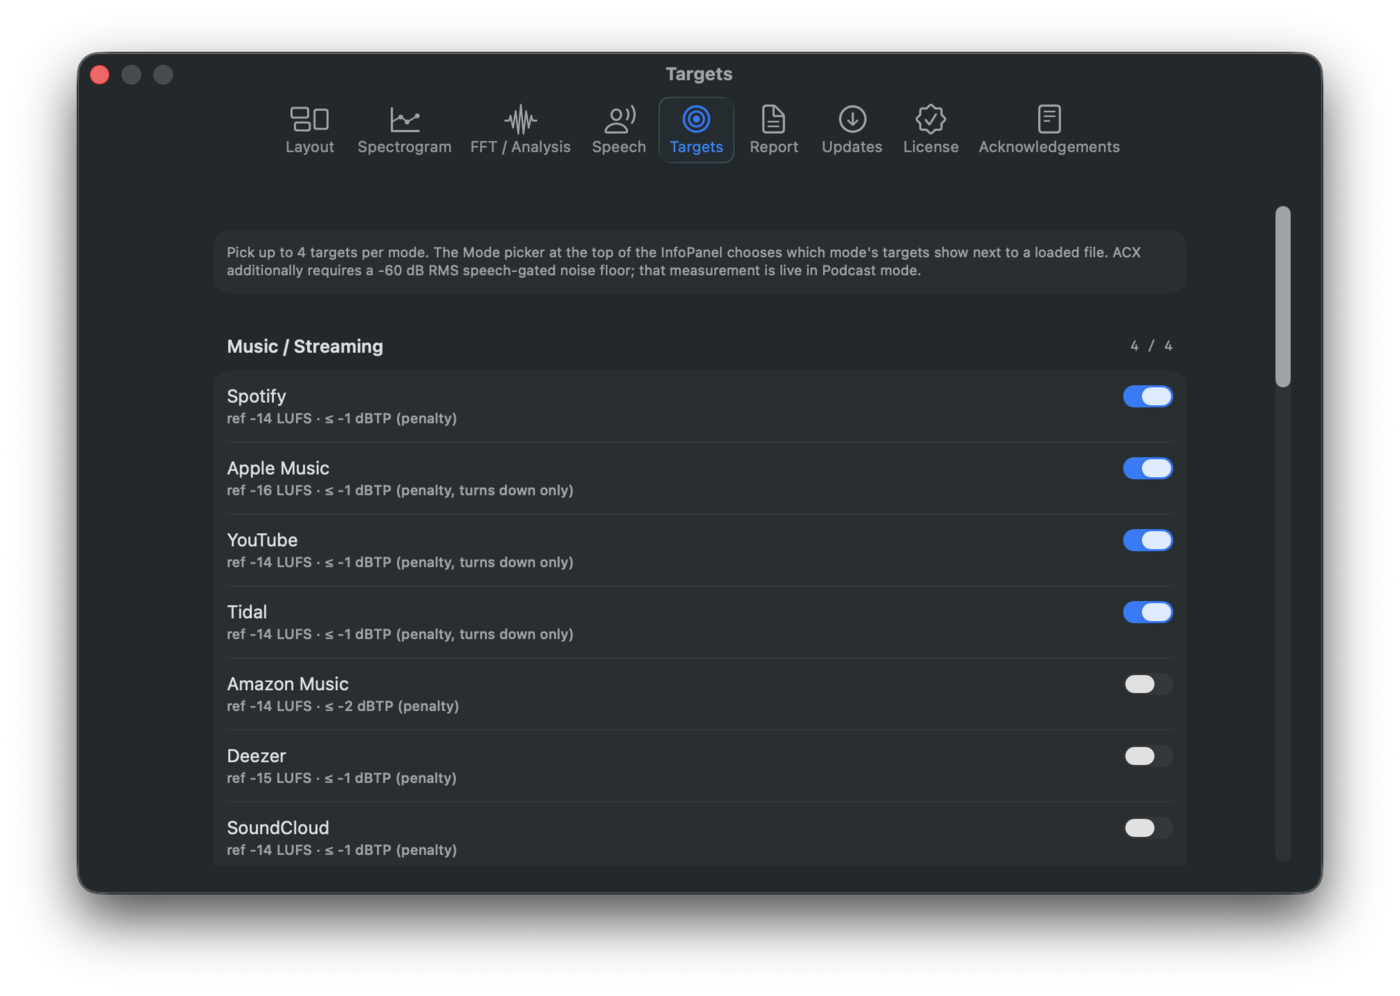
Settings → Targets is a per-mode catalog editor - four sections, one per mode, each with its target toggles. Use it to decide which targets show up next to a loaded file when that mode is active.
Loudness targets
When integrated LUFS is finite, Specula shows the Loudness Targets panel: one row per selected target with the verdict for the active mode. Pick the mode and up to four targets per mode in Settings → Targets.
| Mode | Treatment | Source |
|---|---|---|
| Music / Streaming | Penalty: shows the gain the platform will apply (e.g. Spotify −4 dB) | Integrated LUFS |
| Podcast / Spoken Word | Penalty for streaming podcast targets; compliance for ACX | Dialog-gated (streaming) / RMS (ACX) |
| VOD | Compliance: green dot or FAIL L / FAIL TP against the dialog-gated band | Dialog-gated LUFS |
| Broadcast | Compliance against the integrated band and the true-peak ceiling | Integrated LUFS |
Music targets report the gain the platform will apply rather than a hard verdict. A mix at −10 LUFS reads "Spotify −4 dB" (the platform will turn it down 4 dB to hit its −14 LUFS reference). A quiet mix at −18 LUFS reads "+4 dB" on symmetric platforms, "as-is" on asymmetric ones (see below). The dot is green when the gain is within ±1.5 dB of zero, yellow within ±4 dB, orange beyond. A separate triangle warns when the true peak breaches the platform's ceiling.
VOD and broadcast targets are hard pass/fail. The dot is green when the loudness sits within the tolerance band AND the true peak is at or below the ceiling. FAIL L means the loudness is outside the band; FAIL TP means the loudness is in band but the true peak is over the ceiling; FAIL S↑ means the maximum short-term loudness exceeded the spec's short-term ceiling (used by EBU R128 S1); FAIL NF means the noise floor exceeded the spec's RMS ceiling (used by ACX). Loudness fails take precedence; the loudness reason is reported first even when several criteria are off.
Dialog-gated targets (Netflix and peers, streaming podcasts, ATSC A/85) evaluate against speech-gated LUFS. Files with no detected speech show "no speech" rather than a misleading verdict. Target reference lines lead with dialog · whenever a target reads from the speech-gated path, so you can scan the measurement source without parsing LUFS-vs-LKFS unit suffixes.
ACX noise floor. Specula measures the dB RMS across all VAD-classified non-speech samples and shows it in the Speech-Gated section of the Info panel. ACX rejects audiobooks above −60 dB RMS, so the reading turns red when it exceeds that. The ACX preset in the loudness-targets panel automatically picks up the measurement and shows FAIL NF when the noise floor breaches the ceiling. Files with no non-speech samples show −∞. The noise floor is undefined in that case and the criterion passes trivially.
Verdict in JSON / PDF / HTML exports
Each row in the Loudness Targets panel maps to a verdict object on the corresponding target in the JSON export, so downstream scripts can branch on pass / fail without recomputing against the target spec. The PDF and HTML reports render the same verdict as the status badge above each target card.
| Field | Type | When populated |
|---|---|---|
status | compliant · penalty · notCompliant · unavailable | Always. |
actualLUFS | number | The integrated or dialog-gated reading the verdict was computed against. |
penaltyGainDB | number | Streaming-platform targets (Music + streaming Podcast). |
penaltyApplies | boolean | Streaming-platform targets. False for "as-is" on asymmetric platforms. |
truePeakClean | boolean | Streaming-platform targets. False when the master's true peak breaches the platform's ceiling. |
nonComplianceReason | loudness · truePeak · shortTerm · noiseFloor | Hard-spec targets (VOD / Broadcast / ACX) when status is notCompliant. |
nonComplianceActual | number | The actual reading on the failing criterion. |
nonComplianceLimit | number | The ceiling or band edge the failing criterion exceeded. |
JSON consumers that ignore the field keep working. Useful for batch QC scripts, CI gates on render farms, and Shortcuts workflows that branch on whether a master will pass a given platform without re-running the math.
Dialog-gated vs integrated measurement
Different specs measure loudness differently and Specula computes both in parallel so the right one feeds each target.
- Integrated LUFS is the full-program measurement (ITU-R BS.1770 with K-weighting and two-stage gating). Used by music streaming, EBU R128, ARIB TR-B32, OP-59, and anything labelled simply "LUFS". ACX is the exception: it specifies plain RMS (dBFS), not LUFS, so the ACX target evaluates the file's RMS, not its integrated LUFS.
- Dialog-gated LKFS is the same BS.1770 algorithm applied only to the portions of the file containing speech, classified by the Silero neural VAD on file load. Used by Netflix and every other major VOD platform (Prime Video, Apple TV+, Disney+, Max), by streaming podcast targets, and by ATSC A/85 / the CALM Act (which the spec calls "anchor-element" measurement but is functionally dialog-gated for typical TV programming).
The Loudness section shows both values side by side. Each target row's reference line is prefixed with dialog · when the target evaluates against the dialog-gated reading. Files that contain no detected speech show the dialog-gated reading as "-" and dialog-gated target verdicts as "no speech".
Asymmetric platform normalization
Not every streaming platform applies the gain it computes. Apple Music's Sound Check, YouTube, and Tidal only turn loud tracks down; they leave quieter-than-reference tracks at their original level. So if your master sits at −18 LUFS against Apple Music's −16 reference, the platform plays it at −18, not boosted to −16. Specula reflects this:
- For asymmetric platforms (Apple Music, YouTube, Tidal) when the file is quieter than the target, the row shows "as-is" in green instead of "+X.X dB · platform gain". Same on the report PDF.
- For symmetric platforms (Spotify in its default mode, Amazon Music, Deezer, SoundCloud), the platform boosts quiet tracks peak-limited, so the gain reading is always meaningful and Specula shows the +X dB number unchanged.
Settings → Targets surfaces the behaviour in each target's subtitle ("penalty, turns down only" vs "penalty"). The match-button tooltip on each row also states which measurement source the match will use.
Match to target (non-destructive)
Each target row has a small waveform-circle toggle on the right. Press it and Specula matches playback to that target:
- Gain =
target reference − source LUFS, where source is integrated LUFS for integrated targets (most music + broadcast) or dialog-gated LUFS for dialog-gated targets (Netflix and peers, ATSC A/85, streaming podcasts). - Limiter = real-time 5 ms lookahead true-peak limiter at the target's
dBTPceiling. Reads the 4× oversampled inter-sample peak (ITU-R BS.1770 polyphase FIR), so the ceiling is enforced against the analog-reconstructed signal rather than just the raw sample magnitude. The limiter only acts when the gain would push peaks above the ceiling; below it the limiter is transparent.
Hit play and you'll hear the file the way the platform plays it. Press the toggle again (or pick another target) to release. Nothing in the loaded buffer is modified - match is purely a playback gain stage with a limiter after it.
The match follows the loudness display mode: switching Live → Offline (or back) while a match is active recomputes the gain against the new source. If a matched target is no longer in the active mode's selected targets (you switched mode, or unticked it in Settings), the match auto-disables so you can never apply gain you can no longer see the verdict for.
5 ms playback latency while match is active. Dialog-gated targets can be matched too - the gain is computed against the speech-gated reading. Targets disable with a tooltip explaining which reading is missing (typically "no detected speech" for dialog-gated targets on speech-free files).
Shipping catalog
Defaults are marked ✓.
| Mode | Target | Reference | Tolerance | True-peak ceiling |
|---|---|---|---|---|
| Music | Spotify ✓ | −14 LUFS | penalty (symmetric) | −1 dBTP |
| Music | Apple Music ✓ | −16 LUFS | penalty (turns down only) | −1 dBTP |
| Music | YouTube ✓ | −14 LUFS | penalty (turns down only) | −1 dBTP |
| Music | Tidal ✓ | −14 LUFS | penalty (turns down only) | −1 dBTP |
| Music | Amazon Music | −14 LUFS | penalty (symmetric) | −2 dBTP |
| Music | Deezer | −15 LUFS | penalty (symmetric) | −1 dBTP |
| Music | SoundCloud | −14 LUFS | penalty (symmetric) | −1 dBTP |
| Music | AES TD1008 (streaming) | −18 LUFS | penalty (symmetric, vendor-neutral) | −1 dBTP |
| Podcast | Apple Podcasts ✓ | −16 LKFS dialog-gated | penalty | −1 dBTP |
| Podcast | Spotify (Podcast) ✓ | −14 LKFS dialog-gated | penalty | −1 dBTP |
| Podcast | ACX (Audiobook) | −20.5 dB RMS | ±2.5 dB | −3 dBTP (plus noise floor) |
| VOD | Netflix ✓ | −27 LKFS dialog-gated | ±2 LU | −2 dBTP |
| VOD | Prime Video ✓ | −27 LKFS dialog-gated | ±2 LU | −2 dBTP |
| VOD | Apple TV+ ✓ | −27 LKFS dialog-gated | ±2 LU | −2 dBTP |
| VOD | Disney+ | −27 LKFS dialog-gated | ±2 LU | −2 dBTP |
| VOD | Max ✓ | −27 LKFS dialog-gated | ±2 LU | −2 dBTP |
| Broadcast | EBU R128 (EU) ✓ | −23 LUFS | ±0.5 LU | −1 dBTP |
| Broadcast | EBU R128 (EU, live) | −23 LUFS | ±1 LU | −1 dBTP |
| Broadcast | EBU R128 S1 (EU, short-form) | −23 LUFS | ±0.2 LU + Max Short-term ≤ −18 LUFS | −1 dBTP |
| Broadcast | ATSC A/85 (CALM Act) ✓ | −24 LKFS dialog-gated | ±2 LU | −2 dBTP |
| Broadcast | ARIB TR-B32 (Japan) | −24 LUFS | ±1 LU | −1 dBTP |
| Broadcast | OP-59 (Australia) | −24 LUFS | ±1 LU | −1 dBTP |
Normalize to target (destructive)
Where Match previews a target by ear, Normalize commits to it. Integrated targets (music streaming, broadcast) and dialog-gated targets (VOD, streaming podcasts) carry a second button on the row, the up-to-line icon next to the Match toggle. Press it and Specula opens Edit mode with the Normalize section pre-filled to that target, then click Apply to normalize the loaded buffer.
The Normalize panel states its Basis so you always know which loudness is being targeted, and shows the move before you commit:
- Basis is Integrated (LUFS) for music and broadcast targets, or Dialog-gated (LKFS) for VOD and podcast targets. It names the measurement the target is scored against, which is the one Normalize lands on the reference.
- Now / Target / Gain spell out the current reading, the platform reference, and the gain that will be applied. The whole file is shifted by that uniform gain; "dialog-gated" describes how the gain is chosen (so the speech-gated loudness hits the target), not that only the dialogue is touched.
- Ceiling is the only editable field: the
dBTPtrue-peak limiter ceiling, pre-filled to the target's.
This is a normal edit: it lands on the 16-level undo stack, and exporting writes a new file rather than overwriting the source. Integrated targets re-measure and iterate to the reference; dialog-gated targets apply the uniform gain that lands the speech-gated reading on the reference. Both finish with the same two-pass true-peak limiter at the ceiling.
The ACX RMS target is the one exception: it stays compliance-only with no Normalize button. ACX is a hard delivery spec whose noise-floor requirement a gain can't satisfy (raising RMS into the window raises the noise floor with it), so normalizing its level alone could read as "now compliant" when it isn't. The button is also disabled (with a tooltip) until a loudness reading is available, and unavailable in multi-file Compare, since Edit and Compare are mutually exclusive.
Normalize is the destructive counterpart to Match: Match is a live playback gain you can release at any time, Normalize bakes the gain into a new file. Both target the same basis the row is scored against and share the same true-peak limiter math; the difference is whether the loaded buffer is rewritten.
Limit TP to target (destructive)
Where Normalize fixes a loudness miss (FAIL L), Limit TP fixes a true-peak overage (FAIL TP). When the file's true peak sits above a target's ceiling, that row shows a Limit TP button (the waveform-pulse icon) alongside Normalize. Press it and Specula opens Edit mode with the Limit TP section pre-filled to that target's ceiling; click Apply to cap the inter-sample peaks. Loudness is left untouched, so this is the right fix when the level is already where you want it and only the peaks breach the ceiling, the one-click counterpart to the FAIL L → Normalize button.
The button is contextual: it appears only when there's a true peak over the ceiling to fix. That covers a hard FAIL TP (loudness in band, peak over), a loudness-compliant row carrying the orange over-ceiling triangle, and a music target whose peaks still clip its ceiling. It's offered on any target type, ACX included, because every target carries a true-peak ceiling and capping peaks never raises the noise floor (unlike Normalize). FAIL S↑ and FAIL NF get no fix button, since no peak limit corrects a short-term or noise-floor miss. Like Normalize, it lands on the undo stack, saves as a new file, and is unavailable in multi-file Compare.
6. Speech-gated loudness #
Specula uses a two-tier voice activity detection pipeline to compute integrated loudness over speech-only blocks. This matters for podcast / dialog / film mixing where you want to ignore room tone, music beds, and silence.
Tier 1 - Silero neural VAD
Runs the Silero VAD model via FluidAudio. On file load, the entire file is downsampled to 16 kHz mono and classified. The resulting per-100 ms speech / non-speech history feeds the loudness measurement. Selection analysis re-runs Silero on just the selection.
Tier 2 - Spectral fallback
Used when Silero is unavailable (it fails to load or returns an error). Four spectral features:
- HF gate - if HF energy > 0.35 × total → non-speech (rejects plosives and cymbals).
- Band Energy Ratio (300-3 400 Hz) - threshold 0.45.
- Spectral Flatness Measure (dB) - threshold −8 dB.
- Harmonicity + Spectral Flux - voiced when the 2nd and 3rd harmonics of the dominant 80-400 Hz bin carry ≥ 20% of the fundamental's energy.
Output
- Speech-gated Integrated LUFS (SG-I) - same dual gating as full integrated, but only accumulates VAD-classified speech blocks. Threshold reference shown in sidebar is −27 LUFS (Netflix dialog target).
- Speech % - fraction of the file (or selection) classified as speech.
-is shown for content with < 0.5 % speech. - Noise Floor - dB RMS over every VAD-classified non-speech sample. Live during playback; offline value populates after analysis. Turns red above the ACX ceiling of −60 dB RMS, a common audiobook rejection reason. Files with no non-speech blocks read
−∞.
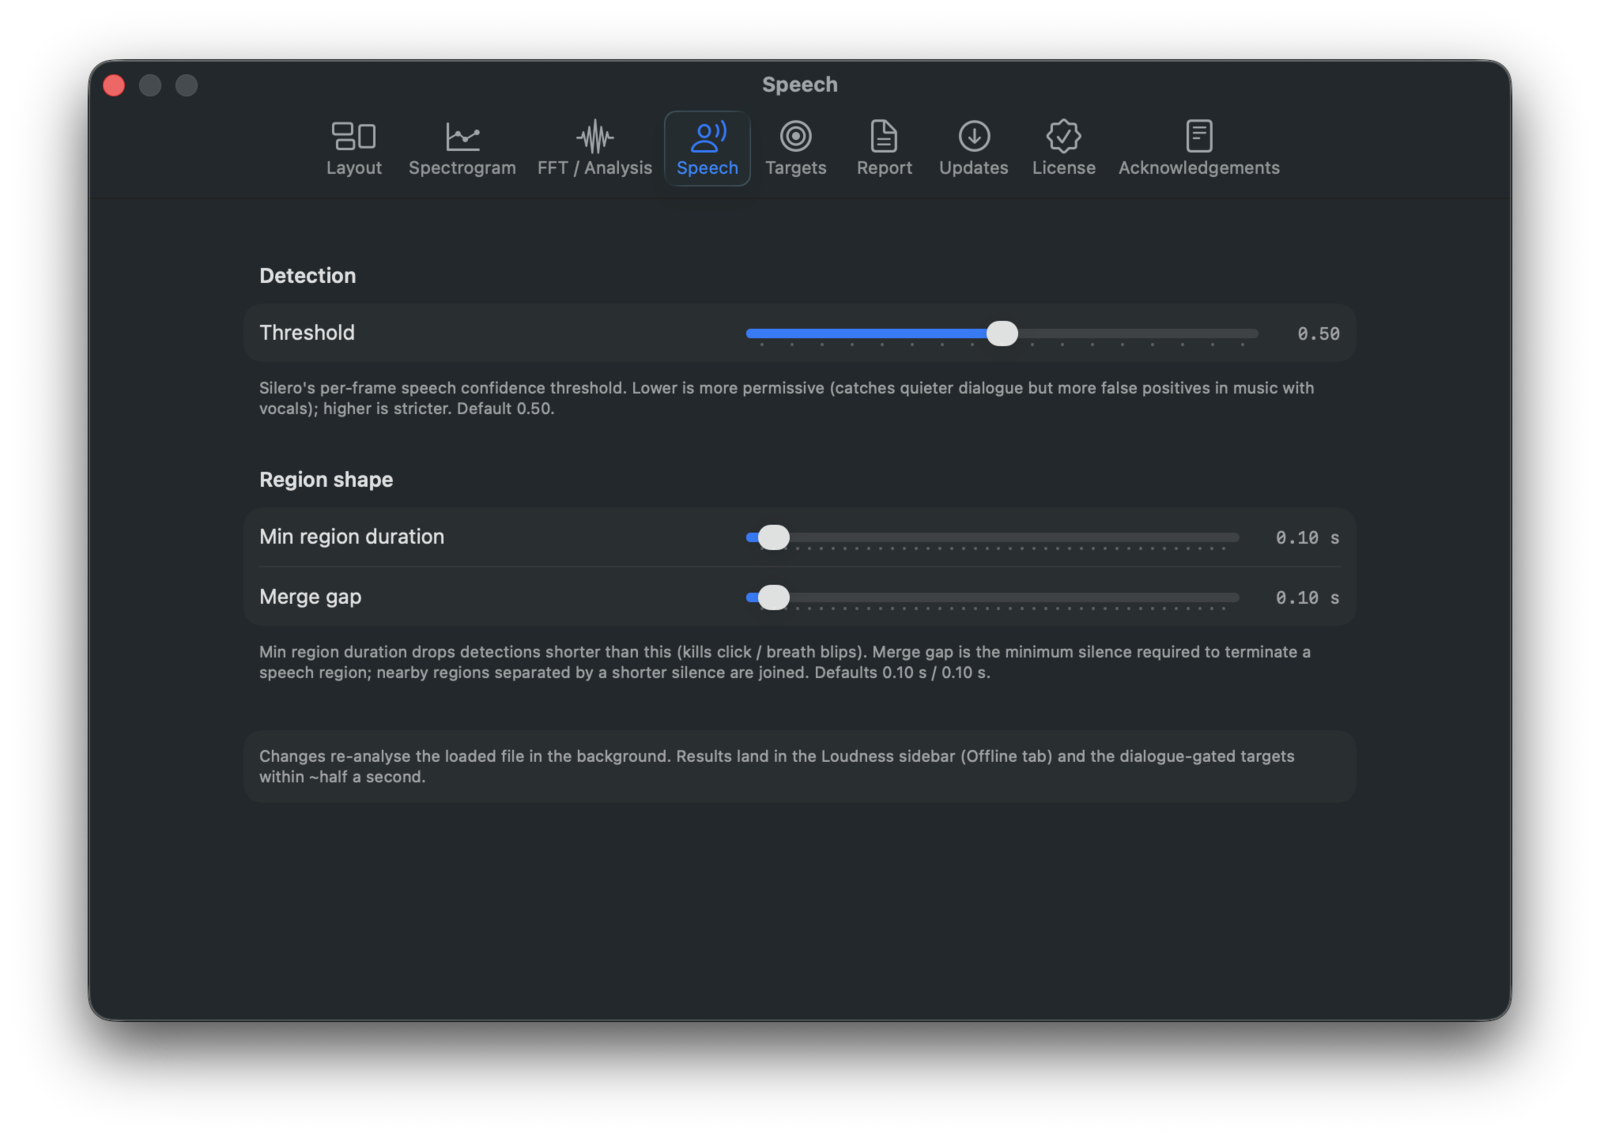
Tuning the VAD (Settings → Speech)
Three sliders bias the detector for the content you work with. Edits trigger a re-analysis in roughly half a second, and the new history feeds straight back into the loudness measurement.
- Threshold (0.1 - 0.9, default 0.5) - confidence below which a frame is classified as non-speech. Lower picks up quieter speech; higher rejects more non-speech.
- Minimum region duration (0.05 - 2.0 s, default 0.10) - shorter detections are dropped. Raise to reject clicks and very short interjections.
- Merge gap (0.05 - 2.0 s, default 0.10) - minimum silence between two regions before they're kept separate. Larger values fuse nearby regions through breath pauses.
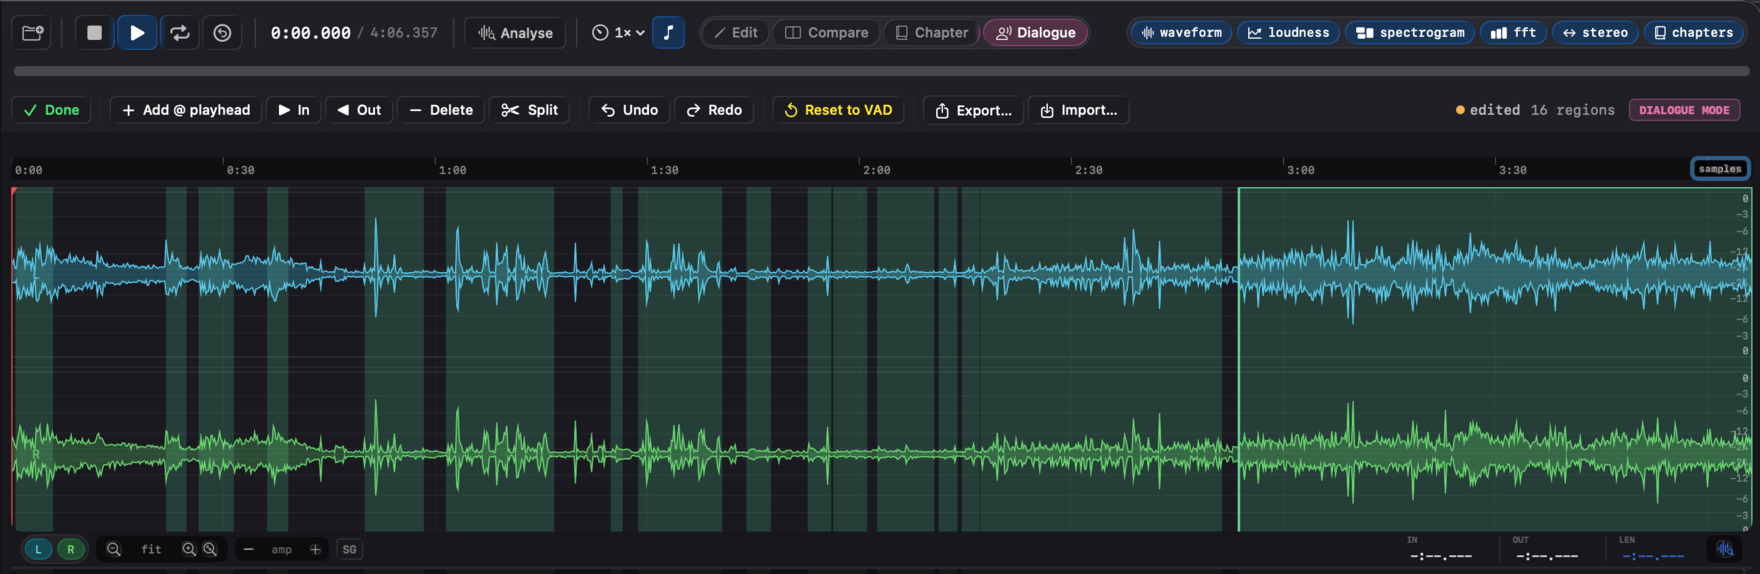
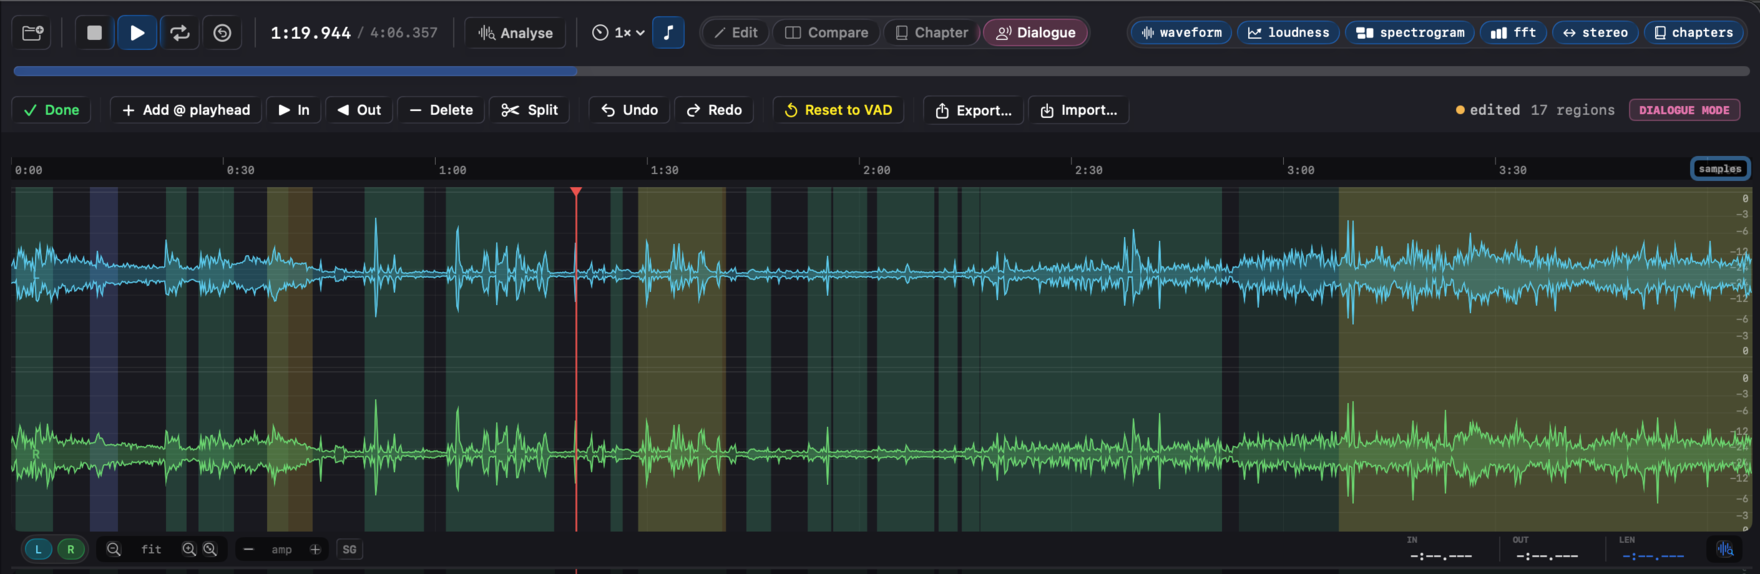
Dialogue mode (manual region authoring)
For programme material where the VAD's false positives or misses matter, ⌘4 (or the Dialogue button on the transport bar) enters Dialogue authoring mode - one of the four modal authoring modes (Edit, Compare, Chapter, Dialogue) the app exposes, mutually exclusive with the other three. Every detected region is visible on the waveform while the mode is active (the SG overlay is forced on so you don't need to discover the toggle).
Region painting on the waveform:
- Drag a region's body to move it.
- Drag a region's left or right edge to resize it. The cursor turns into a resize / move icon when you're over a draggable area.
- Click a region to select it without moving it.
Toolbar:
- Add region - promotes the current waveform selection, or drops a 1 s region at the playhead when there is no selection.
- In / Out (I / O) - two workflows. With no region selected, I anchors an in-point at the playhead (the toolbar shows "In @ X.XXs" and a dashed amber line appears on the waveform), then O finalises the region from the anchor to the new playhead. With a region selected, I sets its start and O sets its end.
- Delete (Delete) - removes the selected region.
- Split (S) - cuts the selected region at the playhead, producing two adjacent regions you can fine-tune independently.
- Undo / Redo (⌘Z / ⇧⌘Z) - a 50-step in-memory history of region edits. Drag operations count as one undo entry each.
- Reset to VAD - discards your edits, deletes the on-disk sidecar, re-runs Silero with the current tuning.
- Export… / Import… - save the current regions to a JSON sidecar, or load one from anywhere.
Settings → Speech slider edits always re-run detection. If you have manual edits when you move a slider, they're pushed onto the undo stack first so you can ⌘Z back to them.
While Dialogue mode is active, each region's waveform tint tells you where it came from:
- Green - pristine Silero output, no edits.
- Amber - a VAD region you've moved or resized. A subtle ghost of the original VAD bounds draws behind it so you can see how far the edit drifted.
- Blue - a hand-painted region (added from selection, from the playhead, or via the In / Out workflow).
Edited regions are auto-saved to <audio>.dlg.json next to the audio file (debounced 500 ms after the last edit). Sidecar files round-trip cleanly: re-opening the same audio re-applies your edits, and the schema is versioned (currently v1) so future format changes won't silently corrupt old work.
Acting on the regions: Level Dialogue
The regions aren't only a measurement input. Once they're right, switch to Edit mode (⌘1) and use Level Dialogue to act on them. It ducks the room tone in the non-speech regions (a downward expander with a fast attack and slow release, so word onsets and tails stay clean) and can optionally lift the dialogue to a target in the same pass. Gating the silence before applying the makeup gain is what lets dialogue normalize without the noise floor riding up with it, the fix for a common ACX rejection. When you lift to a target you also set a true-peak ceiling, and the makeup boost is capped there by the same limiter Normalize uses. It's a gate, not a denoiser, so it helps a marginal room tone rather than a hissy recording.
7. Loudness curve #
A dedicated section that plots per-100 ms momentary and short-term LUFS over time, with the time axis aligned to the waveform's. Toggle with ⌃2.
- Momentary curve - fast-responding, shows transient loudness peaks.
- Short-term curve - slower, shows where the perceived loudness sits.
After offline selection analysis, the Loudness Curve view fills in for the analysed range; live playback adds new samples as they're measured.
The exported JSON and PDF reports plot three traces: Momentary (yellow), Short-term (blue), and a running Integrated trace (green) that converges to the file's final integrated reading at the tail. The third trace is the easiest way to see how a master "settled" against its target during the run.
8. Loudness violations #
Set programme-loudness thresholds and watch the waveform highlight every block that exceeds them. In the Loudness Curve / control strip:
- M threshold - momentary LUFS limit.
- S threshold - short-term LUFS limit.
- TP threshold - true peak limit.
Any 100 ms block above its threshold is highlighted on the waveform in real time during playback and after offline selection analysis. Useful for spotting the exact moment a master clips a streaming target.
The Violations toggle in Settings → Report controls whether they're included in JSON / PDF exports.
9. FFT spectrum #
Real-time logarithmic-frequency spectrum from 20 Hz - 20 kHz. Toggle with ⌃4.

Window function
Five windows, switchable from Settings → FFT / Analysis:
| Window | Side-lobe rejection | Best for |
|---|---|---|
| Hann | −31 dB | General purpose. Good balance. |
| Hamming | (slightly higher) | Slightly narrower main lobe than Hann; higher far side-lobes. |
| Blackman | −58 dB | Excellent side-lobe rejection. Slightly wider main lobe. |
| Blackman-Harris | −92 dB | Best side-lobe rejection. Widest main lobe. Closely-spaced harmonics. |
| Flat Top | (very wide main lobe) | Most accurate amplitude reading. Calibration & level measurement. |
Note names (NOTES toggle)
Hover anywhere on the spectrum and the cursor reads out frequency in Hz, magnitude in dB, and the closest musical note + cents deviation. Toggle on/off via the NOTES button in the FFT control strip.
Frequency selection - live BAND / NOTCH filter
⌘-drag horizontally on the spectrum to capture a frequency range. The selection is an active playback filter, not a measurement readout - playback is routed through it so you can hear what's inside or outside the band.
A BAND / NOTCH toggle in the FFT control strip switches the filter mode:
- BAND (band-pass) - only the selected range passes. Everything outside the band is silenced. Solo a range to hear what's there: "is that 4 kHz buzz a sibilance issue or a ground loop?"
- NOTCH (band-reject) - the selected range is cut from playback. Confirm you've identified the offending frequency before reaching for an EQ.
The filter is live - adjust the selection edges and the audio responds in real time. Drag the body of the selection to slide the band across the spectrum while keeping its width.
Stereo files use a highpass + lowpass pair for BAND and a parametric −40 dB cut for NOTCH; multichannel files apply the same filtering per channel.
Esc clears the selection and bypasses the filter.
Smoothing
The FFT control strip exposes a smoothing slider - exponential averaging across frames. Higher values produce a calmer trace; lower values respond faster.
Channel selection
Pick which channel feeds the FFT (or use a downmix). Useful for inspecting one channel of a multichannel file in isolation.
Selection-analysis spectrum
After ⌘Return offline analysis, the FFT view switches to the averaged spectrum of the selection - a much smoother, more accurate read than the rolling live spectrum. Clearing the selection (Esc) returns to live mode.
Spectrum under the playhead (paused)
While playback is stopped, clicking anywhere on the waveform or spectrogram recomputes the FFT for that position and updates the spectrum view to match. The FFT window ends at the cursor, so the spectrum you see lines up with the spectrogram column under the playhead. Useful for inspecting a specific moment without scrubbing: click, read, click again, read. Works for keyboard skips too (←, →, ⇧←, ⇧→).
10. Spectrogram #
Rolling time-frequency display. Toggle with ⌃3. All settings live in Settings → Spectrogram.

Colormap (4 options)
- Inferno - high contrast, dark background, warm highlights.
- Turbo - perceptually uniform, full rainbow.
- Plasma - purple → magenta → yellow.
- Viridis - perceptually uniform, blue → green → yellow.
Frequency scale
- Log (Logarithmic) - emphasises low frequencies; matches musical perception.
- Mel - compresses high frequencies; gives more resolution in the vocal range (~200 Hz - 4 kHz). Useful for podcast / dialogue / vocal work.
dB range
Two sliders set the colour-mapping window:
- Floor - −120 to −24 dB (default ~−96 dB).
- Ceiling - −18 to 0 dB (default 0 dB).
Anything quieter than the floor is mapped to the bottom colour; anything louder than the ceiling clips to the top colour. Tighten the window to highlight subtle detail; widen it to see the full dynamic range.
Time resolution (FFT overlap)
Each spectrogram column is one FFT. Overlap controls how often that FFT is recomputed per second, which sets the time-axis density. Higher overlap means columns are closer together: less blocky at high zoom, smoother gradients in time.
| Overlap | Hop (fftSize=4096, 48 kHz) | Columns/sec |
|---|---|---|
| 75% (default) | 21.3 ms | ~47 |
| 87.5% | 10.7 ms | ~94 |
| 93.75% | 5.3 ms | ~188 |
| 96.875% | 2.7 ms | ~375 |
| 98.4375% | 1.3 ms | ~750 |
96.875% and 98.4375% can substantially lengthen the offline Analyse pass at large FFT sizes (16k or 32k), since the column count scales with the overlap factor. Use them when you need maximum smoothness; 75% is the standard pro-audio default.
Live vs Offline
The spectrogram follows the same [Live] [Offline] toggle the loudness section uses.
- Live shows the rolling spectrogram built incrementally from the audio tap as the file plays. Limited to the in-memory column ring (~1800 columns).
- Offline shows the whole-file or whole-selection spectrogram. With Auto-compute spectrogram on load enabled in Settings → Spectrogram → Performance, the whole-file pass runs automatically during the load-time analysis pass; otherwise, run ⌘Return on a selection to populate it. Persists across playback and seeks.
The two stores are independent: live playback never overwrites the offline analysis, and Analyse never disturbs the live history.
Auto-compute on load (opt-in)
Settings → Spectrogram → Performance → Auto-compute spectrogram on load. Off by default. When on, the whole-file spectrogram is built during the load-time background pass instead of waiting for ⌘Return on a selection. Sub-second for typical music tracks; the cost scales with file length, so long-form audio takes proportionally longer.
The setting is independent of the FFT spectrum view, which still requires a selection because its averaging is selection-scoped. Turn it on for sessions that mainly work with shorter material (stereo mixes, single tracks) and want the spectrogram immediately on load; leave it off for long-form audio when you'd rather pick a region with ⌘Return.
Channel selection
Pick a single channel or a downmix. The spectrogram persists per-slot in compare mode, so switching slots restores that slot's spectrogram history (both live and offline).
Settings persistence
Colormap, frequency scale, dB Floor, dB Ceiling, and FFT overlap all persist across launches. Tune the view once and Specula remembers.
11. M/S stereo width #
Computes the Pearson correlation between the mid and side signals over rolling windows. Toggle with ⌃5.

Display modes
The control strip has a Correlation / Width % toggle:
- Correlation range −1 to +1
- +1.0 - fully mono (L = R).
- 0.0 - uncorrelated (independent L/R, e.g. natural stereo image).
- −1.0 - out of phase (L = −R) - destructive when summed to mono.
- Width % range 0-100 %, computed as
(1 − corr) / 2 × 100. 0 % = mono, 50 % = decorrelated, 100 % = out of phase.
Zone colour mode
Optional shading of the correlation curve:
- Mono (red-tint) - correlation > 0.85.
- Narrow (warm) - 0.5 to 0.85.
- Stereo (neutral) - 0 to 0.5.
- Wide (cool) - −0.5 to 0.
- Out-of-phase (red) - < −0.5.
Hover interpretation
Mouse over any point on the curve to see a plain-English label ("narrow stereo image", "natural stereo", "potential mono sum issue", etc.) plus the raw correlation value.
12. Phase scope #
Lissajous correlation meter - plots L on the X axis and R on the Y axis as a 2D scatter. Useful for catching out-of-phase content at a glance.
- A diagonal line from bottom-left to top-right → fully mono, in-phase.
- A circle / ellipse → genuinely stereo.
- A diagonal line from top-left to bottom-right → out of phase (destructive).
- A horizontal or vertical line → one channel is silent.
Hidden by default in the FFT panel area; can be enabled via Layout settings or a panel toggle.
13. RMS level meters #
Per-channel vertical bars in the Channels sidebar. Each bar shows:
- Continuous RMS level.
- Peak hold (decays slowly).
- Colour-coded zones - green / yellow / red as level approaches 0 dBFS.
Click a channel label to toggle mute on that channel for playback. The meter still shows the muted-source level - useful for inspecting muted channels.
14. Channel routing & monitor mode #
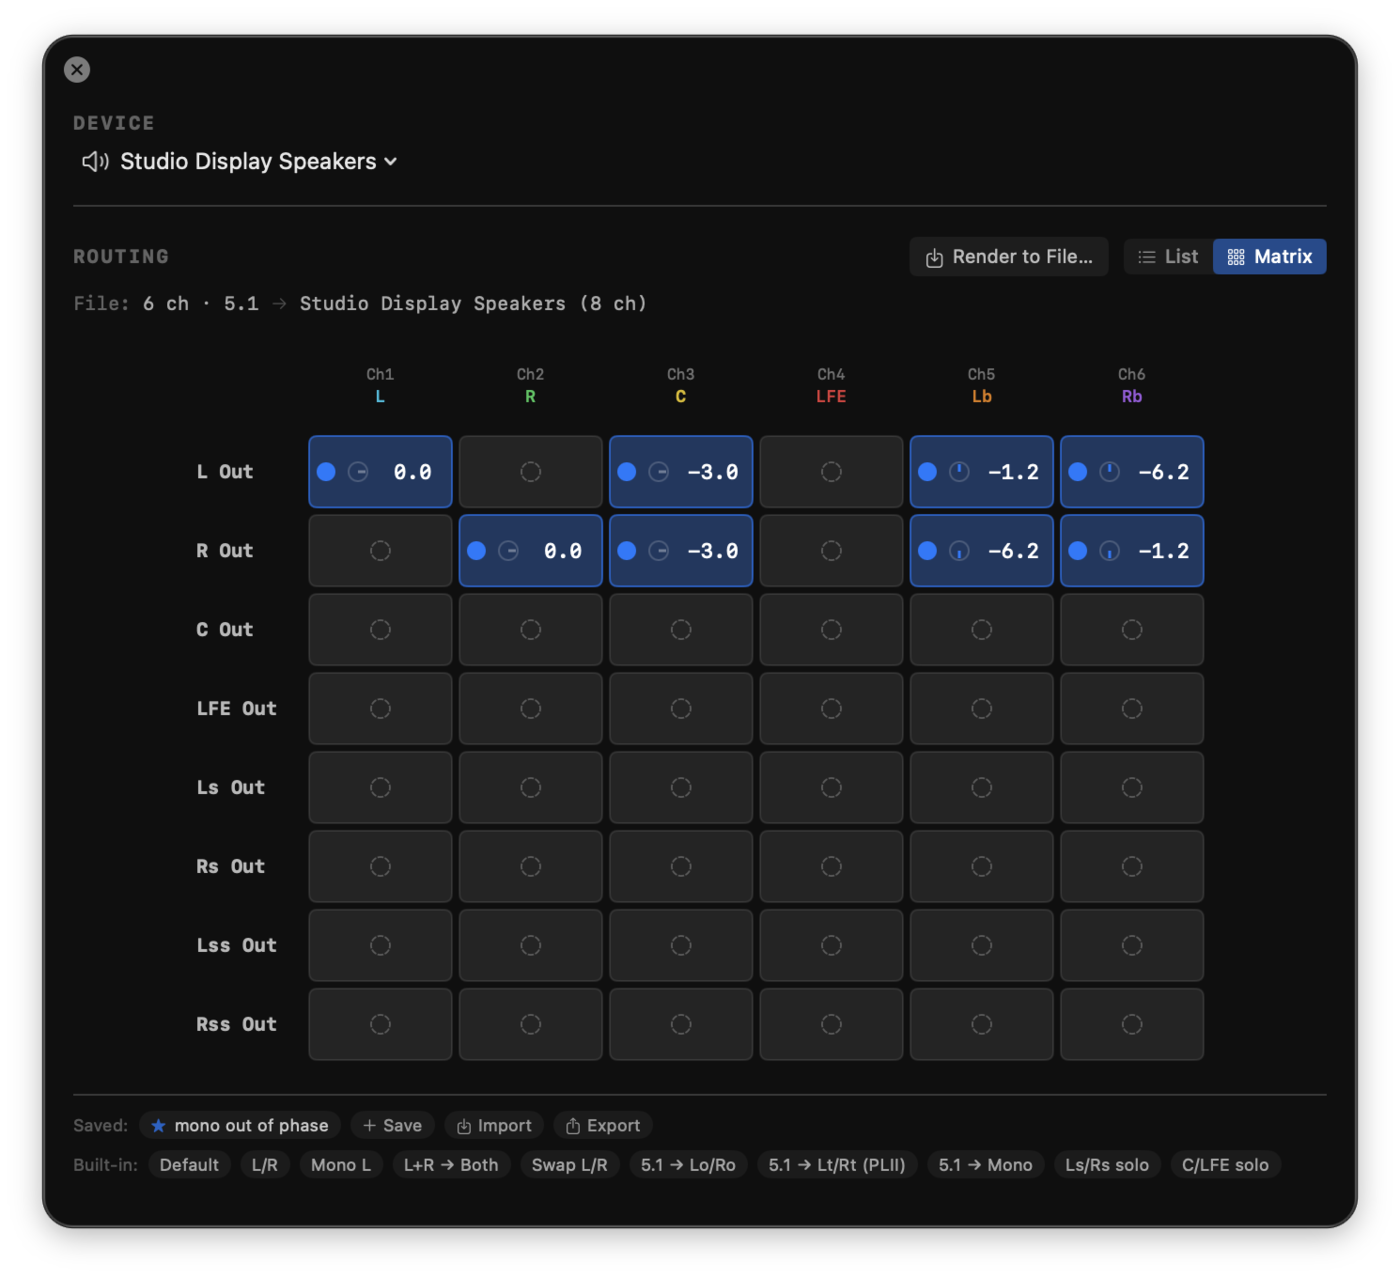
The Routing panel lives in the dedicated Output window (Window → Output Panel, ⌥⌘O, or click the Output pill in the Transport bar). It is an N → M matrix that maps each input/source channel to one or more output channels with per-route gain trim. The Output window also holds the device selector, so the channel count the matrix targets and the device driving it are always co-located.
The window is hidden by default. Open it when you need to reroute, then close it again. Routing settings persist for the loaded file.

List view vs Matrix view
The routing section has a List / Matrix toggle. Same data, two presentations.
- List view: one row per output channel, with a source picker and a typeable dB gain field per route. Best for precise gain entry.
- Matrix view (default): patch-bay grid. Rows are device outputs, columns are source channels. Background colour shows the topology at a glance (filled accent = routed, dim gray = unrouted). Each routed cell splits into three click zones from left to right: the on/off dot disables the route in one click; the ϕ glyph flips polarity (used by Lt/Rt encoding or quick phase checks; turns orange when active); the value is the typeable gain in dB. Press Enter to commit, Esc to cancel an edit. Drag vertically over a routed value to adjust (±0.25 dB per pixel). Click an unrouted cell to enable the route at unity (0 dB). Right-click any cell for the menu equivalents. A silent row or unused source column jumps out at first glance. Cell backgrounds use Liquid Glass on macOS 26 (the same opt-out toggle the rest of the chrome respects).
Your preference persists across launches.
Mixdown preset library
A horizontally scrolling preset bar (visible in both views) applies a complete mapping in one click. Presets are filtered to the ones that apply to the current file and device channel counts.
- Default (any file/device): restores the 1:1 identity routing (source channel N to output channel N) for as many channels as both have. Use this to get back to a clean state after experimenting.
- Basic (any stereo file): L/R, Mono L, L+R to both, Swap L/R.
- 5.1 downmix (file is 6 ch): Lo/Ro (ITU-R BS.775 / Dolby stereo downmix), Lt/Rt (Pro Logic II matrix encoding: same-side surround positive at −1.2 dB, opposite-side surround inverted at −6.2 dB), 5.1 to Mono.
- 7.1 downmix (file is 8 ch): 7.1 to Lo/Ro, 7.1 to Lt/Rt (PLII, same polarity rule applied to both side and back surround pairs), 7.1 to 5.1.
- Test (file is 6 ch): Ls/Rs solo, C/LFE solo, for inspecting surround content in isolation.
Applying a preset is destructive: it overwrites the routing for every output channel, including any custom gain you set. Outputs the preset doesn't address are muted, so the preset fully replaces the routing.
Coefficients follow ITU-R BS.775-3. The −3 dB factor on summed channels is 1/sqrt(2), the equal-power gain for correlated channel summation. The Pro Logic II coefficients (−1.2 dB and −6.2 dB on surrounds, with phase inversion on the left total) match the Dolby specification.
Saved (user) presets
Above the built-in row is a Saved row for your own routings.
- Save captures whatever's currently in the routing (every output's sources, gains and polarity flags) under a name you choose. Saved presets only show when a file and device with the same channel counts are loaded.
- Import reads a Specula Routing Presets JSON file and appends any presets not already in your library (deduplicated by ID). Use this to receive setups from a collaborator.
- Export writes all your saved presets to a JSON file, ready to share.
- Right-click a saved preset for Rename, Export (just that one), or Delete.
- Saved presets persist across launches and survive future updates.
Polarity inversion
Polarity inversion is a per-source-slot flag, separate from gain. List view has a small ϕ button next to each source's gain knob; Matrix view has the dedicated ϕ click zone in every routed cell (orange glyph when active). Needed for Pro Logic II Lt/Rt encoding and useful for quick A/B phase checks across any single route.
Why it matters
A 5.1 master with the wrong channel order is a routing problem, not an EQ problem. Specula lets you reroute channels for playback without modifying the file, so you can verify L / R / C / LFE / Ls / Rs ordering against your monitor system. The preset library covers the common stereo and surround downmix workflows in one click; the matrix view makes any custom mapping obvious at a glance.
Render to File
Once a downmix, reorder, or custom matrix is right, Render to File… (in the Routing section header) renders it to a new audio file, so the routing is a deliverable, not just an audition. Every per-route gain, polarity, and Pro Logic II ±90° phase shift is applied exactly as it sounds on playback, computed offline.
Only the outputs you've actually routed are written. A 5.1 → stereo downmix on an 8-channel device renders a 2-channel file, not eight channels padded with silence (outputs with no source are dropped). The result writes as a new file (WAV, or CAF when the output channel layout can't be stored in WAV order) and never overwrites the source.
It bakes the routing only: the playback-side loudness match and the channel solo / mute are not baked, so the output is exactly what the matrix defines. To drop a channel from the bake, mute its route in the matrix (set its source to none) rather than relying on the monitor mute.
PRE / POST monitor mode
A PRE / POST toggle in the Channels sidebar header decides which signal feeds the loudness measurement:
- PRE - the raw, unrouted file. Loudness reflects what's on disk.
- POST - after routing and gain trim. Loudness reflects what's reaching your speakers.
For most workflows, PRE is what you want - the file's actual loudness. POST is useful when you've reduced channel count via the matrix (e.g. a 5.1 → stereo downmix) and need the loudness of the resulting stereo pair.
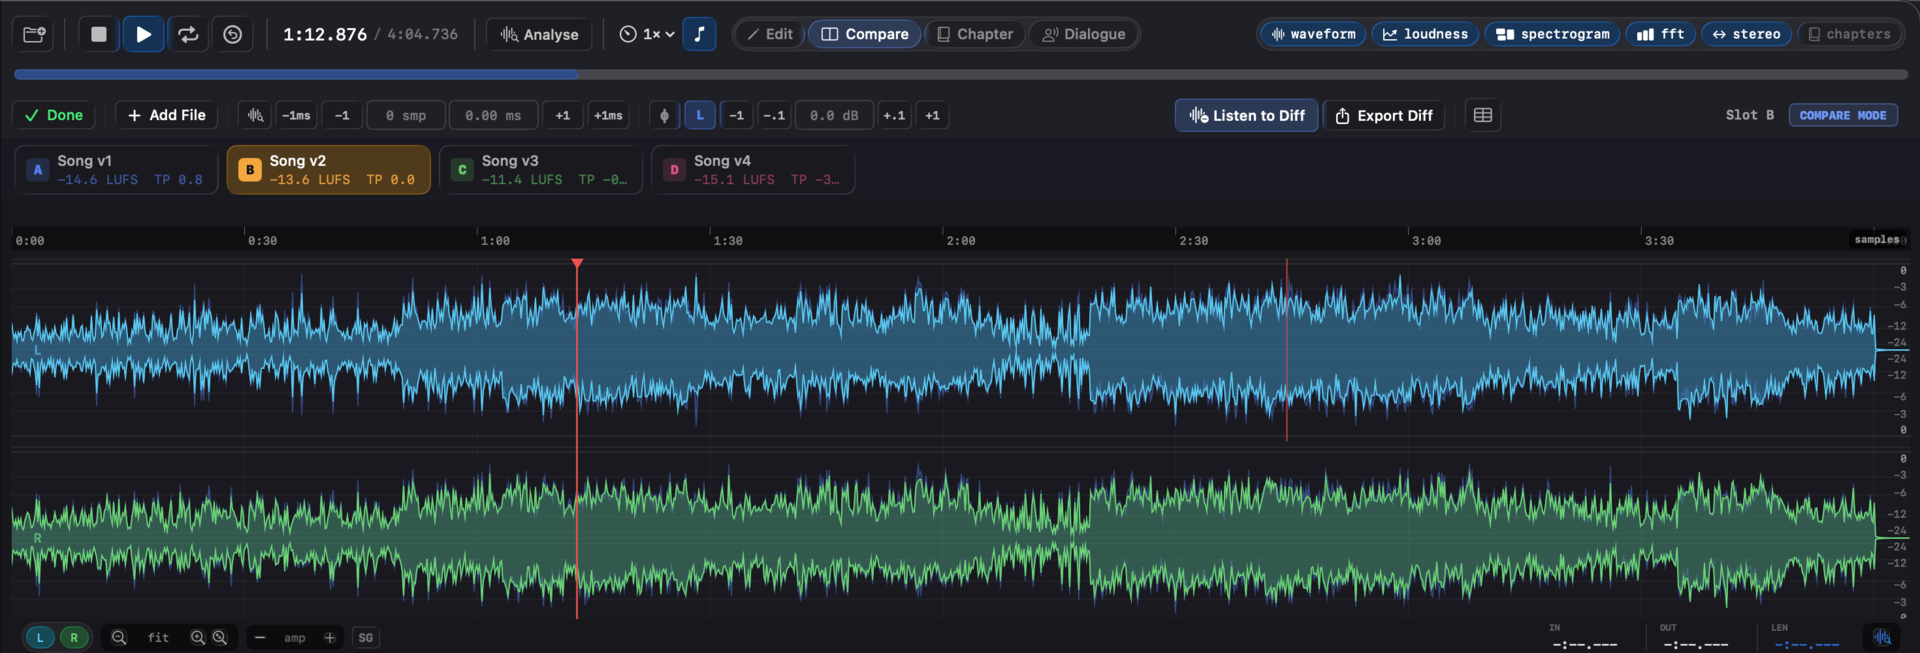
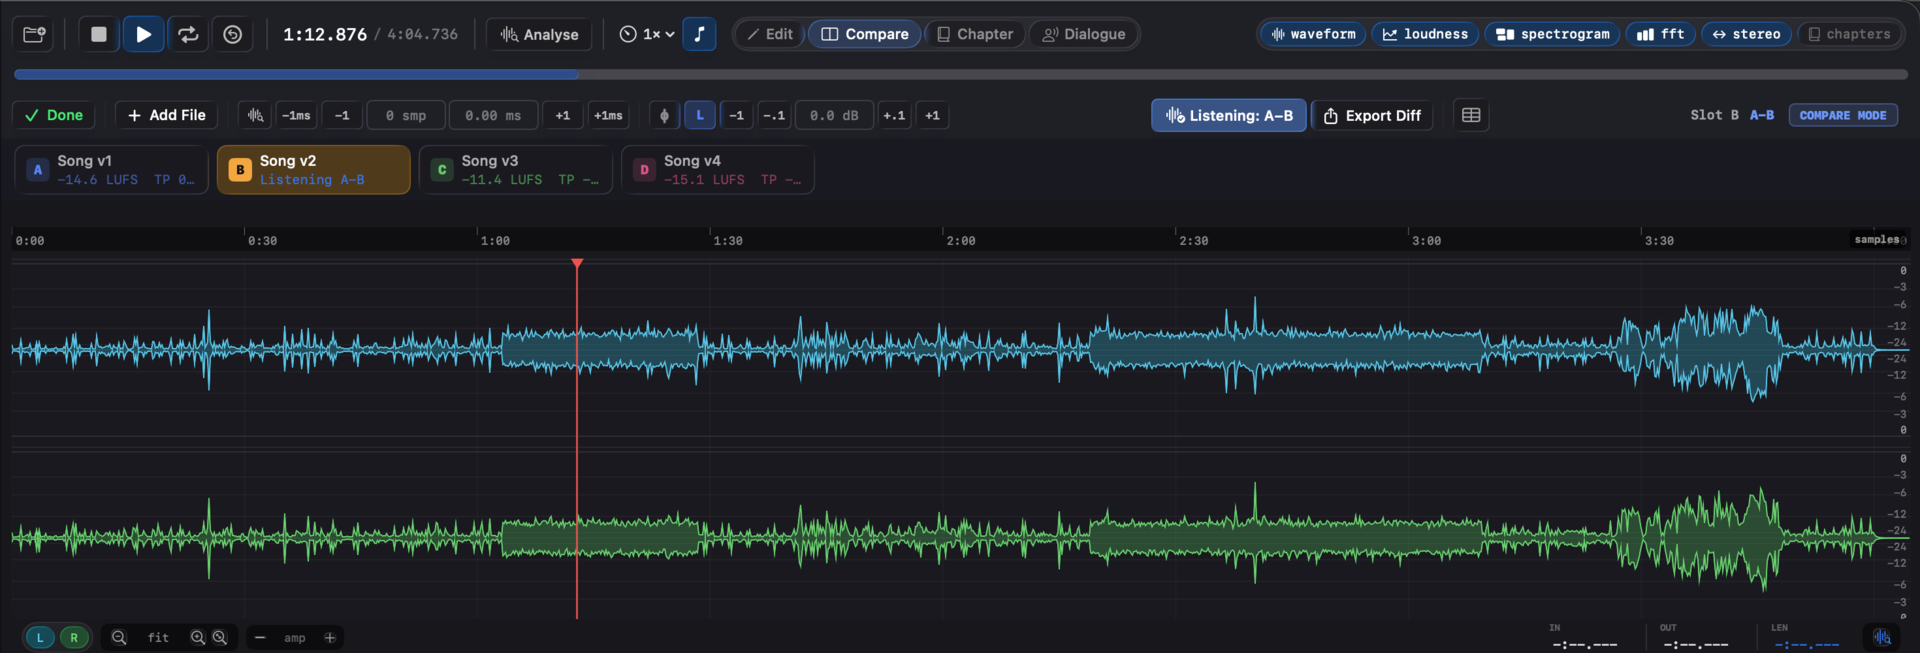
15. Compare mode #
Load up to 6 files as slots A through F, switch between them instantly, level-match them by integrated LUFS, and compute sample-accurate residuals between any two.
Compare is a toggled mode (⌘2, or the Compare button in the transport bar), one of the four mutually exclusive modes (Edit, Compare, Chapter, Dialogue) Specula exposes. The mode carries its own sky-blue accent colour and its own dedicated toolbar: the compare toolbar sits below the transport with the per-slot offset / gain / polarity controls, the diff toggle, and the metrics popover - the same shape the other three mode toolbars use, so muscle memory carries between modes.
Entering the mode
Three ways in:
- Click the Compare button in the transport bar (or press ⌘2).
- Drag a file onto the Compare toggle in the transport. The file loads as a new slot and Compare mode activates in one gesture.
- Drop multiple files into an empty window. The first becomes slot A, the rest land in slots B - F, and Compare mode auto-activates.
Compare is mutually exclusive with Edit, Chapter, and Dialogue. Entering one mode exits the others; the Compare-mode-only controls (per-slot toolbar, diff toggle, slot-switch keys) disappear when you leave the mode and reappear when you return.
Loading slots
After the first file is open, drag additional files onto the window, drop them on the Compare toggle, or use the + button on the file dock. New files load in detached background tasks; their per-file metrics (integrated LUFS, true peak, sample peak, LRA, DR, speech stats, loudness curve, stereo width curve, speech history) are computed on load.
Switching slots
| 1 - 6 | Switch to slot A - F (only slots that exist). Bare digits, no modifier. |
Slot switching uses two paths. Fast path: when the new slot's audio format matches the current one, the engine performs an atomic buffer swap. Sub-millisecond. Slow path: when sample rate or channel count differs, the engine is rebuilt. ~50-100 ms.
Reorder slots
Drag any slot chip in the file dock to a different position to reorder. The slot you drop on becomes the new home of the dragged slot, and the chip you targeted (plus everything between) shifts to make room. Dragging a slot to position A (the leftmost) promotes it to the reference file; existing residuals are invalidated at that point because they were computed against the previous A. Use this when your file came in from a Dock drop or Finder drag and Specula didn't pick the file you wanted as the primary. Finder serialises drag selections in display order, not click order, so the file you wanted as the reference may not be the one Specula picked.
Level match (L)
Each slot's chip has an L toggle. When on, Specula applies a gain offset that brings the slot's integrated LUFS to match slot A's. Hear two masters at the same loudness instead of "the louder one always wins".
Polarity invert (ϕ)
Each slot has a ϕ toggle that flips polarity. Useful for catching wiring errors and for diff workflows where flipping one signal makes the residual sit closer to zero.
Editable offset and gain
The compare toolbar's offset (samples + ms) and gain (dB) readouts are editable TextFields, not just display labels. Click into one, type the value you want, press Return to commit (or Esc to cancel). Each field has a small ↺ reset button that appears when the value is non-zero - one click returns it to zero. Right-click either field for the same Reset entry.
The ±1 sample / ±1 ms / ±0.1 dB / ±1 dB nudge buttons sit next to the fields for fine adjustments by ear, folded together with level-match into one gain stage. The transport bar's ↺ Hold play-start toggle (full description in Loading & playback → Transport) extends to compare-mode nudges: with it on, every nudge re-seeks playback to where Play was last started, so the comparison point stays fixed while you click ±1 sample / ±1 ms.
Auto-align
Click the auto-align button on any non-A slot. Specula runs decimated cross-correlation between slot A and the active slot to find the best sample offset, then applies it. Works on takes that are within ~10 seconds of each other.
Listen to Diff (per-slot)
Diff is a per-slot listening mode, not a separate slot. The active non-A slot's toolbar carries a prominent Listen to Diff toggle: press it and playback switches to the cached A − slot residual through the same waveform, spectrogram, and export paths the source uses. Press the toggle again (or pick another slot) to return to the source instantly.
Bare D (no modifier) toggles diff view on the active compare slot - a one-key A/B between source and residual that fits the muscle memory of bare-digit slot switching.
The residual:
- Recomputes automatically (80 ms debounced) when nudge / gain / polarity / level-match changes.
- Plays through the same render path the source slots use, so seek, loop, and rate controls work transparently.
- Has no live measurement - the loudness sidebar clears while you're listening to the residual; switch back to the source to read its numbers.
- Can be exported to WAV via the Export Diff button next to the toggle (enabled when a residual is cached), or with ⌃⌘E.
Waveform A overlay
The Waveform A Overlay toggle (Edit menu → "Waveform A Overlay" or in the Compare panel) draws slot A's waveform as a ghost behind whichever slot is active - direct visual A/B at the sample level.
Compare panel
The Compare metrics button (toolbar) opens a popover with a side-by-side metrics table for every loaded slot - integrated LUFS, true peak, sample peak, LRA, DR, speech stats, etc.
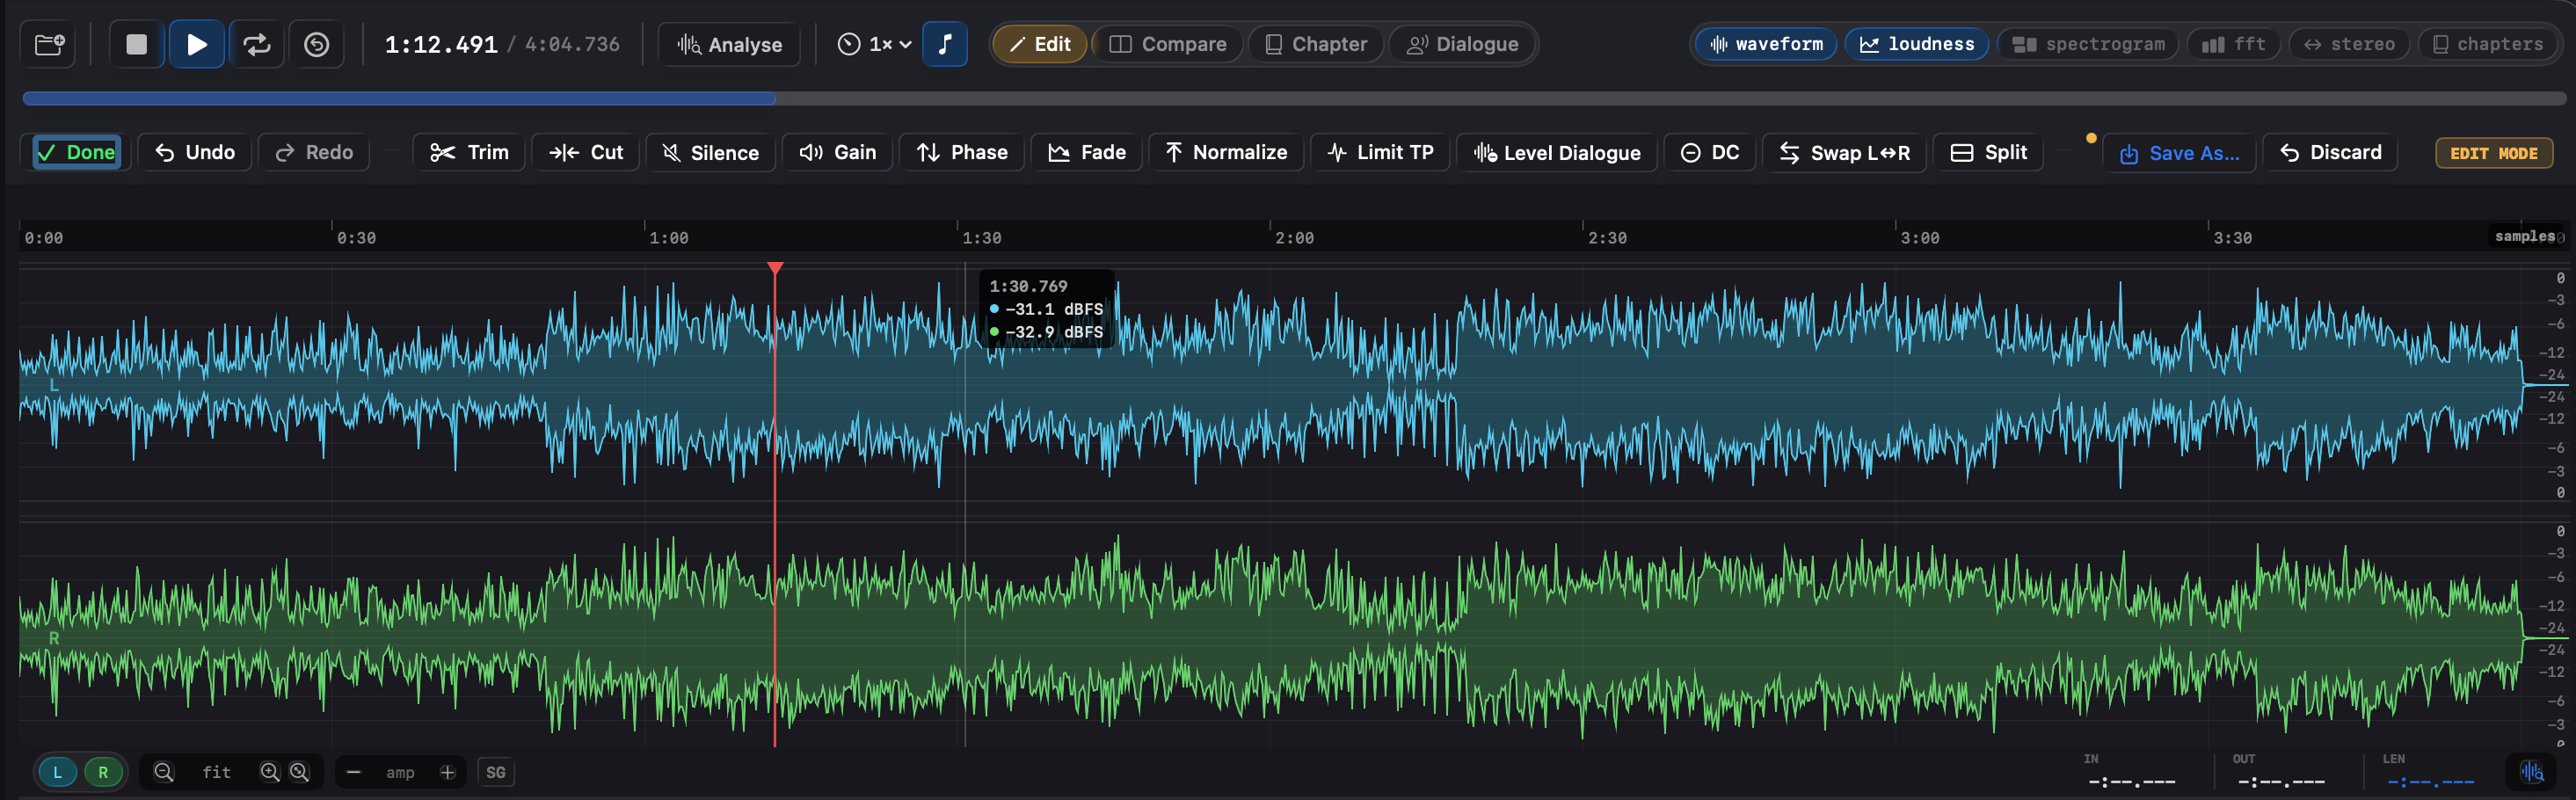
16. Edit mode #
Non-destructive editing. Always saves as a new file - never overwrites the original.
Edit, Chapter, and Dialogue share one editing session: the edited audio, the undo history, and the unsaved-changes state follow you across all three modes, so a workflow that moves between them is continuous and a single Save at the end writes everything. Switching modes never discards edits; loading a different file, or Discard Edits, is what clears the session. Multi-file Compare is separate: entering it from unsaved edits prompts to Save or Discard first.
Enter / exit
⌘1 toggles edit mode. Edit is one of the four mutually exclusive modes (Edit, Compare, Chapter, Dialogue); entering it exits any other active mode. The mode carries the amber accent colour - matching the EDIT badge that lights on the waveform and the tint of the edit toolbar.
Operations
Each operation pauses playback, captures an undo snapshot (a 16-level disk-backed stack), applies the change, and resumes.
| Operation | Notes |
|---|---|
| Trim | Crop to the current selection (keep the selection, discard the rest). |
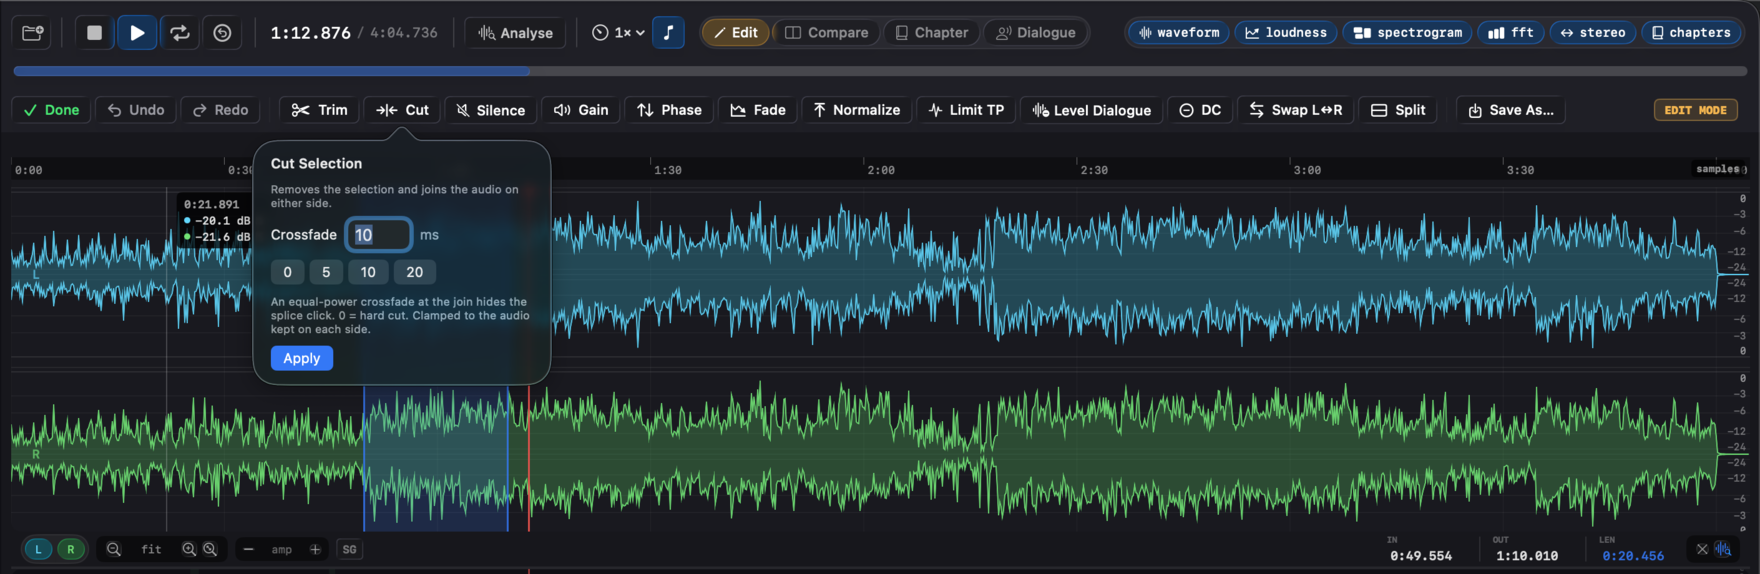
| Cut | Remove the selection and join the audio on either side - the opposite of Trim. Use it to take a too-long pause or a flubbed line out of the middle. An equal-power crossfade at the join (default 10 ms, set it or 0 for a hard cut) hides the splice click; it's clamped to the audio kept on each side. Undoable, saves as a new file, and large files stream the result. |
| Add Silence | Insert at the playhead (no selection needed - park the cursor where the gap belongs, say 500 ms for a video edit, and Apply), insert before / after or replace a selection, or insert at the file start / end. Units: seconds or samples. |
| Change Level | Linear gain in dB, applied to the selection or the whole file. |
| Invert Phase | Multiply by −1. |
| Fade | Linear / Logarithmic / Equal-power × In / Out - 6 fade curves total. |
| Normalize Peak | Target dBFS. Applies to the selection when one is set, otherwise the whole file. |
| Normalize LUFS | Target LUFS + ceiling (interpreted as dBTP). Auto-applies a 5 ms lookahead true-peak limiter when normalization increases loudness so inter-sample peaks stay under the ceiling, not just sample peaks. Two-pass offline: pass 1 builds the gain envelope from the input's oversampled peaks; pass 2 catches any residual peaks the release stage might leave fractionally over the ceiling. Scopes to the selection when one is set (measure and gain over that range only), otherwise the whole file. |
| Limit TP | True-peak limiter only, ceiling in dBTP. Loudness otherwise unchanged. Use when integrated LUFS is already where you want it but inter-sample peaks need to be capped under a platform ceiling. Same DSP as the limiter Normalize LUFS uses; just skips the loudness measurement and gain stage. Scopes to the selection when one is set, otherwise the whole file. |
| Level Dialogue | A region-aware downward expander keyed to the detected speech regions (the ones you can tune in Dialogue mode). It ducks the room tone between phrases with a fast attack and slow release, so word onsets and tails stay clean, no clipped starts, no chopped ends. Tick Lift dialogue to target and it also gains the speech to a loudness target in the same pass, capping inter-sample peaks at a true-peak ceiling. Because the silence is gated before the makeup gain goes on, the floor ends up lower, not higher: that's the move a plain dialog-gated Normalize can't make, since a uniform gain lifts the floor along with the voice. It's a gate, not a denoiser, so it helps a marginal floor (a quiet room tone just under the gate), not a hissy recording. Undoable, saves as a new file. |
| Remove DC Offset | Subtracts each channel's mean. |
| Swap Channels | Stereo L↔R swap. |
| Split to Mono | Writes N mono WAV files (one per channel) to a directory you pick. Channel labels in the filename. |

Keyboard shortcuts
Edit mode adds a set of single-key edits, active only in Edit mode so they don't shadow the transport keys, and listed in the Edit menu so the keys are always visible. The first group acts on the selection; the playhead group acts at the cursor. Cut uses a 10 ms equal-power crossfade by default; the fade keys use the equal-power curve.
| Key | Action | Acts on |
|---|---|---|
| ⌫ | Cut (remove and crossfade-join) | selection |
| ⌥⌫ | Silence selection (replace, keep length) | selection |
| ⌘T | Trim to selection (keep it, discard the rest) | selection |
| ⌘F / ⌥⌘F | Fade In / Fade Out | selection |
| ⌃↑ / ⌃↓ | Gain +1 / −1 dB | selection |
| ⌘⌫ | Cut to start (remove start → playhead) | playhead |
| ⇧⌘⌫ | Cut to end (remove playhead → end) | playhead |
| ⌥[ / ⌥] | Fade in to / out from the playhead | playhead |
Undo
⌘Z steps back through the session's edits, including edits applied from Chapter mode (Level chapters) and the Level Dialogue pass, since the three modes share one undo history. ⇧⌘Z redoes. Undo is disk-backed (each level is a temp file, not a second copy in RAM), so deep history doesn't multiply memory. In Dialogue mode, ⌘Z targets region edits (a separate 50-step history); audio-buffer undo is reached from Edit or Chapter.
Save and Discard
⇧⌘S opens a save panel. Specula writes the current audio to a new file (it never overwrites the source). Format defaults to WAV at the file's native bit depth and sample rate. Saving makes the written file the working document in place: your chapters, dialogue regions, and playhead stay put, and you stay in the mode you were in.
Discard Edits (Edit menu) reverts the buffer to the last saved version in one step, the explicit counterpart to Save. Save As, Discard, and the unsaved-changes dot are reachable from Edit, Chapter, and Dialogue alike, because those three modes share one editing session.
Edit toolbar
While in edit mode, a horizontal toolbar appears below the transport. Operations with parameters (Cut, Silence, Gain, Fade, Normalize, Limit TP, Level Dialogue) open small popovers - set the parameters, click Apply. The Limit TP popover takes a ceiling in dBTP with presets at -2 / -1 / -0.5 / -0.1. The Cut popover takes the crossfade length (default 10 ms, 0 for a hard cut). The Level Dialogue popover sets the duck amount, an optional Lift dialogue to target with a target and true-peak ceiling.
17. Chapter mode #
A dedicated mode for audiobooks and long-form podcasts. Specula segments the file at long silences, scores every chapter against the full ACX measurement set, and surfaces both the per-chapter ACX gates and each chapter's deviation from the book's own median. Mutually exclusive with the other three modes (Edit, Compare, Dialogue) so the workspace stays focused.

Entering the mode
A Chapter button sits in the transport bar next to Edit, Compare, and Dialogue. Click it to enter or exit chapter mode; ⌘3 does the same from the keyboard. Chapter mode carries the green accent colour - the chapter toolbar that slots in below the transport, the playing-chapter fill on the ribbon, and the Chapter button itself all match. Mutually exclusive with Edit, Compare, and Dialogue.
Detect
Detect scans the loaded mono mix for silences longer than the minimum duration (default 2 s) below the silence threshold (default −55 dB). Each silence becomes a boundary; the audio between two silences becomes a chapter. Chapters whose total non-silent content runs under 1 s are dropped so a stray cough doesn't fragment the result.
The detector absorbs leading and trailing silence into the first and last chapters. Chapter 1 always starts at 0 s, the last chapter always ends at file duration, and the ribbon covers the full file timeline with no gaps at the edges.
Boundaries follow zoom and scroll
Boundary markers are drawn inside every time-axis section that has one open: waveform, loudness curve, spectrogram, and stereo width. Each section uses its own time-to-x mapping, so the boundaries stay aligned across stacked views at any zoom level. The chapter ribbon mirrors the waveform's zoom and horizontal scroll, and narrow chapters keep their width when neighbours dominate the visible range.
Editing boundaries
Each chapter boundary draws as a vertical teal line with a "#N" badge labelling the chapter that starts at that boundary. Drag a boundary on the waveform to move it. Hit zone is 6 px; the cursor switches to the macOS resize cursor when it lands on a boundary. Drag clamps so neither neighbouring chapter shrinks below 1 s of content. A time + dBFS hover readout tracks the boundary's new position while the drag is in progress.
Add drops a new boundary at the playhead. The chapter ribbon and the per-chapter measurements update as you drag.
Selecting a chapter
Click a slot in the ribbon to select it. The selected slot takes a 2 pt accent border; unselected slots keep a 1 pt white border. Selection and playback are independent: the currently playing chapter is shown by an accent-tinted fill (28 %), regardless of which chapter is selected. Double-click a slot to seek the playhead to its start.
Selecting a boundary for removal
Click a boundary line in the waveform (not a slot in the ribbon) to flag it. The flagged boundary draws thicker in amber with a "✕" marker next to its number, and the chapter that starts at that boundary becomes the selected chapter in the ribbon. The next press of Remove in the chapter toolbar deletes that boundary, merging its two chapters into one. This is the precise way to pick which split to undo; clicking a slot in the ribbon still selects the same chapter without changing which boundary is highlighted.
Name and reorder
Double-click a chapter name in the ribbon to rename. Default names ("Chapter 01", "Chapter 02"…) follow the index after edits; custom names ("Foreword", "Walk through the woods") stay put.
Per-chapter measurements
Analyse Loudness in the toolbar runs an offline BS.1770 pass per chapter and populates the full measurement set. For each chapter:
- RMS (dB) - plain RMS over the chapter, in dBFS. This is the metric ACX's −23 to −18 dB loudness window actually checks (un-weighted RMS, not K-weighted LUFS), so it drives the per-chapter ACX loudness gate. Valid at any length, so it populates even for short chapters.
- Integrated LUFS (I) - gated EBU R128 integrated over the chapter's audio. Shown alongside RMS as a narrator-consistency reference: it drives the deviation-from-median flag, not the ACX loudness gate.
- True peak (TP, dBTP) - 4× oversampled per ITU-R BS.1770-4. ACX rejects above −3 dBTP.
- Sample peak (SP, dBFS) - cheaper than true peak; useful for very short chapters where inter-sample peak isn't meaningful. Populated even when the chapter is too short for an integrated reading so clipping still surfaces.
- Loudness range (LRA, LU) - consistency indicator inside one chapter. Large LRA usually means a section the narrator should re-record.
- Max momentary (Max M, LUFS) - peak of the 400 ms window. Surfaces a single shouted line.
- Max short-term (Max S, LUFS) - peak of the 3 s window. EBU R128 S1 short-form criterion; useful for podcast deliveries too.
- Speech-gated LUFS (Dlg) - integrated over the speech blocks only, using the same Silero VAD result the file analysis already computed, sliced to the chapter's block range. The dialog-only level audiobook engineers track.
- Median noise floor (NF, dB RMS) - median RMS across non-speech blocks. ACX rejects above −60 dB. Median rather than mean so a voice block the VAD occasionally misclassifies doesn't bias the reading upward.
- Speech percentage (Sp) - fraction of the chapter the VAD classified as speech.
Chapters shorter than 10 s skip the BS.1770 measurements entirely (the absolute-gate and relative-gate machinery isn't reliable below that). RMS and sample peak still populate, since plain RMS and peak are valid at any length, so the ACX loudness gate and clipping don't slip through on short chapters.
Ribbon slot layout
Each slot is four lines tall:
#NN · Chapter Name                                 m:ss
-20.4 dB RMS    -20.6 LUFS  +0.0 LU
TP -2.1 dBTP    NF -62 dB
LRA 4.2 LU Dlg -19.8 LUFS Sp 87%- Line 1. Index, name, and chapter length (h:mm:ss for chapters over an hour).
- Line 2. RMS (the ACX loudness gate, red when outside [−23, −18] dB), with the integrated LUFS and its deviation from the book median alongside (LUFS reddens when the deviation exceeds the threshold).
- Line 3. The other two ACX gates: true peak and noise floor.
- Line 4. Secondary metrics: LRA, speech-gated (Dlg), and speech percentage.
Missing metrics render as muted - so the row positions stay stable across chapters that haven't been analysed yet, are too short for an integrated reading, or fall outside the VAD's coverage.
ACX gates
Each chapter is independently checked against three ACX delivery limits. Failures render the metric in red on the ribbon slot and on the report's chapter table:
- RMS outside [−23, −18] dB. The RMS cell turns red.
- True peak > −3 dBTP. The TP cell turns red.
- Median noise floor > −60 dB RMS. The NF cell turns red.
These three gates are independent of the deviation-from-median flag, so each chapter answers two separate questions: will ACX accept this chapter on its own? (the three red/no-red signals) and is this chapter consistent with the rest of the book? (the deviation badge, controlled by the ±2 LU threshold in Settings → Targets → Chapter detection).
Outlier flag
The consistency metric (RMS or integrated LUFS) and the deviation threshold (default ±2.0, in that metric's unit) drive the red-tint flag on outlier slots and the headline banner at the top of the ribbon ("Chapter 07 is 2.3 dB above median"). RMS is the default, since it's what ACX delivery is judged on. Both live in Settings → Targets → Chapter detection (the metric is also set in the Level… popover).
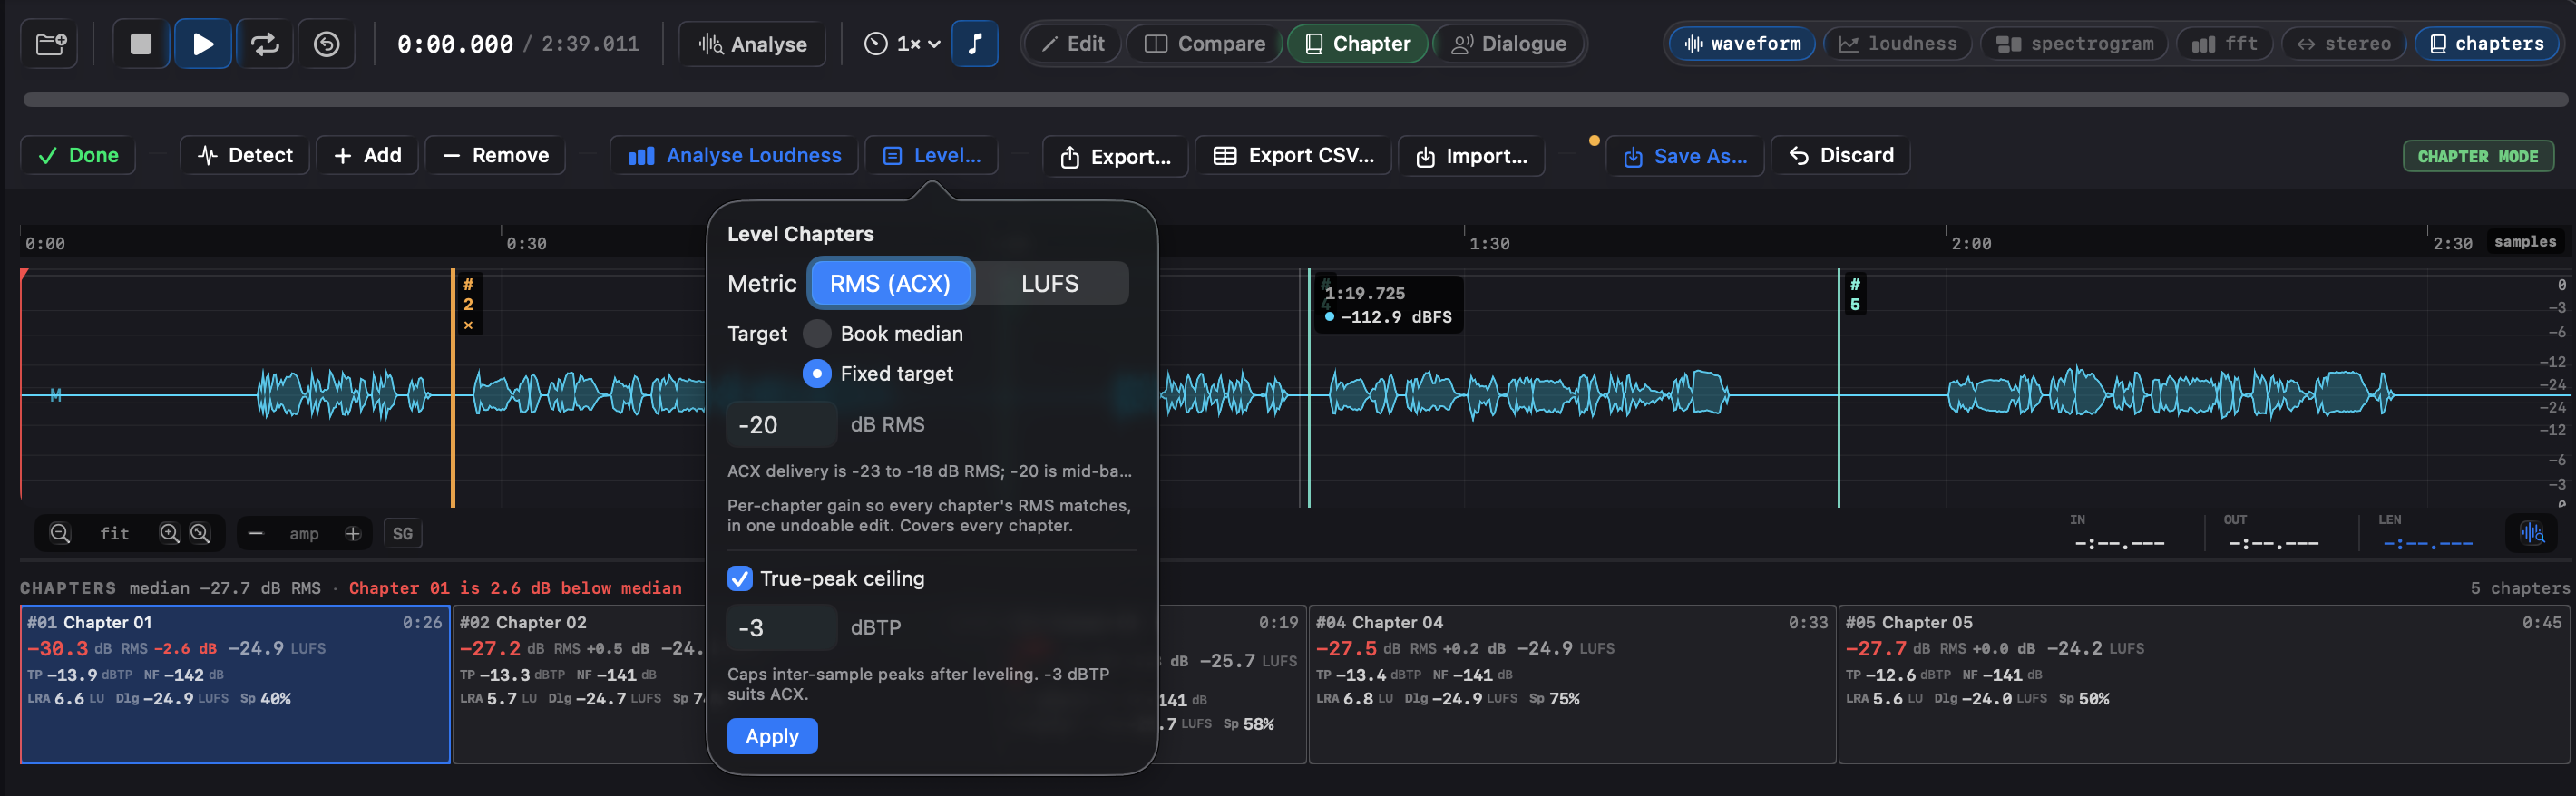
Level chapters
The fix for the outlier flag, and for the consistency deviation across a book. Level… in the toolbar opens a popover with two choices:
- Metric: RMS (the metric ACX delivery is judged on, and the default) or integrated LUFS (for music-album chapter consistency). The same choice drives the ribbon's deviation flag, so the fix matches what's flagged.
- Target: the book median (each chapter to the book's own median, for consistency) or a fixed value (e.g. −20 dB RMS, mid the ACX −23..−18 band, for consistency and compliance in one pass). The fixed value is entered in the selected metric's unit (dB RMS, or LU when the metric is integrated LUFS).
It applies a per-chapter uniform gain, then re-measures so the ribbon updates. RMS covers every chapter; LUFS skips chapters under 10 s (no integrated reading), as it does chapters already on target. Run Analyse Loudness first; the button stays disabled until there's a reading.
It's a single undoable edit (⌘Z). Chapter mode shows a dirty dot and a Save As button when the buffer has unsaved edits, and ⇧⌘S writes the leveled file without leaving Chapter mode.
A true-peak ceiling is applied in the same edit, on by default, so a boosted chapter can't run past the delivery ceiling. It defaults to −3 dBTP for RMS/ACX and −1 dBTP for LUFS (tracking the metric), and the Level popover lets you change it or switch it off. One caveat remains: a uniform per-chapter gain moves that chapter's room-tone noise floor with its level, so for a floor-aware pass, gate the room tone first with Level Dialogue, then level.
Reset to detected
Restores Specula's silence-detection result, dropping all manual boundary edits, adds, and removes. Renames are kept.
Export / Import
Export… writes the current chapters (name + start + end) to a JSON sidecar. Import… loads one back, replacing the current chapter list. The exported JSON is plain Specula JSON; the importer also accepts a slimmer format with just start and end per entry, so you can hand-craft one.
Export CSV… writes the per-chapter metrics table (RMS, integrated LUFS, deviation from median, true peak, sample peak, LRA, max momentary / short-term, dialog LUFS, noise floor, speech %) as a spreadsheet-ready CSV, for the producers who live in spreadsheets. Run Analyse Loudness first so the metric columns are populated.
Recall
When you load a file whose fingerprint (filename + duration + sample rate + channels) matches a prior chapter setup saved in ~/Library/Application Support/Specula/chapters/, a Recall button appears in the toolbar. Click to restore the saved chapters. Toggle the prompt in Settings → Targets → Chapter detection.
Chapter ribbon (⌃6)
The sixth section at the bottom of the window. Time-aligned to the waveform's zoom and scroll. Click a slot to select; double-click to seek the playhead to its start. Toggle the section's visibility with ⌃6 (independent of whether chapter mode is active).
In the report
When chapters exist on the file, the PDF / JSON report includes a Chapters section. The table carries every per-chapter metric the ribbon shows: RMS, integrated LUFS, deviation from median, true peak, sample peak, LRA, max momentary, max short-term, dialog LUFS, noise floor, and speech percentage. Cells fail-red on the same three ACX gates the ribbon uses (RMS outside [−23, −18] dB, TP > −3 dBTP, NF > −60 dB). The caption above the table documents all three gates and the configured deviation threshold so a producer reading the PDF can interpret it without opening the app.
18. Export #
| Key | Action | Output |
|---|---|---|
| ⇧⌘E | Export JSON Report | *.json - all metrics, both live and selection analysis, channel info, file metadata |
| ⌥⌘E | Export PDF Report | *.pdf - formatted report with charts |
| ⌃⌘E | Export Diff Audio | *.wav - the active slot's cached A − slot residual buffer (compare mode only). Same output as the Export Diff button next to the Listen to Diff toggle. |
In edit mode, ⇧⌘S is "Save Edited Audio As", not the JSON export - the menu item swaps based on context.
Report contents
The Settings → Report tab decides what's included:
- Loudness curves - momentary, short-term, AND integrated per-100 ms timelines (the integrated trace converges to the final integrated reading at the tail).
- Stereo width - correlation curve over time.
- Per-channel stats - peak / RMS / crest factor / DC offset / clipping flag (populated for the full file at load time; selection analysis updates them for the selected range).
- Violations - loudness threshold violations.
JSON is a stable, machine-readable schema. PDF is the same content rendered for human reading. For the audiobook and podcast producers who live in spreadsheets, Chapter mode → Export CSV… writes the per-chapter metrics table as a CSV (one row per chapter), and the CLI's specula report <file> --format csv does the same from the command line. See Chapter mode.
The full-file report (no selection) carries integrated LUFS, true peak (4× oversampled dBTP), sample peak, LRA, Max Momentary, Max Short-Term, DR, speech-gated LUFS, speech %, stereo correlation, per-channel stats, and loudness-target verdicts - every metric the info panel shows.
Each entry in loudnessTargets.targets[] in the JSON envelope carries an inline verdict object so a Shortcut, CLI pipeline, or batch QC script can branch on pass / fail without recomputing it against the target spec. Fields: status (compliant / penalty / notCompliant / unavailable), actualLUFS, plus penaltyGainDB / penaltyApplies / truePeakClean for streaming targets and nonComplianceReason / nonComplianceActual / nonComplianceLimit for hard-spec fails. The PDF and HTML reports render the same verdict as a status badge. Full field reference in Loudness targets.
19. Command-line tool (specula) #
For batch QC, shell scripts, and Shortcuts that walk a folder of files, Specula ships a CLI built on the same measurement engine the app uses. Same numbers, no window.
Install
The CLI ships inside the app bundle. Pick Specula → Install Command-Line Tool… and Specula links specula into /usr/local/bin (one admin prompt if that folder needs it). The link points at the copy inside Specula.app, so app updates keep the installed command current.
Manual alternative (scripted setups):
sudo ln -sfh "/Applications/Specula.app/Contents/Helpers/specula" /usr/local/bin/speculaVerify with specula --version.
Licensing
The CLI shares the app's license and trial. It runs through the 7-day trial (a days-left note prints on stderr) and requires the license activated in the app after that (Specula → Manage License…); an expired, unlicensed install exits with code 77 and an explanation on stderr. --help and --version always work. The first licensed run asks once for access to the license in the Keychain - click Always Allow. Do that once in a local Terminal window before using the tool over SSH, where the prompt can't appear.
specula analyze <FILE>
Headline numbers (integrated LUFS, true peak, sample peak, loudness range, speech-gated LUFS, stereo correlation) as JSON.
specula analyze mix-v2.wav
specula analyze mix-v2.wav --no-vad        # skip Silero (faster)
specula analyze mix-v2.wav --no-stereo     # skip the per-block correlation pass
specula compare <A> <B>
Two files side-by-side with B − A deltas for every metric.
specula compare master-v1.wav master-v2.wav
specula compare master-v1.wav master-v2.wav --match-loudness
specula compare master-v1.wav master-v2.wav --no-vad   # skip Silero on both files
--match-loudness subtracts the integrated-LUFS delta from B's peak / speech-gated readings so the deltas surface spectral or shape differences instead of being dominated by level mismatch. Useful when you've rebalanced a mix but want to know whether the tonality really changed.
--out-diff <PATH> additionally writes the A − gainB·B residual to that path as a Float32 WAV (paired with --match-loudness to net out pure level differences before subtracting). The compare JSON gains a residual block carrying the residual's peak / RMS / applied gain so a script can branch on the residual energy without re-loading the file. Sample rate + channel count must match between A and B - the diff refuses structural mismatches rather than silently resampling.
specula edit <FILE> --out <OUT> …
Applies edit operations and writes the result to --out (-o for short). --out is required and must not resolve to the same path as the input - Specula never writes in place, the same contract the app's Save As enforces.
specula edit mix.wav --out mix-norm.wav --normalize-lufs=-14 --lufs-ceiling=-1
specula edit mix.wav --out mix-trimmed.wav --trim 5.0:30.5
specula edit mix.wav --out mix-louder.wav --gain 3Negative values need the --option=value form (e.g. --gain=-3, --normalize-lufs=-14). The CLI otherwise reads a bare leading - as an option name and rejects the value.
Supported operations (applied in this order if multiple are passed):
--trim START:END- keep only the range, in seconds (e.g.5.0:30.5).--dc-remove- subtract per-channel mean.--invert-phase- flip polarity on every channel.--gain DB- uniform gain.--normalize-peak DBFSor--normalize-lufs LUFS [--lufs-ceiling DBTP]- mutually exclusive.--limit-tp DBTP- apply the true-peak limiter at this ceiling without changing loudness; runs last so it can catch any residual peaks left by an upstream normalize.
LUFS normalization and --limit-tp use the same 5 ms two-pass true-peak limiter (BS.1770 4× polyphase oversampled detection).
specula report <FILE>
Full Specula report through the headless pipeline, in your choice of format.
specula report mix.wav --mode music                                   # JSON to stdout
specula report mix.wav --mode podcast --out report.json               # JSON to file
specula report mix.wav --mode music --format html --out report.html   # the same dark-themed HTML the app's preview window renders
specula report mix.wav --mode music --format pdf  --out report.pdf    # rasterised PDF
specula report book.wav --mode podcast --format csv --out chapters.csv # per-chapter metrics table as CSV
specula report mix.wav --mode broadcast --no-curve                    # drop the loudness curve for smaller batch output
--format selects the output shape: json (default), html, pdf, or csv. PDF requires --out (binary data on stdout isn't useful), and the receipt printed to stdout on success carries the written byte count + mode so a pipeline can confirm the file landed. csv emits the per-chapter metrics table when the file has chapters, otherwise a flat metric,value table of the file-level numbers. --mode selects which loudness-target catalog drives the evaluation: music, podcast, vod, broadcast. --no-curve omits the per-100 ms loudness curve when the receipt only needs the summary numbers. --no-vad skips Silero speech detection (the speech-gated fields read -inf) and --no-stereo skips the correlation pass, both for faster unattended batches.
Output format
Every subcommand emits pretty-printed JSON with sorted keys, so diffs across runs stay deterministic. Non-finite floats (silence → -∞) render as "-inf" strings rather than blowing up the encoder.
Shortcuts (App Intents)
Specula surfaces eight App Intents that the system Shortcuts app and Siri can call directly. Same engine as the CLI; same numbers. No file-handling shell glue required, output is chainable. The four core actions ship in two variants each (file-input and text-path) so they fit whichever Shortcuts workflow shape you have.
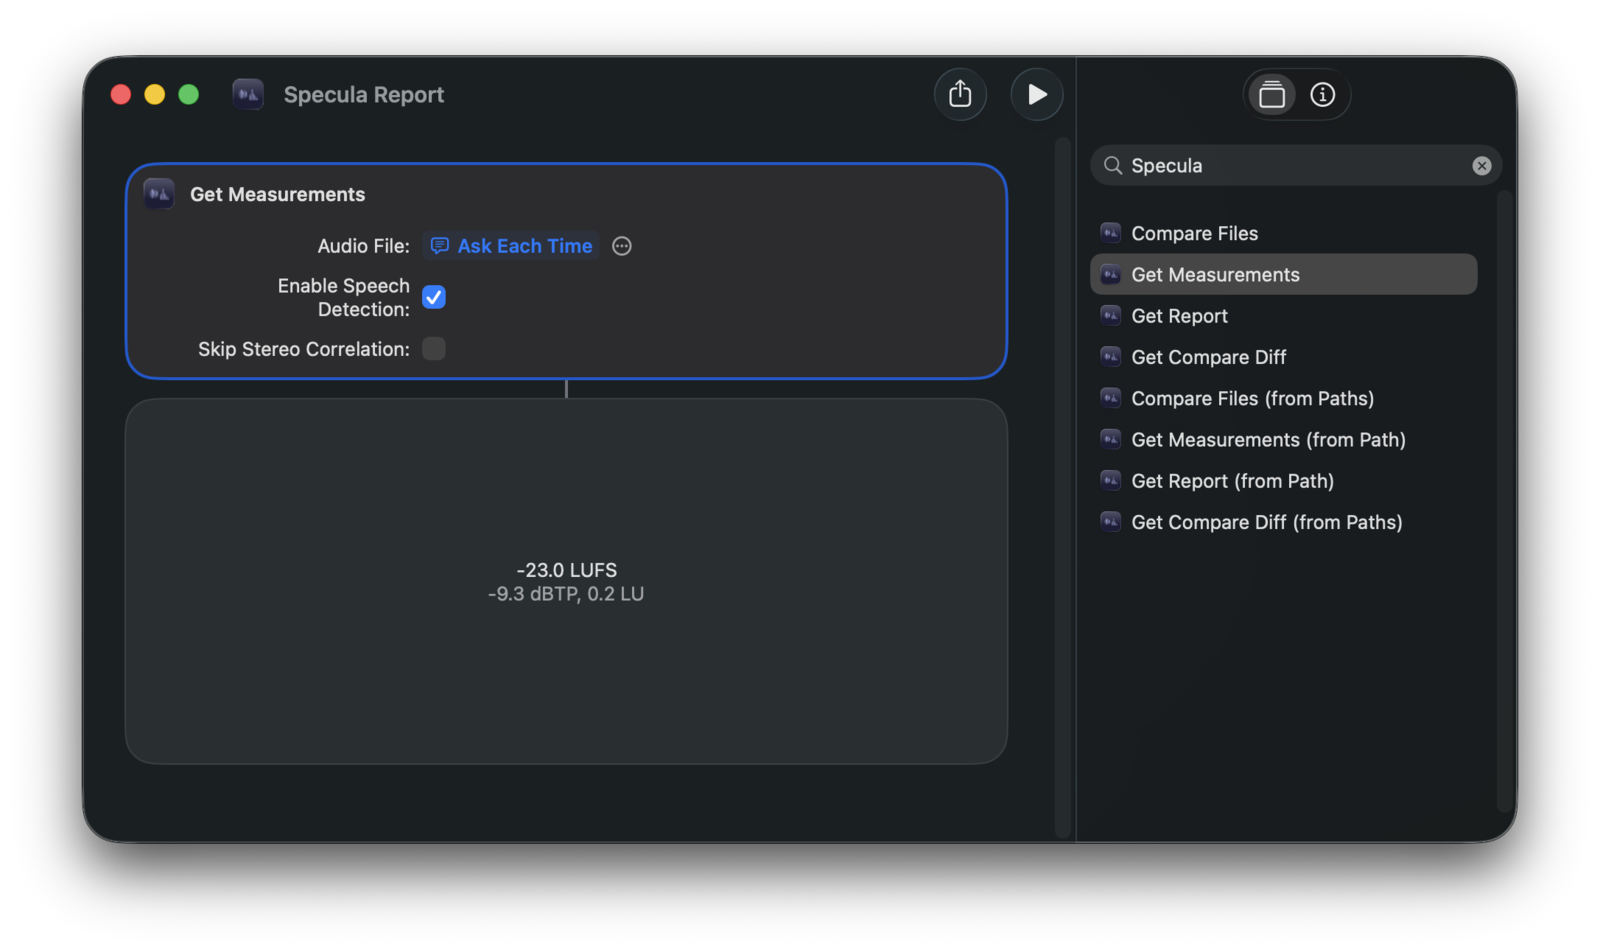
| Action | File-input | Path-input | Returns |
|---|---|---|---|
| Measurements | Get Measurements | Get Measurements (from Path) | Specula Measurements (I, M, S, LRA, TP, SP, DR, Speech-Gated, Speech %) |
| Numeric compare | Compare Files | Compare Files (from Paths) | Specula Comparison (both sides + B − A deltas) |
| Audio compare | Get Compare Diff | Get Compare Diff (from Paths) | residual WAV file (A − gainB·B) |
| Report | Get Report | Get Report (from Path) | report file (JSON / HTML / PDF) |
Each action's behaviour:
- Get Measurements - every numeric field is exposed as a Shortcuts variable a downstream step can compare against ("if Integrated LUFS > -12 then …"). Carries a Skip Stereo Correlation toggle (off by default) to shave the per-block correlation pass on very long files.
- Compare Files - the Match Loudness toggle subtracts the integrated-LUFS delta from B's peak / speech-gated numbers so the deltas surface spectral / shape differences instead of pure level drift.
- Get Compare Diff - returns the residual audio you can listen to or further analyse. With Match Loudness on, B is scaled to A's integrated LUFS before subtracting so the residual reflects spectral / shape differences. Sample rate + channel count must match between A and B; the intent throws a typed error otherwise (no resampling).
- Get Report - Format selects JSON / HTML / PDF; PDF is the dark-themed report identical to the app's preview window. A Loudness Mode picker (Music / Podcast / VOD / Broadcast) chooses which target catalog drives the verdict, the same as the CLI's
--mode. Pipe the result straight into AirDrop, Save File, Mail, or any Shortcut file step.
Binding the file input
Each intent's file parameter shows a Choose button followed by a small … menu. The Choose button opens a static file picker (one-off use). The … menu is where the magic-variable picker lives - pick Shortcut Input to bind the file that came in from a Finder Quick Action / Share Sheet / prior action's output. Don't pick "Clear" - that wipes the binding.
Path-input variants
For text-path workflows (clipboard text, Ask for Text, paths pasted from a shell), each intent has a sibling (from Path) variant that takes the audio file as a text string instead of a File. The text variants accept:
- Bare paths:
/Users/me/foo.wav - Paths with spaces:
/Users/me/My Mix.wav(no quoting needed) - Tilde paths:
~/Music/foo.wav - Single-quoted shell paths:
'/Users/me/My Mix.wav'(terminalrealpathoutput) - Double-quoted paths:
"/Users/me/My Mix.wav" - Curly-quoted paths from Notes / Mail:
'/Users/me/My Mix.wav' - file:// URLs:
file:///Users/me/My%20Mix.wav(percent-encoded)
Quotes are stripped automatically; tilde gets expanded against your home directory. So a typical clipboard-driven shortcut is just Get Clipboard → Get Report (from Path) with the clipboard variable bound to Audio File Path.
Spotlight phrases
- "Measure with Specula" / "Measure path in Specula"
- "Compare files in Specula" / "Compare paths in Specula"
- "Get diff with Specula" / "Get diff from paths with Specula"
- "Build a report with Specula" / "Build a report from path with Specula"
Each file-input action also answers to a second phrasing: "Get measurements from Specula", "Compare audio in Specula", "Get Specula report".
Type one into Spotlight (⌘Space). Intents with required file parameters will prompt for the file via a picker; for variable-driven workflows the Shortcuts app is the better surface.
The six measurement, compare, and report intents default to speech detection off. Flip the "Enable Speech Detection" toggle in the Shortcut step when you need speech-gated metrics; the first speech-gated run may take a moment as the model loads. The two Get Compare Diff intents return a pure residual, so they carry no speech toggle.
Finder Services (right-click → Services)
Three services install automatically and appear under Services when you right-click one or more audio files in Finder. They work out of the box, with nothing to build in Shortcuts or configure in Automator.
- Analyze in Specula opens the selected file with live measurement.
- Compare in Specula opens 1-6 selected files: the first becomes slot A (the reference), the rest land in slots B through F.
- Get Report from Specula runs headlessly: it analyses the file, builds the PDF, and saves it as
Specula Report - <filename>.pdfnext to the source (auto-numbered if that name exists), falling back to~/Downloadsif the source folder isn't writable, then reveals it in Finder. If Specula wasn't running it stays hidden the whole time, so no empty window pops up.
If the entries don't appear right after first install, log out and back in (or reboot) so Launch Services indexes them.
20. Settings #
Open with ⌘,. Nine tabs: Layout · Spectrogram · FFT / Analysis · Speech · Targets · Report · Updates · License · Acknowledgements.

Layout
Defaults for which sections show on launch:
- Waveform · Loudness Curve · Spectrogram · FFT / Phase · Stereo Width.
Each section can still be toggled live with ⌃1-⌃5.
Liquid Glass chrome (macOS 26+ only). On macOS 26 the transport bar, file dock, info panel, seek bar, and section-toggle strip use the system Liquid Glass material so they feel native alongside Finder, Safari, and other macOS 26 apps. Default on. Turn off in Settings → Layout → Appearance for solid dark chrome, useful when recording screenshots or screencasts where the depth-aware refraction would change with whatever's underneath the window, or simply if you prefer the flat look. The toggle is hidden on macOS 14-25 (Liquid Glass isn't available there; chrome stays solid regardless).
With the toggle on, each chrome strip renders as a rounded floating pill (radius 6, with a small dark gutter between strips and the window edges), the macOS 26 native pattern Music, Photos, and Calendar use. The Liquid Glass material's edge highlights become the rim of each pill rather than horizontal lines crossing the window. The seek bar's accent fill also picks up the glass material when the toggle is on (otherwise solid). With the toggle off, chrome is edge-to-edge square strips; the rounding belongs to the Liquid Glass look.
The seek bar's track and fill are 8 px tall regardless of the toggle, a substantial slider lane that reads well whether it's filled with glass or solid colour.
Spectrogram
- Colormap - Inferno / Turbo / Plasma / Viridis.
- Frequency Scale - Log / Mel.
- dB Range - Floor (−120 to −24) and Ceiling (−18 to 0).
- Time resolution (FFT overlap) - 75% (default), 87.5%, 93.75%, 96.875%, 98.4375%. Higher overlap = denser columns per second. The two highest settings can lengthen offline Analyse at large FFT sizes; the Settings footer flags them as the heavier options.
- Performance → Auto-compute spectrogram on load - off by default. When on, the whole-file offline spectrogram is built during the load-time analysis pass instead of waiting for ⌘Return on a selection. Sub-second for typical music tracks; long-form audio takes proportionally longer.
All six values (colormap, frequency scale, Floor, Ceiling, FFT overlap, auto-compute on load) persist across launches.
FFT / Analysis
- Window Function - Hann / Hamming / Blackman / Blackman-Harris / Flat Top, with a short description shown for the selected window.
Speech
- Threshold (0.1 - 0.9, default 0.5) - Silero confidence below which a frame counts as non-speech.
- Minimum region duration (0.05 - 2.0 s, default 0.10) - shorter detections are dropped.
- Merge gap (0.05 - 2.0 s, default 0.10) - silence shorter than this fuses two adjacent regions.
Edits re-run detection in about half a second and the new history feeds back into the live loudness path. If you have manual edits in Dialogue mode when you move a slider, they're pushed onto the Dialogue mode undo stack first so you can ⌘Z back to them. See Speech-gated loudness + Dialogue mode for the full workflow.
Report
- Toggles for what's included in JSON / PDF exports - Loudness curves / Stereo width / Per-channel stats / Violations.
21. Complete keyboard reference #
File
| ⌘O | Open audio file |
| ⌘, | Open Preferences |
Playback
| Space | Play / pause |
| ⌘. | Stop and return to start |
| ← / → | Skip ±5 seconds |
| ⇧← / ⇧→ | Skip ±1 second |
| ⌘← | Jump to start |
| L | Toggle loop |
Playback rate
| [ | Step rate down |
| ] | Step rate up |
| \ | Reset rate to 1× |
Waveform navigation (mouse / trackpad)
| Gesture | Action |
|---|---|
| Click / plain drag | Move the playhead (drag scrubs) |
| ⌘-drag | Create a selection region |
| Drag a selection's edge / body | Resize / move it |
| Scroll (wheel or two-finger) | Horizontal zoom (cursor-anchored) |
| ⇧-scroll | Pan horizontally |
| ⌥-scroll | Amplitude (vertical) zoom |
Selection & analysis
| Esc | Clear selection (waveform + FFT) |
| ⌘A | Select all |
| ⌘Return | Analyse selection (offline) |
Modes (mutually exclusive)
| ⌘1 | Enter / exit Edit mode (accent: amber) |
| ⌘2 | Enter / exit Compare mode (accent: sky-blue) |
| ⌘3 | Enter / exit Chapter mode (accent: green) |
| ⌘4 | Enter / exit Dialogue mode (accent: rose) |
Compare mode
| 1 - 6 | Switch to compare slot A - F (bare digits, Compare mode only) |
| D | Toggle Listen to Diff on the active slot (bare D, Compare mode only) |
Edit mode
These operate only in Edit mode (so they don't shadow the transport keys) and are listed in the Edit menu. The first group needs a selection; the playhead group acts at the cursor. Defaults: Cut uses a 10 ms equal-power crossfade; the fade keys use the equal-power curve.
| ⌘Z / ⇧⌘Z | Undo / redo last edit |
| ⇧⌘S | Save edited audio (new file) |
| ⌫ | Cut (remove and crossfade-join) - selection |
| ⌥⌫ | Silence selection (replace, keep length) - selection |
| ⌘T | Trim to selection (keep it, discard the rest) - selection |
| ⌘F / ⌥⌘F | Fade In / Fade Out - selection |
| ⌃↑ / ⌃↓ | Gain +1 / −1 dB - selection |
| ⌘⌫ | Cut to start (remove start → playhead) - playhead |
| ⇧⌘⌫ | Cut to end (remove playhead → end) - playhead |
| ⌥[ / ⌥] | Fade in to / out from the playhead - playhead |
Chapter mode
| ⌃6 | Toggle chapter ribbon section visibility |
Dialogue mode
| I | Mark In (anchor at playhead, or set start of selected region) |
| O | Mark Out (close pending region, or set end of selected region) |
| S | Split selected region at playhead |
| Delete | Delete selected region |
| ⌘Z / ⇧⌘Z | Undo / redo region edit (50-step history) |
Export
| ⇧⌘E | Export JSON report |
| ⌥⌘E | Export PDF report |
| ⌃⌘E | Export diff audio (WAV) |
View - toggle sections
| ⌃1 | Toggle Waveform |
| ⌃2 | Toggle Loudness Curve |
| ⌃3 | Toggle Spectrogram |
| ⌃4 | Toggle FFT |
| ⌃5 | Toggle Stereo Width |
| ⌃6 | Toggle Chapter Ribbon |
View - focus one section (hide others / restore)
| ⌃⌥1 | Focus Waveform |
| ⌃⌥2 | Focus Loudness Curve |
| ⌃⌥3 | Focus Spectrogram |
| ⌃⌥4 | Focus FFT |
| ⌃⌥5 | Focus Stereo Width |
22. Standards #
| Standard | Where it appears |
|---|---|
| ITU-R BS.1770-4 | K-weighting filter, 100 ms gating blocks, dual gating, 4× true-peak oversampling |
| EBU R128 | Momentary / Short-term / Integrated LUFS, LRA, True Peak, recommended programme loudness |
| Silero VAD (MIT) | Speech detection model |
| FluidAudio (Apache 2.0) | Swift wrapper for Silero on Apple platforms |
Specula's loudness implementation is validated against the EBU R128 loudness test set (EBU Tech 3341 / 3342), to the EBU Tech 3341 ±0.1 LU tolerance. The underlying measurement algorithm is ITU-R BS.1770-4, which EBU R128 builds on.
loudness compliant ↑ Back to top